How to Create Quiz with ConvertQuiz
💡 NOTE: If this is your first time here, simply follow these instructions step-by-step.
TABLE OF CONTENTS:
Getting Started: Choose Your Master/Starter Setup
Quiz builder settings required for ConvertQuiz
Pre-designed custom question themes & variations
STEP 1: Prepare your brand colors
STEP 2: Open the quiz’s Custom css
STEP 3: Paste your brand colors into the variables
STEP 4: Optional - Secondary color variables, Typography & sizing
How to Create Your Custom Quiz Questions
1. What elements make up a ConvertQuiz question
2. How to create your questions
3. How to set the Custom HTML question
3.1 How custom question section settings work
3.2 How custom answers section settings work
4. How to set default Multiple Choice quiz question element
4.1 Set the number of default options
4.2 Set question headline in the default Multiple choice element
4.3 How ConvertQuiz segmentation and redirection work
4.4 How to assign categories and scores to each default option
How to Configure ConvertQuiz Functions
1. Important Footer HTML editing rules (Read first)
2. How to configure redirection behaviour
3. How to configure redirection overlay
4. How to configure quiz progress barr
5. How to configure Multiple choice question helper & button text
Getting Started: Choose Your Master/Starter Setup
Option 1: Quiz only
Use this if you want just the ConvertQuiz functionality and will plug it into funnels/pages you already have.
Go to Sites → Quizzes and clone the Master quiz that best fits your brand's color scheme:
ConvertQuiz (Dark) – MASTER (Ref/Clone)
ConvertQuiz (Light) – MASTER (Ref/Clone)
Rename your clone and open it to start customizing your quiz.
Quick reminder: keep Masters untouched—clone for new projects.
Option 2: Quiz + funnel (recommended fast start)
Use this if you want the full, pre-wired Starter funnel (quiz embedded, opt-ins connected, Welcome workflow enabled).
Go to Sites → Quizzes and open the Starter quiz that fits your brand's color scheme:
ConvertQuiz (Dark) – STARTER (Embedded in (Dark) – STARTER Funnel)
ConvertQuiz (Light) – STARTER (Embedded in (Light) – STARTER Funnel)
Open your choice to start customizing your quiz.
Quiz builder settings required for ConvertQuiz
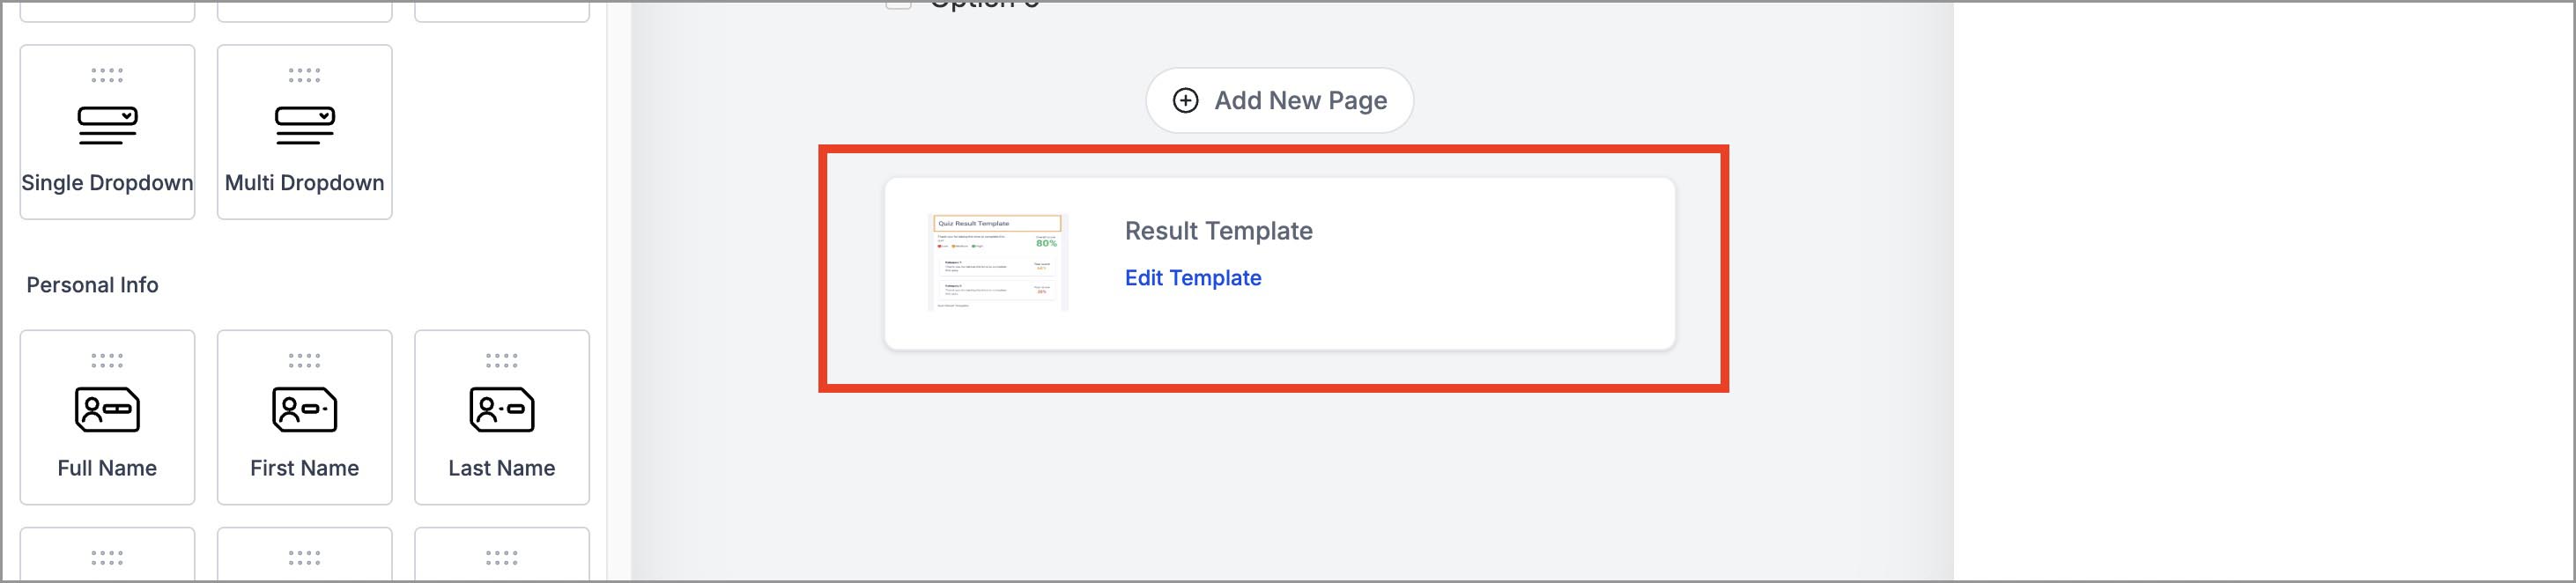
1. On submit behaviour & Result template
Using our templates, these are already set for you.
In the top panel → Settings, make sure On Submit behavior is set to Result Page.
(click to enlarge)

Return to the quiz editor, scroll to the bottom, and click Edit Template under Result Template.
(click to enlarge)
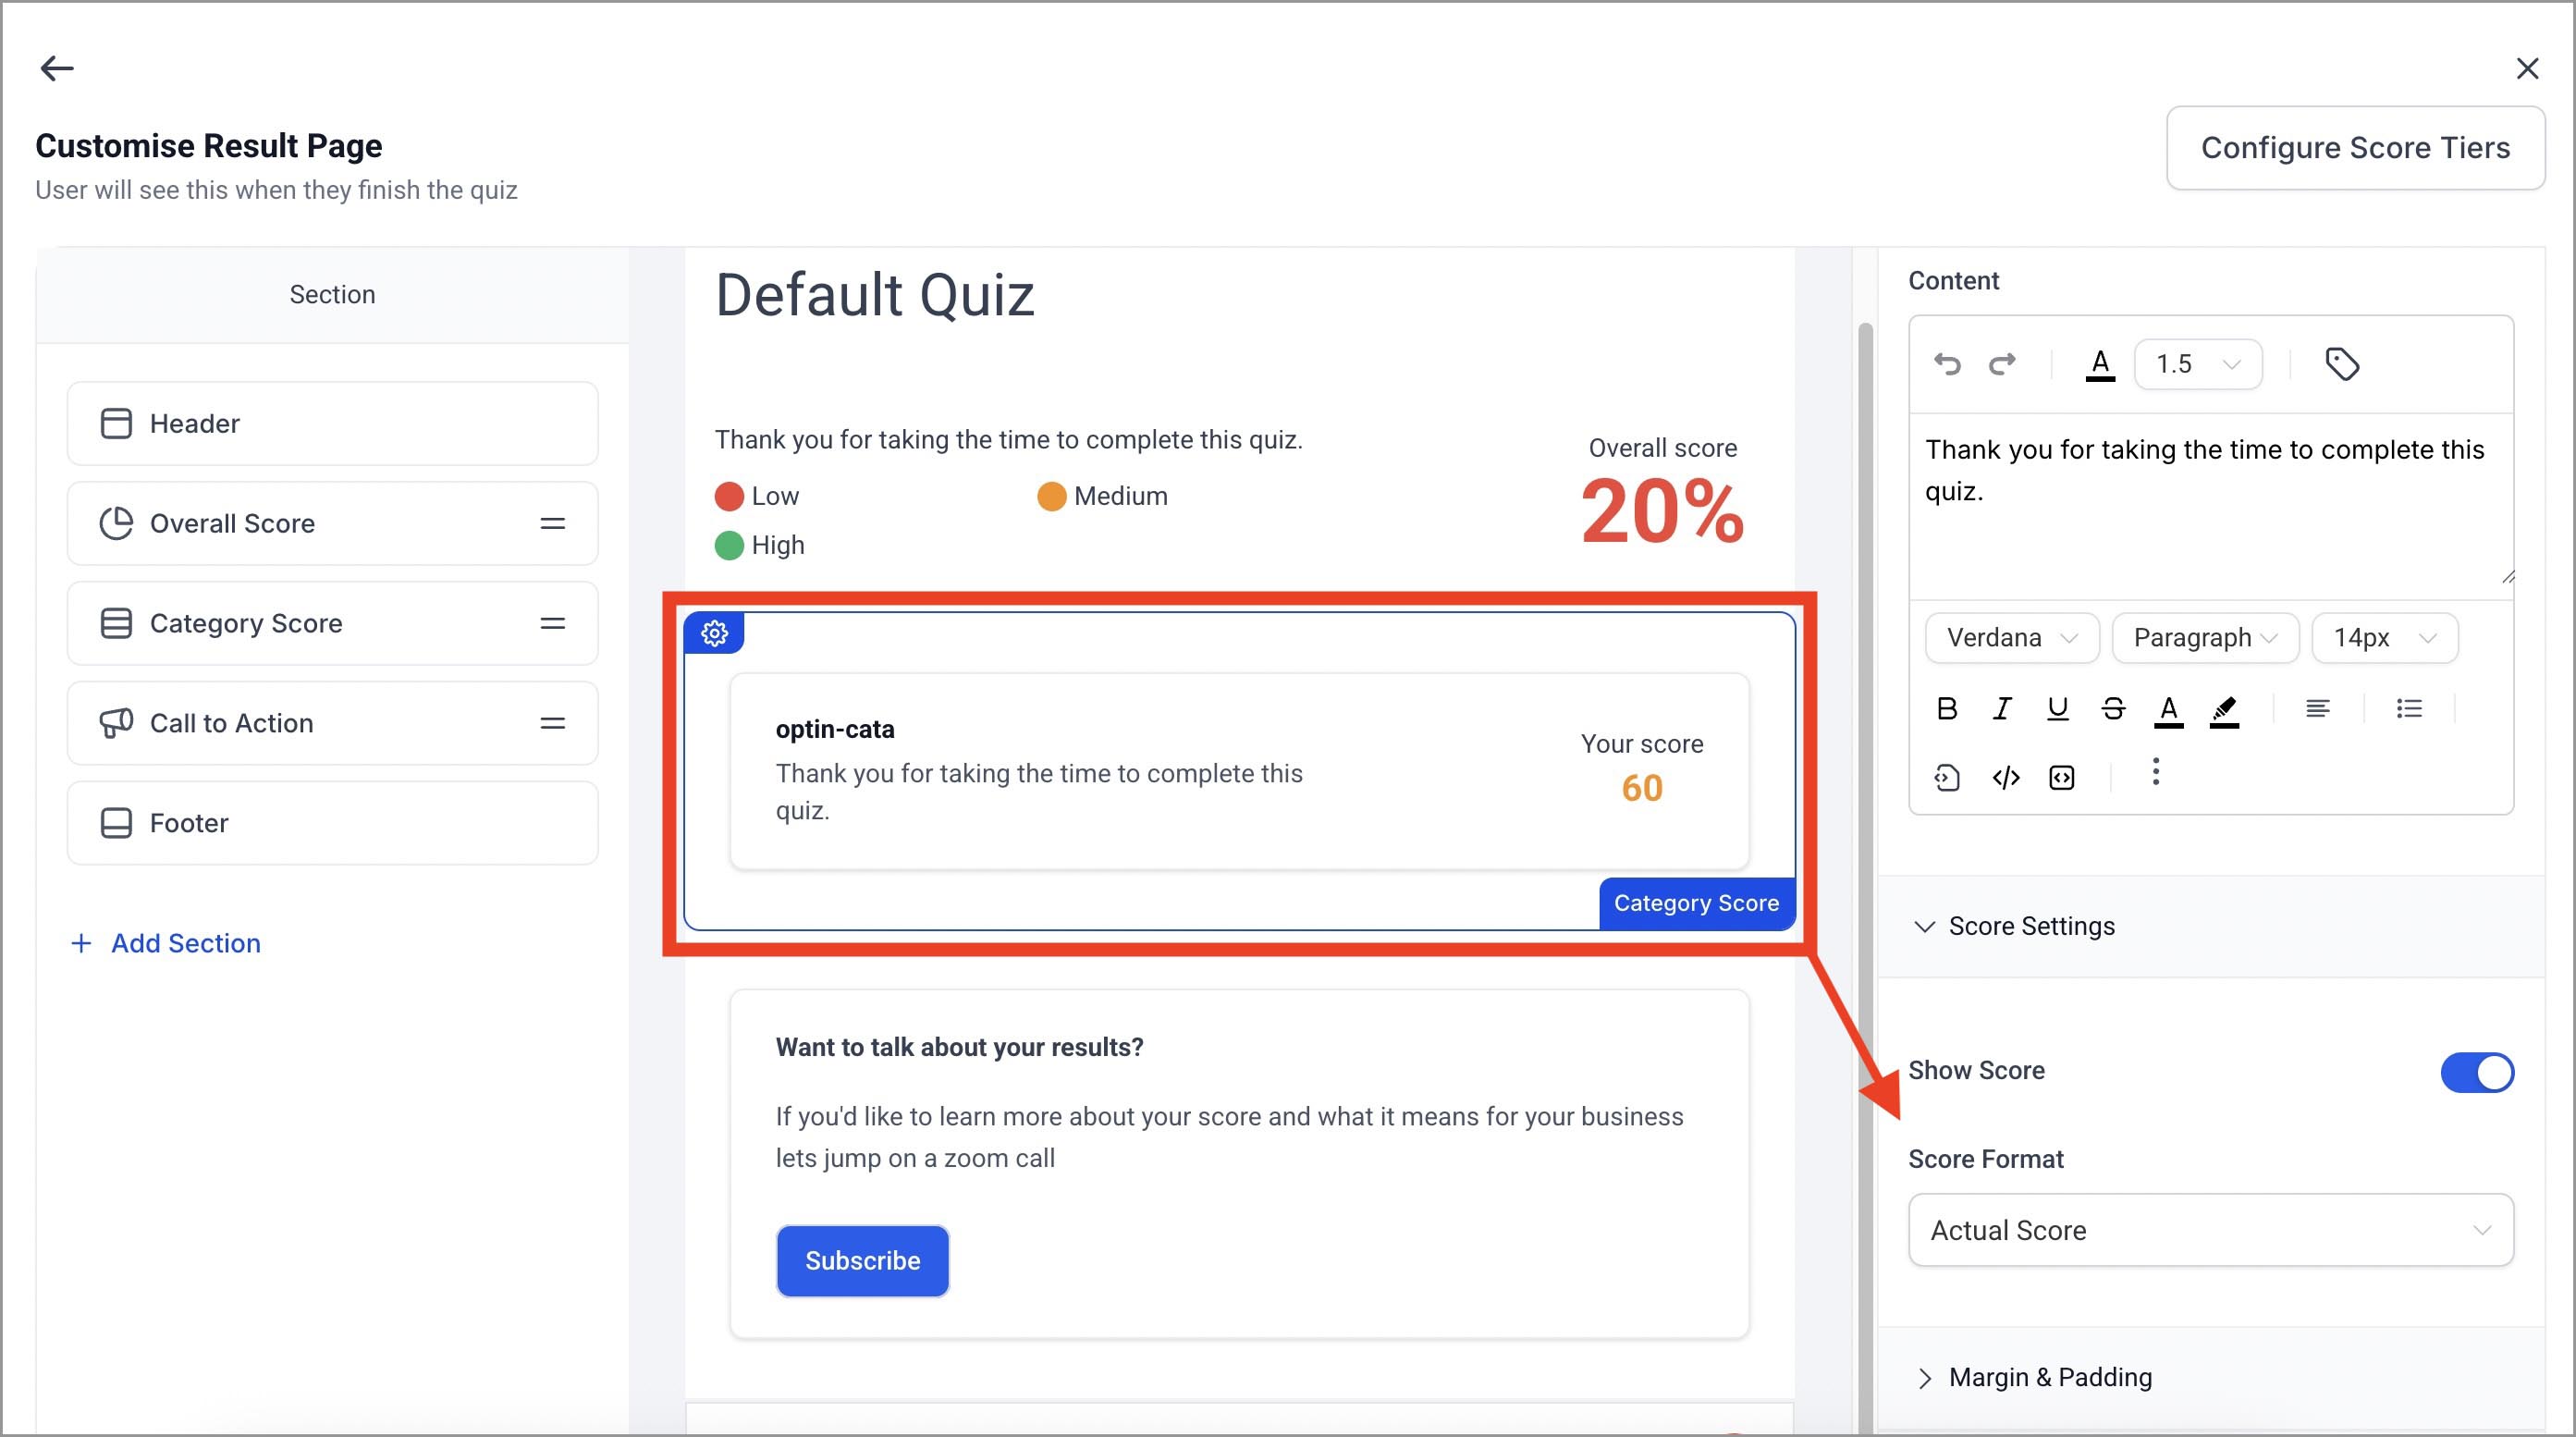
In Category Score settings, set:
Show Score = On
Score Format = Actual Score
(click to enlarge)

💡 NOTE: Category redirection depends on the actual score per category. If points aren’t counted, ConvertQuiz can’t determine which category wins.
2. Quiz Styles & Options
Without selecting any quiz element, click Styles & Options (right side of the top panel).
(click to enlarge)

In Layout, the only option to consider is Width. We suggest 450px and changing this only if you have a strong reason.
(click to enlarge)
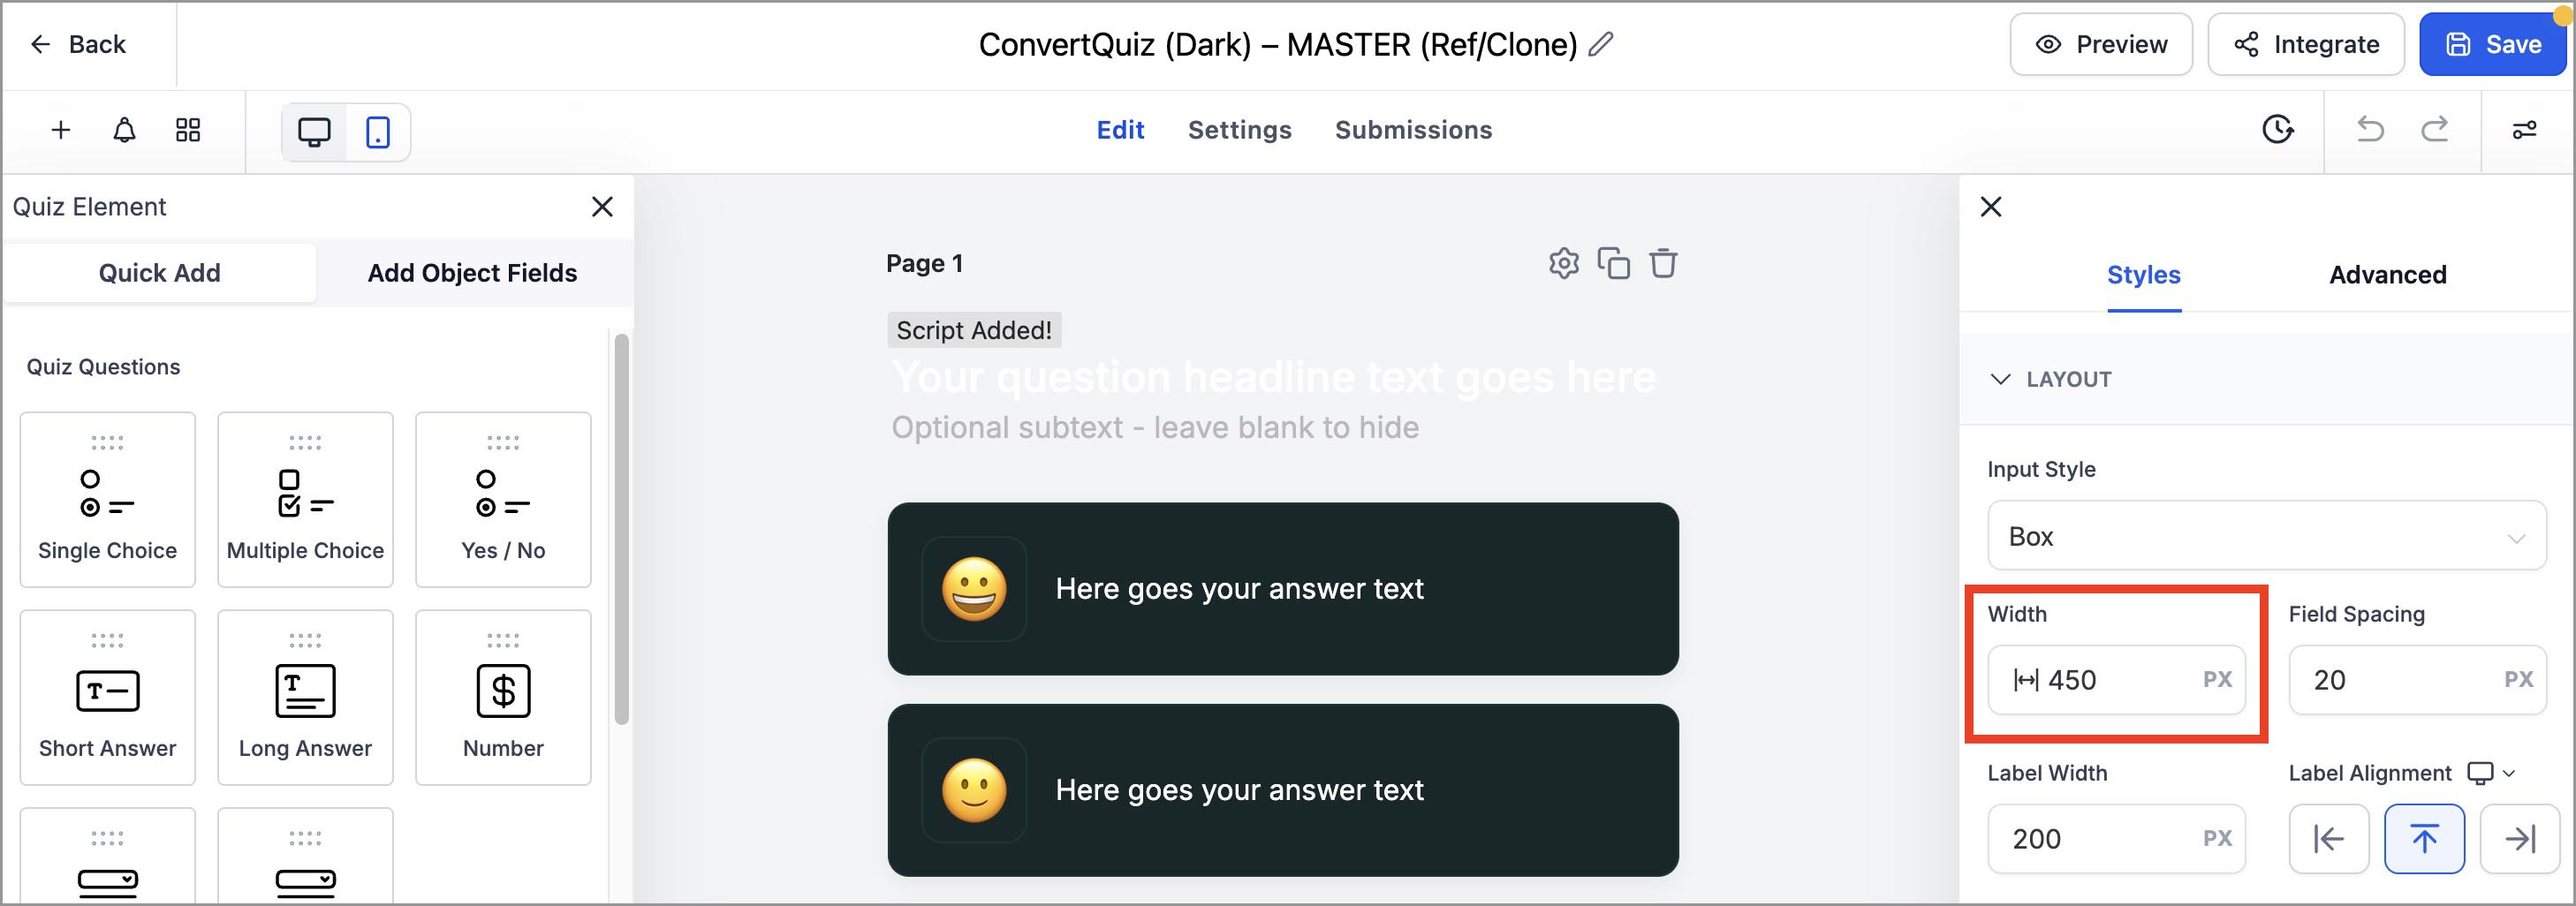
‼️ IMPORTANT: Don’t change the quiz's built-in styles (Layout, Footer, Colors & Background).
The quiz background is intentionally transparent so it inherits the page background from the host page where you embed it (that’s where you set your background color).
You also don’t need to touch any other default quiz settings or panels (inputs, labels, placeholders, etc.). All visual customization you need for ConvertQuiz happens in the Custom CSS (for quiz look) and on the quiz host page (for background).
💡 NOTE: If you’re using a STARTER template funnel, your quiz is already embedded—just set the page background color there.
How to Set Your Brand Colors
Pre-designed custom question themes & variations
Our quiz templates already include ConvertQuiz custom question themes in multiple variations so you can pick a style and move fast. There are 3 main themes, each with two variations:
Emoji / Text Theme
Text with Emoji
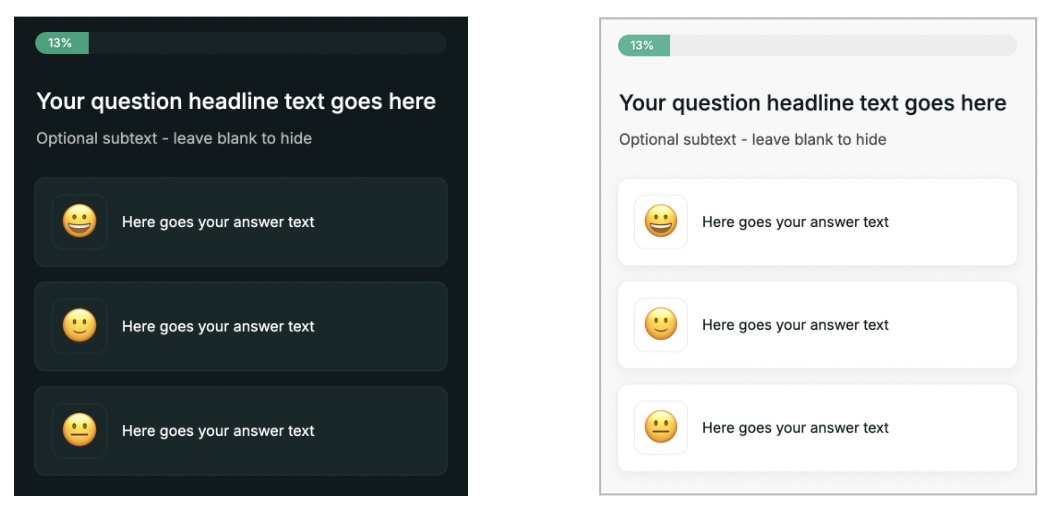
Text-only
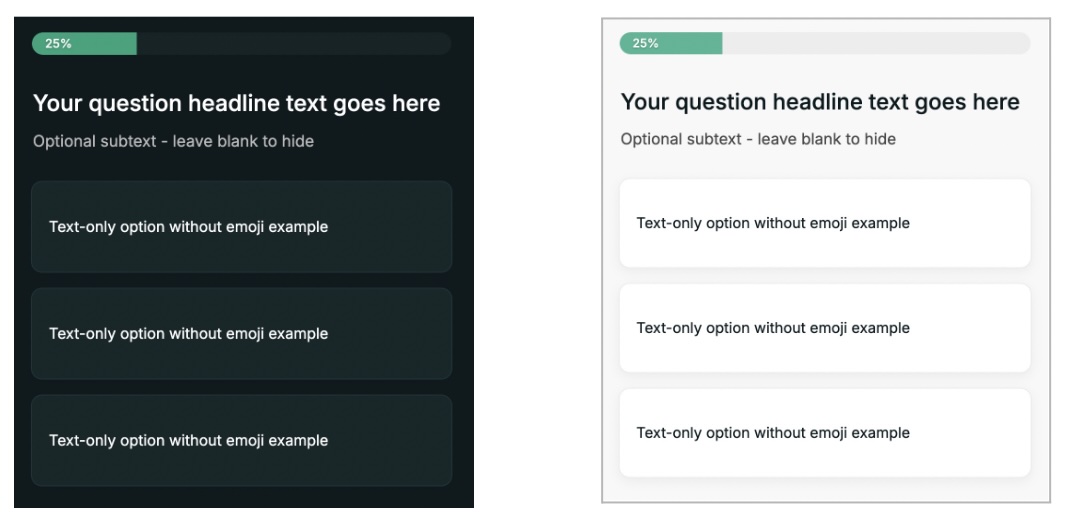
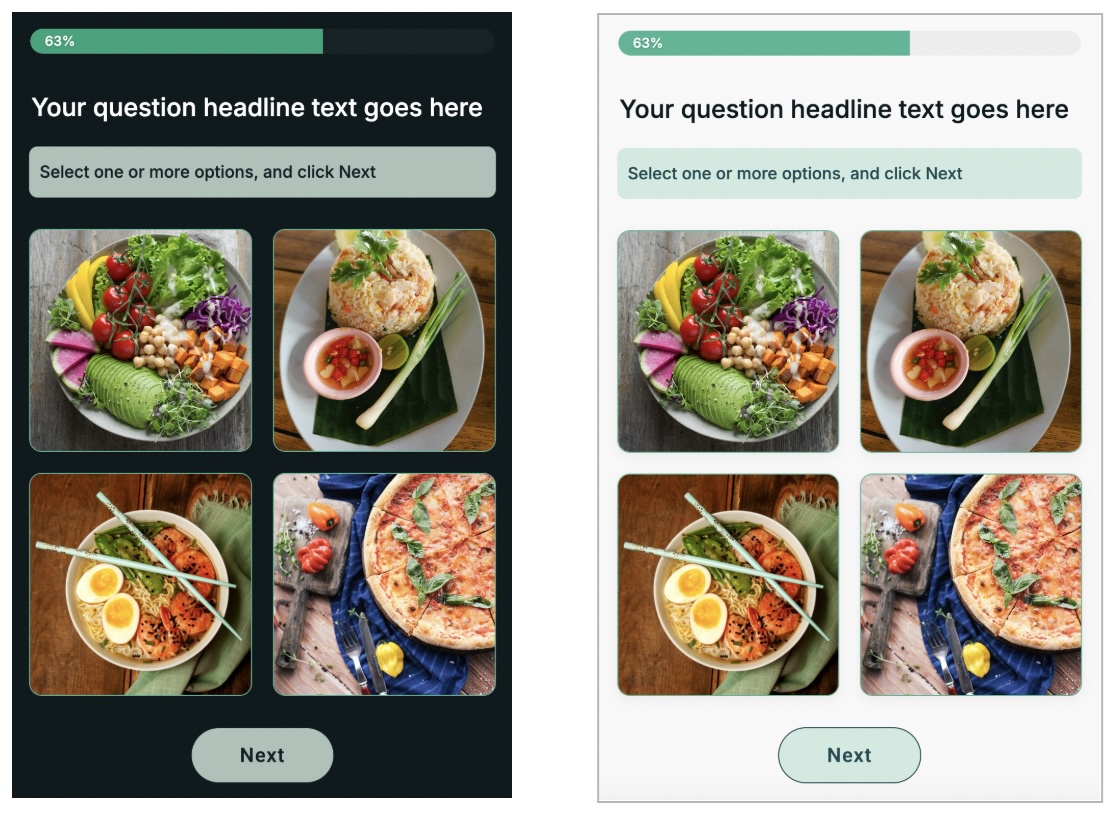
Image Card Theme
Text with Image
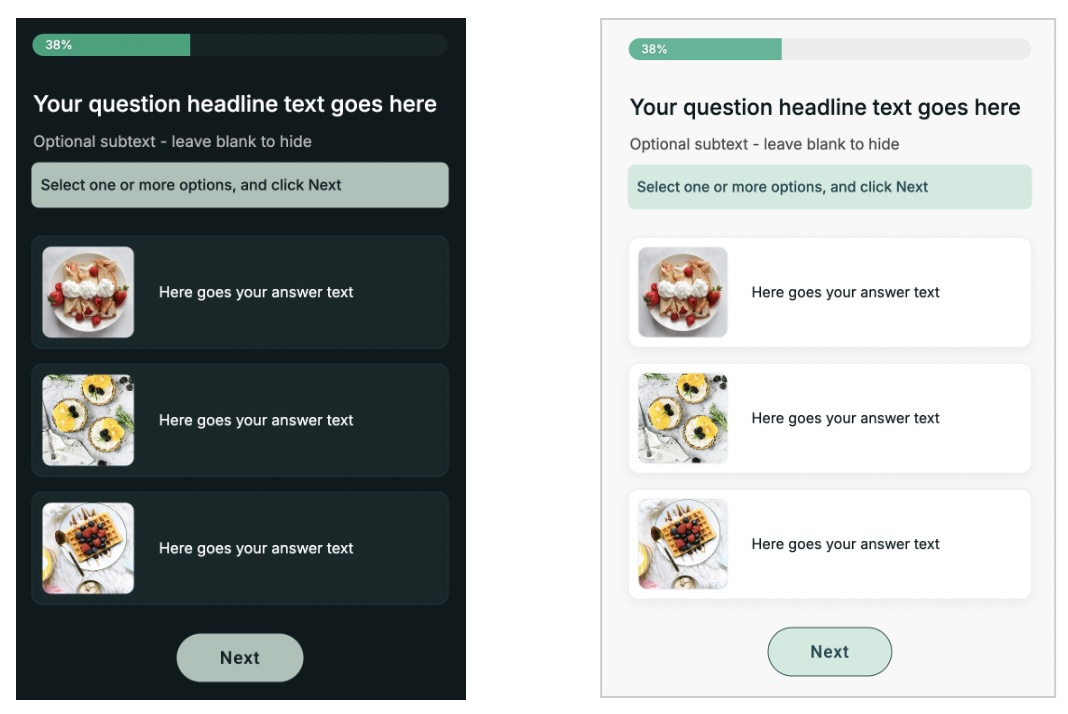
Image Grid Theme
Image with Label
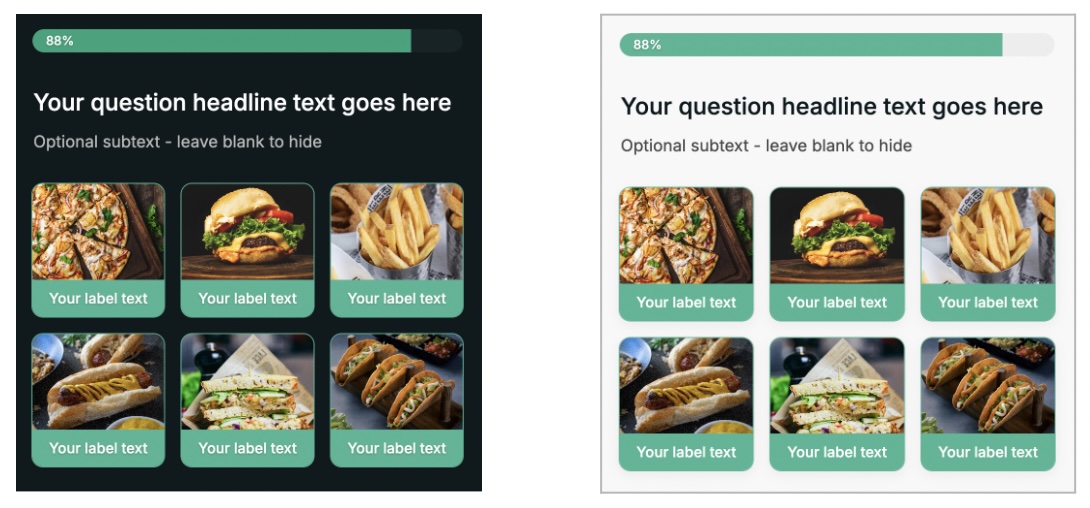
Image with Label
We’ll explain how to edit questions in the next part. For now, let’s quickly match the colors to your brand.
If you like the default quiz colors, you can skip next step and go straight to Create Your Quiz Questions chapter.
If you want exact brand colors, follow the steps below.
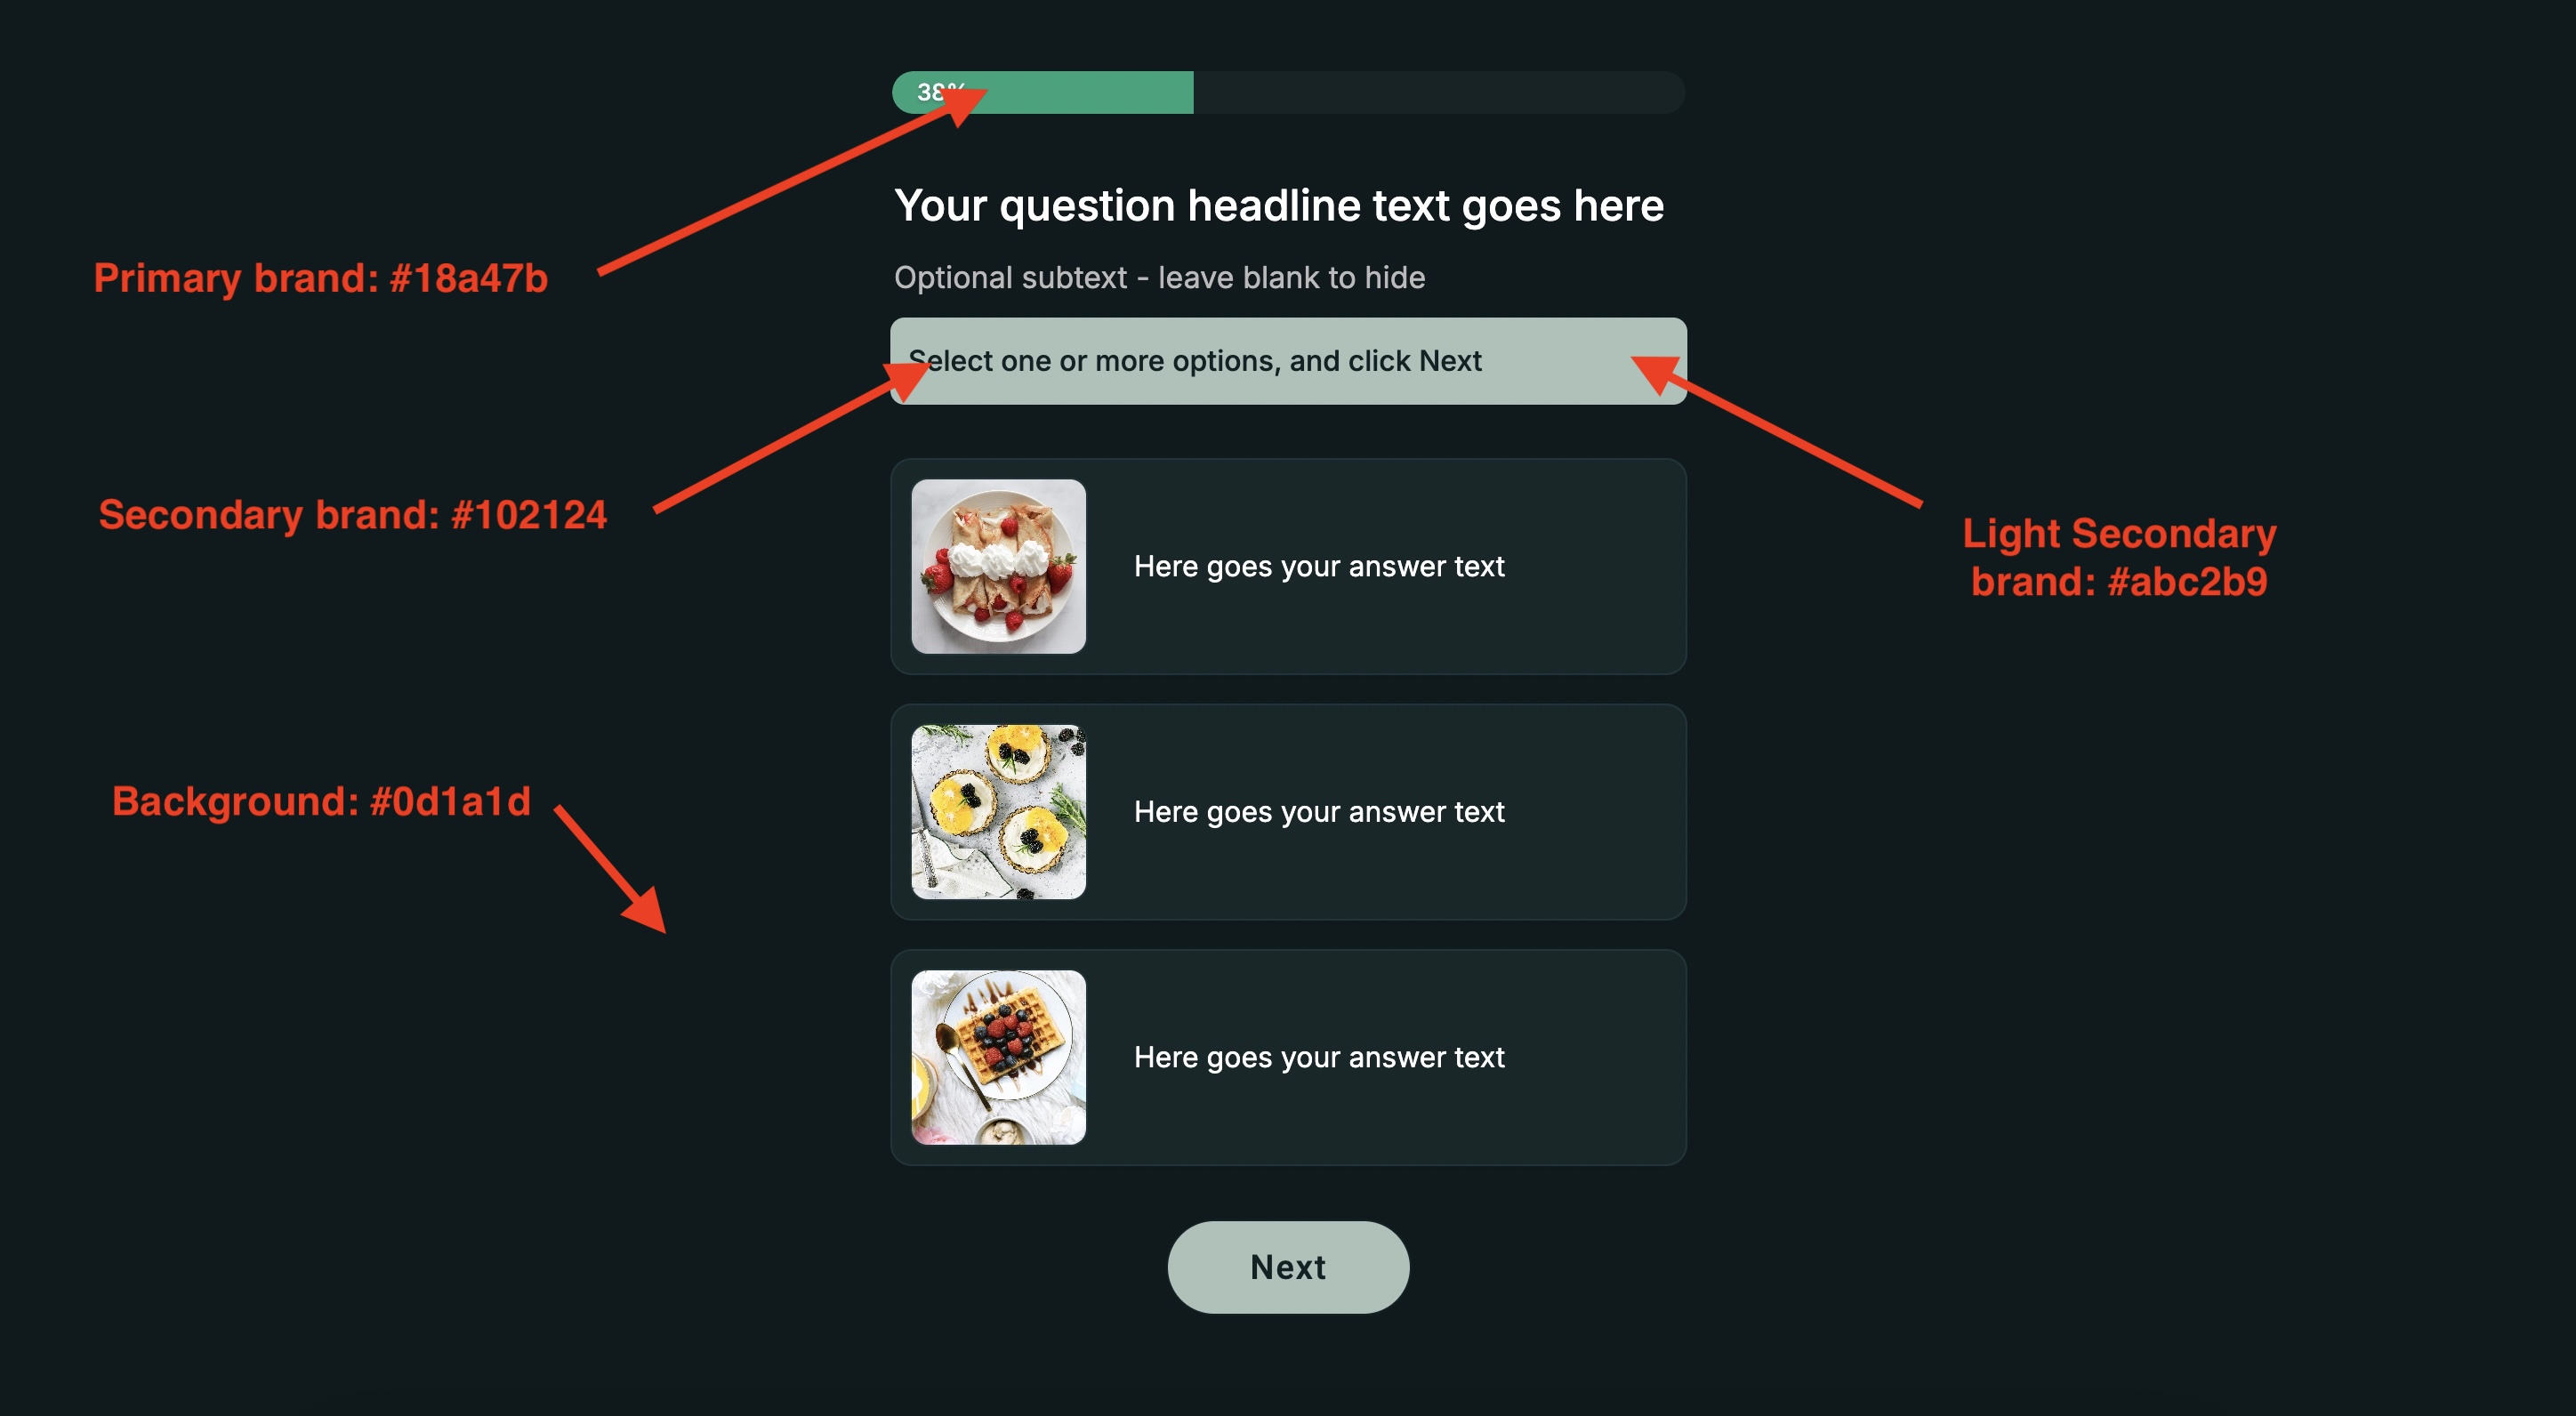
STEP 1: Prepare your brand colors
We’ll swap a few colors so the whole design updates at once. For the fastest results and a consistent design, match brightness of colors:
Replace bright colors with bright versions of your brand colors.
Replace dark colors with dark versions of your brand colors.
Dark theme (our defaults):
Primary brand color: #18a47b (Green)
Secondary brand color: #102124 (Dark green)
Light secondary brand color: #abc2b9 (Light green)
Background color: #0d1a1d (Very dark)
(click to enlarge)
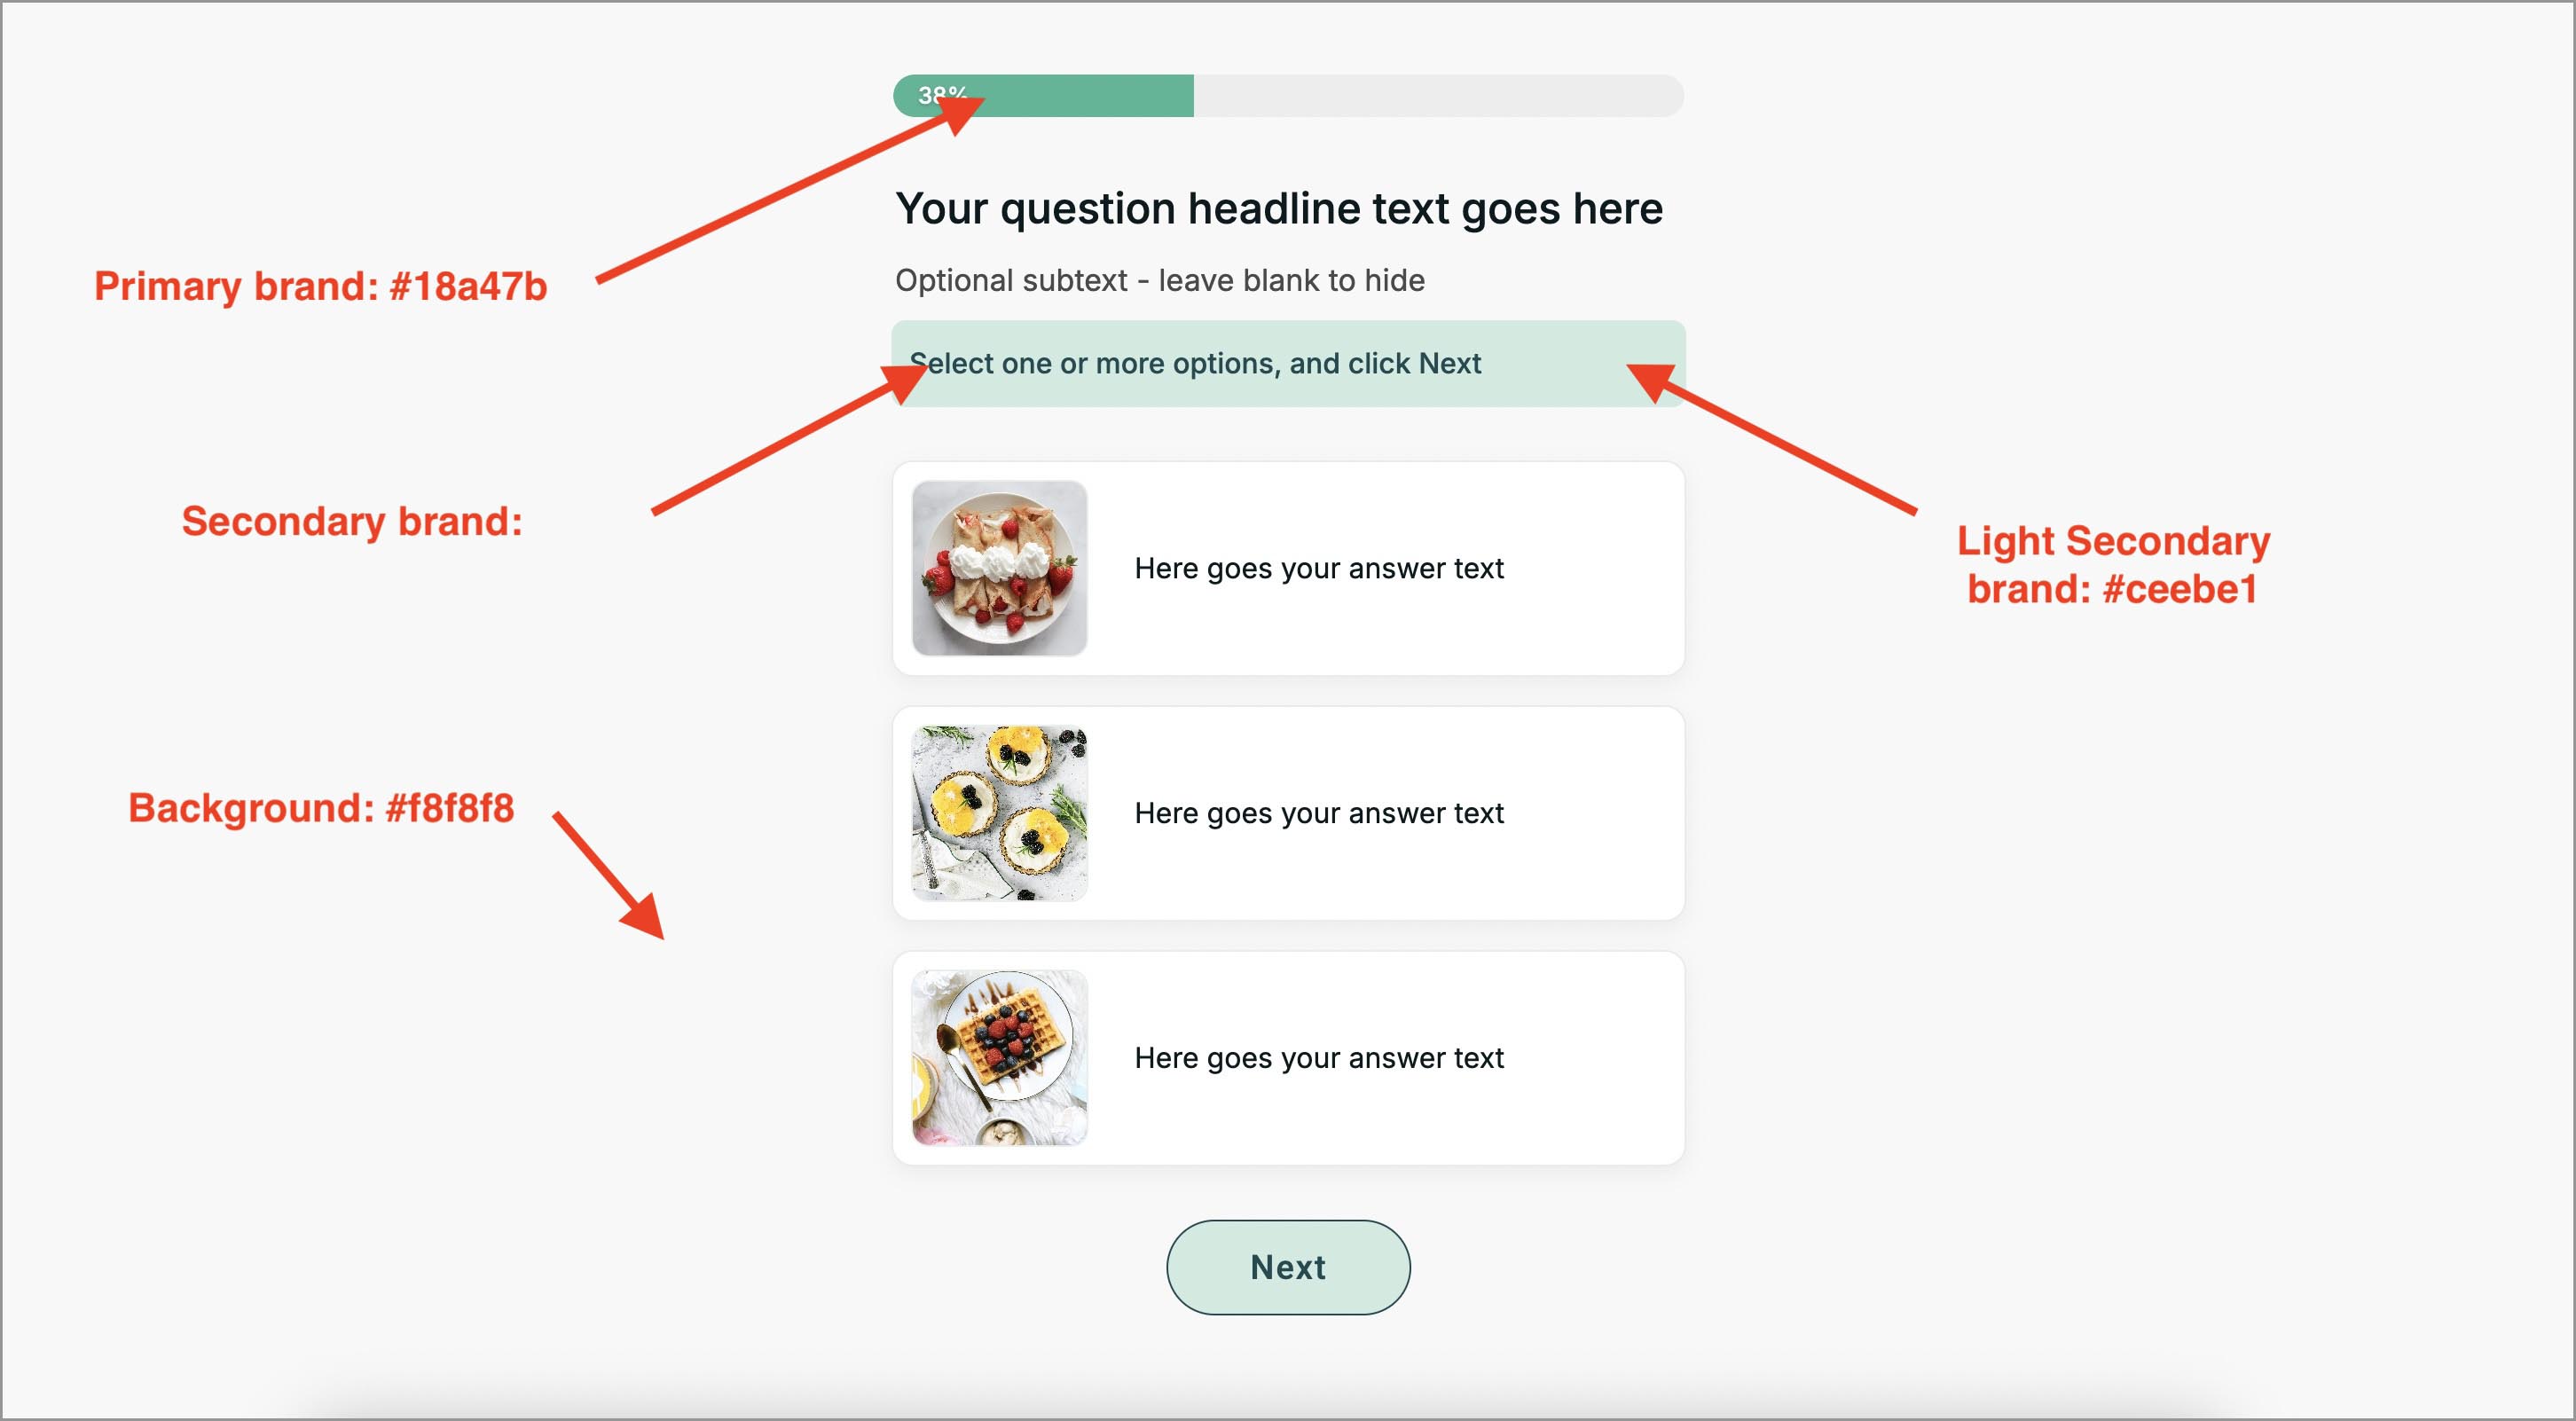
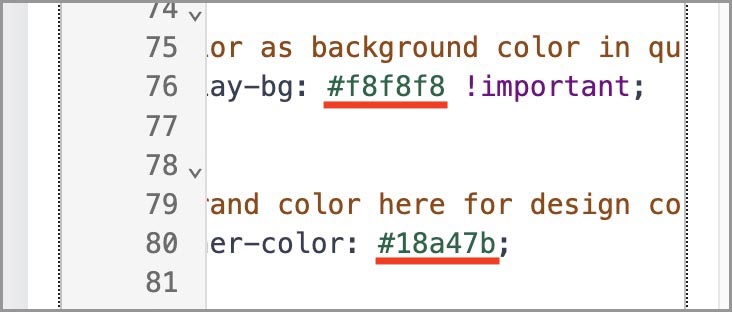
Light theme (our defaults):
Primary brand color: #18a47b (Green)
Secondary brand color: #184b52 (Dark green)
Light secondary brand color: #ceebe1 (Light green)
Background color: #f8f8f8 (Very dark)
(click to enlarge)
Where to find your HEX codes:
Open any funnel/web page → click an element that already uses your brand color.
In the right sidebar, click the color swatch to open the Color Picker.
Copy the HEX value (e.g., #1E90FF). This six-character code is the most common web color format.
(click to enlarge)
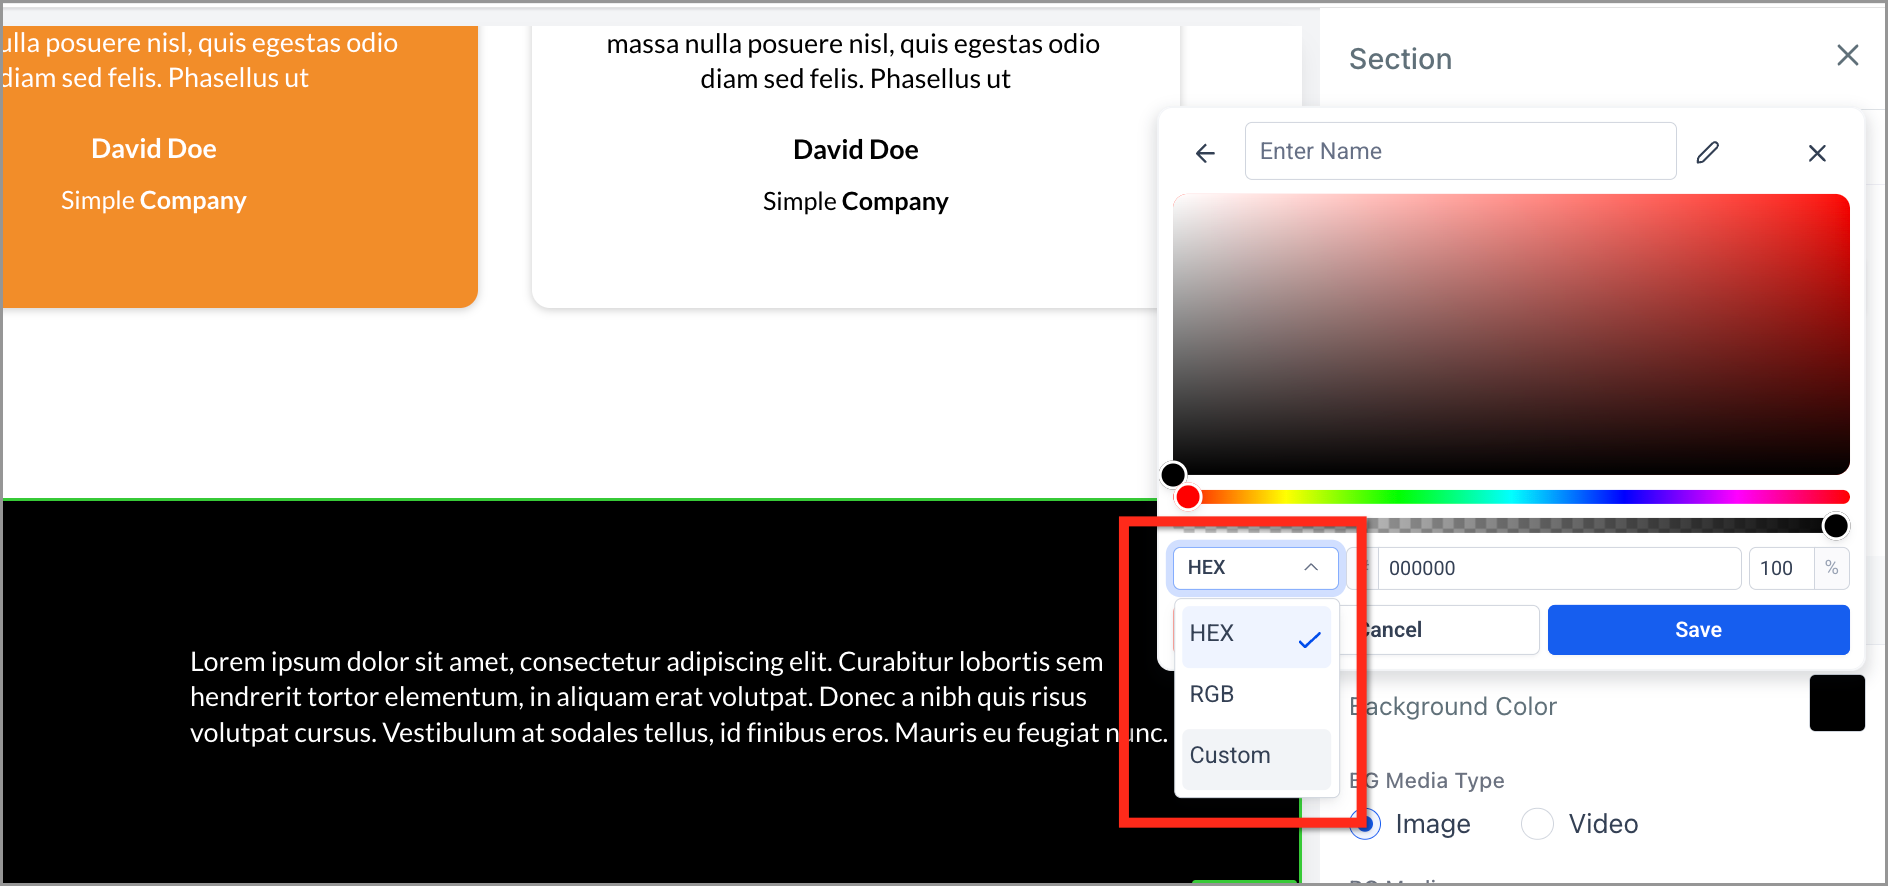
💡TIP: You can also grab colors from your logo/website using any browser color-picker extension.
STEP 2: Open the quiz’s Custom css
In your quiz builder without selecting any element of the quiz go to the Styles & Options button on the right side of the Top Panel.
(click to enlarge)

Next click Advanced tab and scroll down to Custom CSS
(click to enlarge)
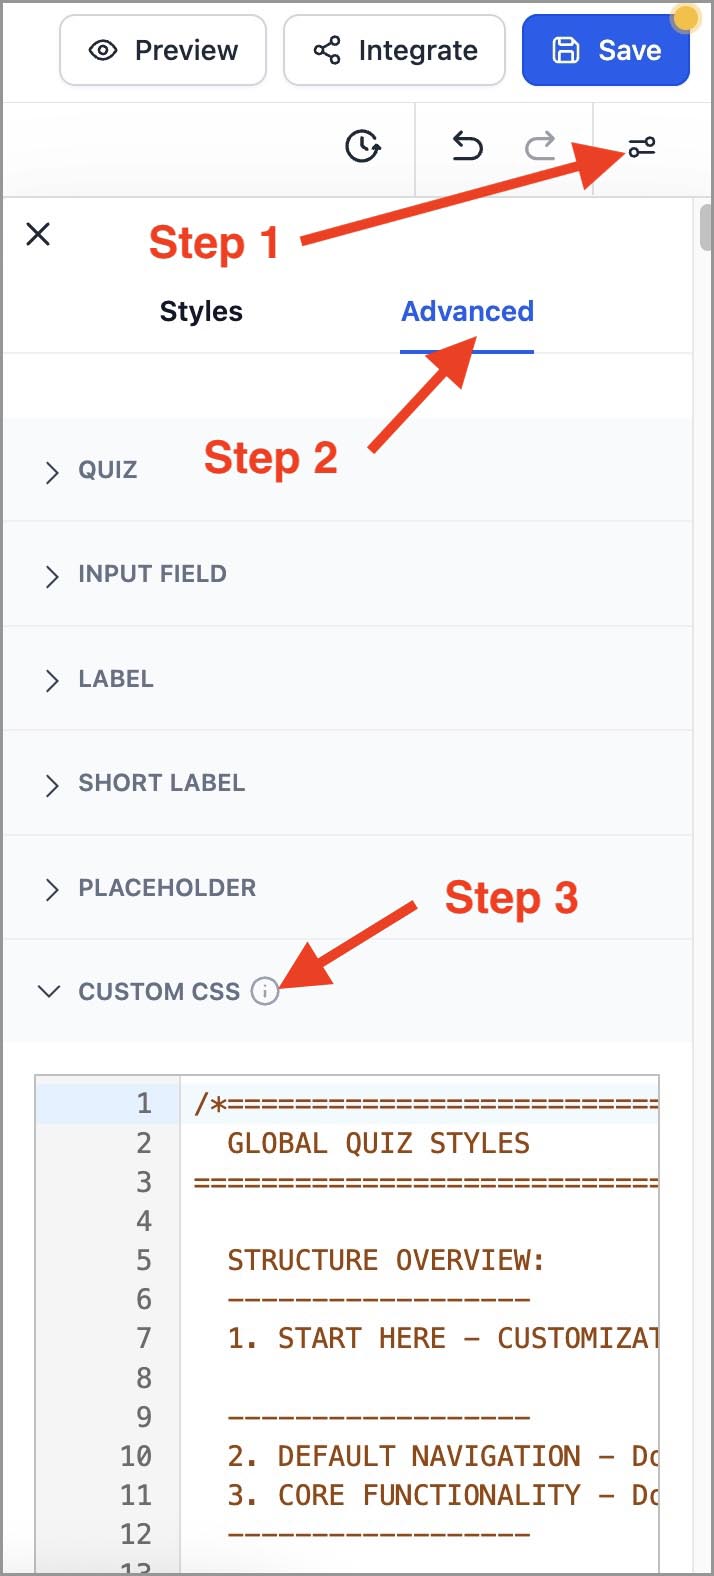
You’ll see a clearly labeled structure at the top of the file.
Here’s how to use it:
1. START HERE – CUSTOMIZATION — Safe to modify
This is the only section most users need. This section contains all the variables you need to adjust the quiz look to your brand. Other colors are derived from the 4 core colors you set, so you’ll rarely need to touch anything else.
Only move on to editing individual question themes if you need deeper customization and you know what you are doing.
------------------
2. DEFAULT NAVIGATION — Do not modify
3. CORE FUNCTIONALITY — Do not modify
------------------
EDIT SECTIONS BELOW ONLY IF YOU KNOW WHAT YOU'RE DOING
------------------
4. PROGRESS BAR
5. EMOJI / TEXT THEME
6. IMAGE CARD THEME
7. IMAGE GRID THEME
8. OVERLAY & WARNINGS
STEP 3: Paste your brand colors into the variables
(no coding beyond copy/paste)
In Global CSS → Section 1 (START HERE – CUSTOMIZATION), edit only color values on the right side of the variables. The values can vary depending on the color theme. Be careful to not delete colons : or semicolons ;
🔎 PREVIEW TIP: Click outside the CSS editor to see changes instantly. For elements not visible in-editor (e.g., progress bar or redirect overlay), use Preview (top right). Remember to save your quiz before preview.
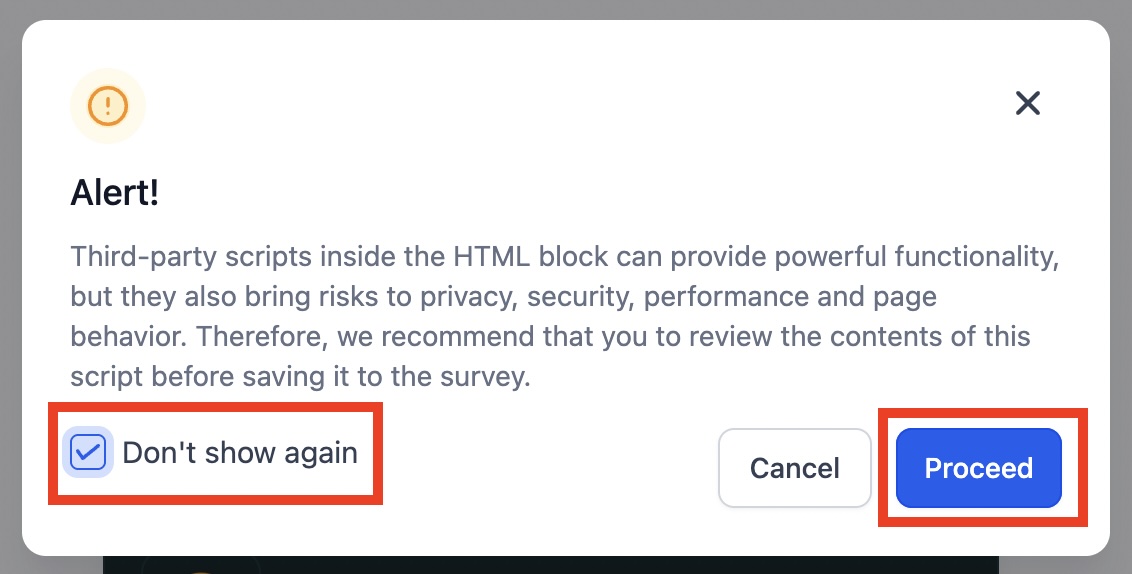
If you see an Alert! banner (“Third-party scripts inside the HTML block…”), check Don't show again and click Proceed.
💡 NOTE: In preview mode, the background color is visible ONLY in the redirect overlay. To see the quiz with the background color, embed it on the page where the background color is set. If you are using the STARTER template, your quiz is already embedded on the quiz page of the appropriate theme funnel – just replace your background color and you're done.
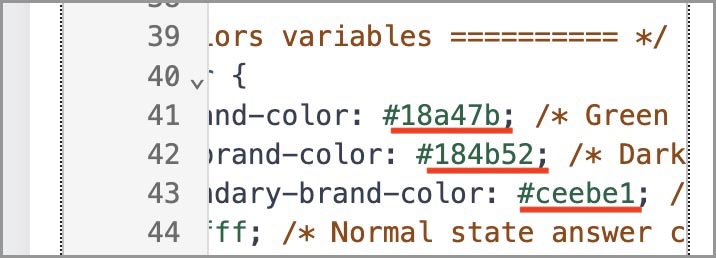
1. Global colors variables:
Line 41 --Q-primary-brand-color: → Your Primary brand color
Line 42 --Q-secondary-brand-color: → Your Secondary brand color
Line 43 --Q-light-secondary-brand-color: → Your Light Secondary brand color
(click to enlarge)
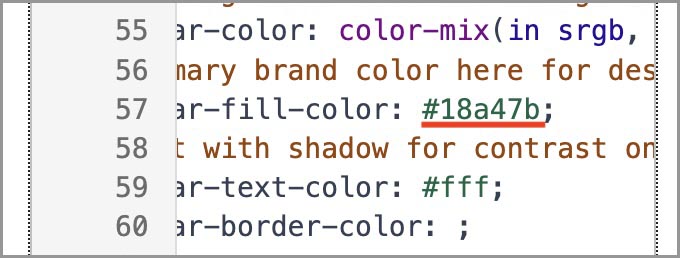
2. Progress bar colors variables:
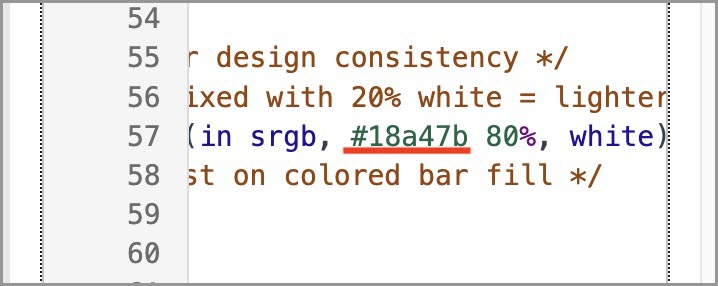
Line 57 --progress-bar-fill-color: → Your Primary brand color
Dark theme:
(click to enlarge)
Light theme:
(click to enlarge)
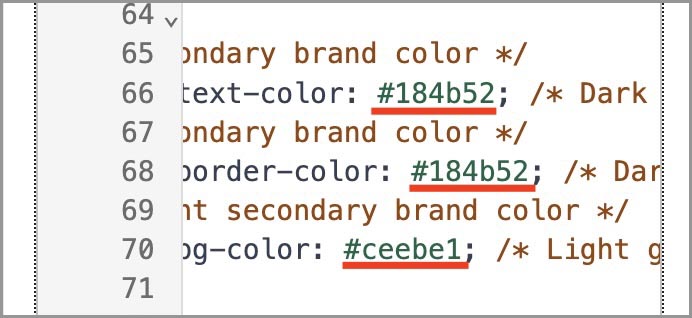
3. Multiple choice question type Next button variables:
Line 66 --next-button-text-color: → Your Secondary brand color
Line 68 --next-button-border-color: → Your Secondary brand color
Line 70 --next-button-bg-color: → Your Light Secondary brand color
(click to enlarge)
4. Redirection overlay style variables:
Line 76 --redirection-spinner-color: → Your Primary brand color
Line 80 --redirection-overlay-bg: → Your Background color
(click to enlarge)
That’s it. Your quiz now matches your brand. 🎉
STEP 4: Optional - Secondary color variables, Typography & sizing
Secondary color variables
(Edit only if needed—most users can skip.)
Line 44 --Q-card-bg: Normal state answer card background color
Line 45 --Q-card-border: Normal state answer card border color
Line 48 --Q-card-text-color: Answer card text color
Line 49 --Q-grid-card-text-color: Image Grid Theme label text color
Line 97 color: Question headline color
Line 112 color: Question optional subtext color
Typography & sizing
(Edit only if needed—most users can skip.)
Line 85 — Global answer text & card sizes
Line 97 — Question headline
Line 110 — Question optional subtext
Line 122 — Subheader for Multiple Choice Questions
Line 137 — Multiple choice question type Next button styles
Advanced theme sections
(Edit only if you know what you’re doing)
These fine-tune spacing, borders radius, image sizes, and grid columns per theme. Use sparingly; Section 1 variables restyle most elements globally.
4. PROGRESS BAR — Safe to modify if advanced
5. EMOJI/TEXT THEME — Safe to modify if advanced
6. IMAGE CARD THEME — Safe to modify if advanced
7. IMAGE GRID THEME — Safe to modify if advanced
8. OVERLAY & WARNINGS — Safe to modify (with caution)
How to Create Your Custom Quiz Questions
1. What elements make up a ConvertQuiz question
Each quiz question page contains two elements:
Custom HTML question (top) – this holds the ConvertQuiz question layout, which is styled by the Custom CSS you just customized.
(click to enlarge)

Multiple Choice quiz question element, where you set Categories and Points for each answer. ConvertQuiz always uses Multiple Choice (even for single-choice type questions) and sets question type in Custom HTML element.
(click to enlarge)

‼️ IMPORTANT: The number of answers set in the Custom HTML element must always match the number of default answers (options) in the Multiple Choice question element.
2. How to create your questions
(clone first)
💡 NOTE: Don’t start from a blank quiz page. Simply find a pre-built question in the theme you like, and clone that question page. This is much faster than building a blank page, adding Custom HTML, and copying/pasting custom question code.
(click to enlarge)
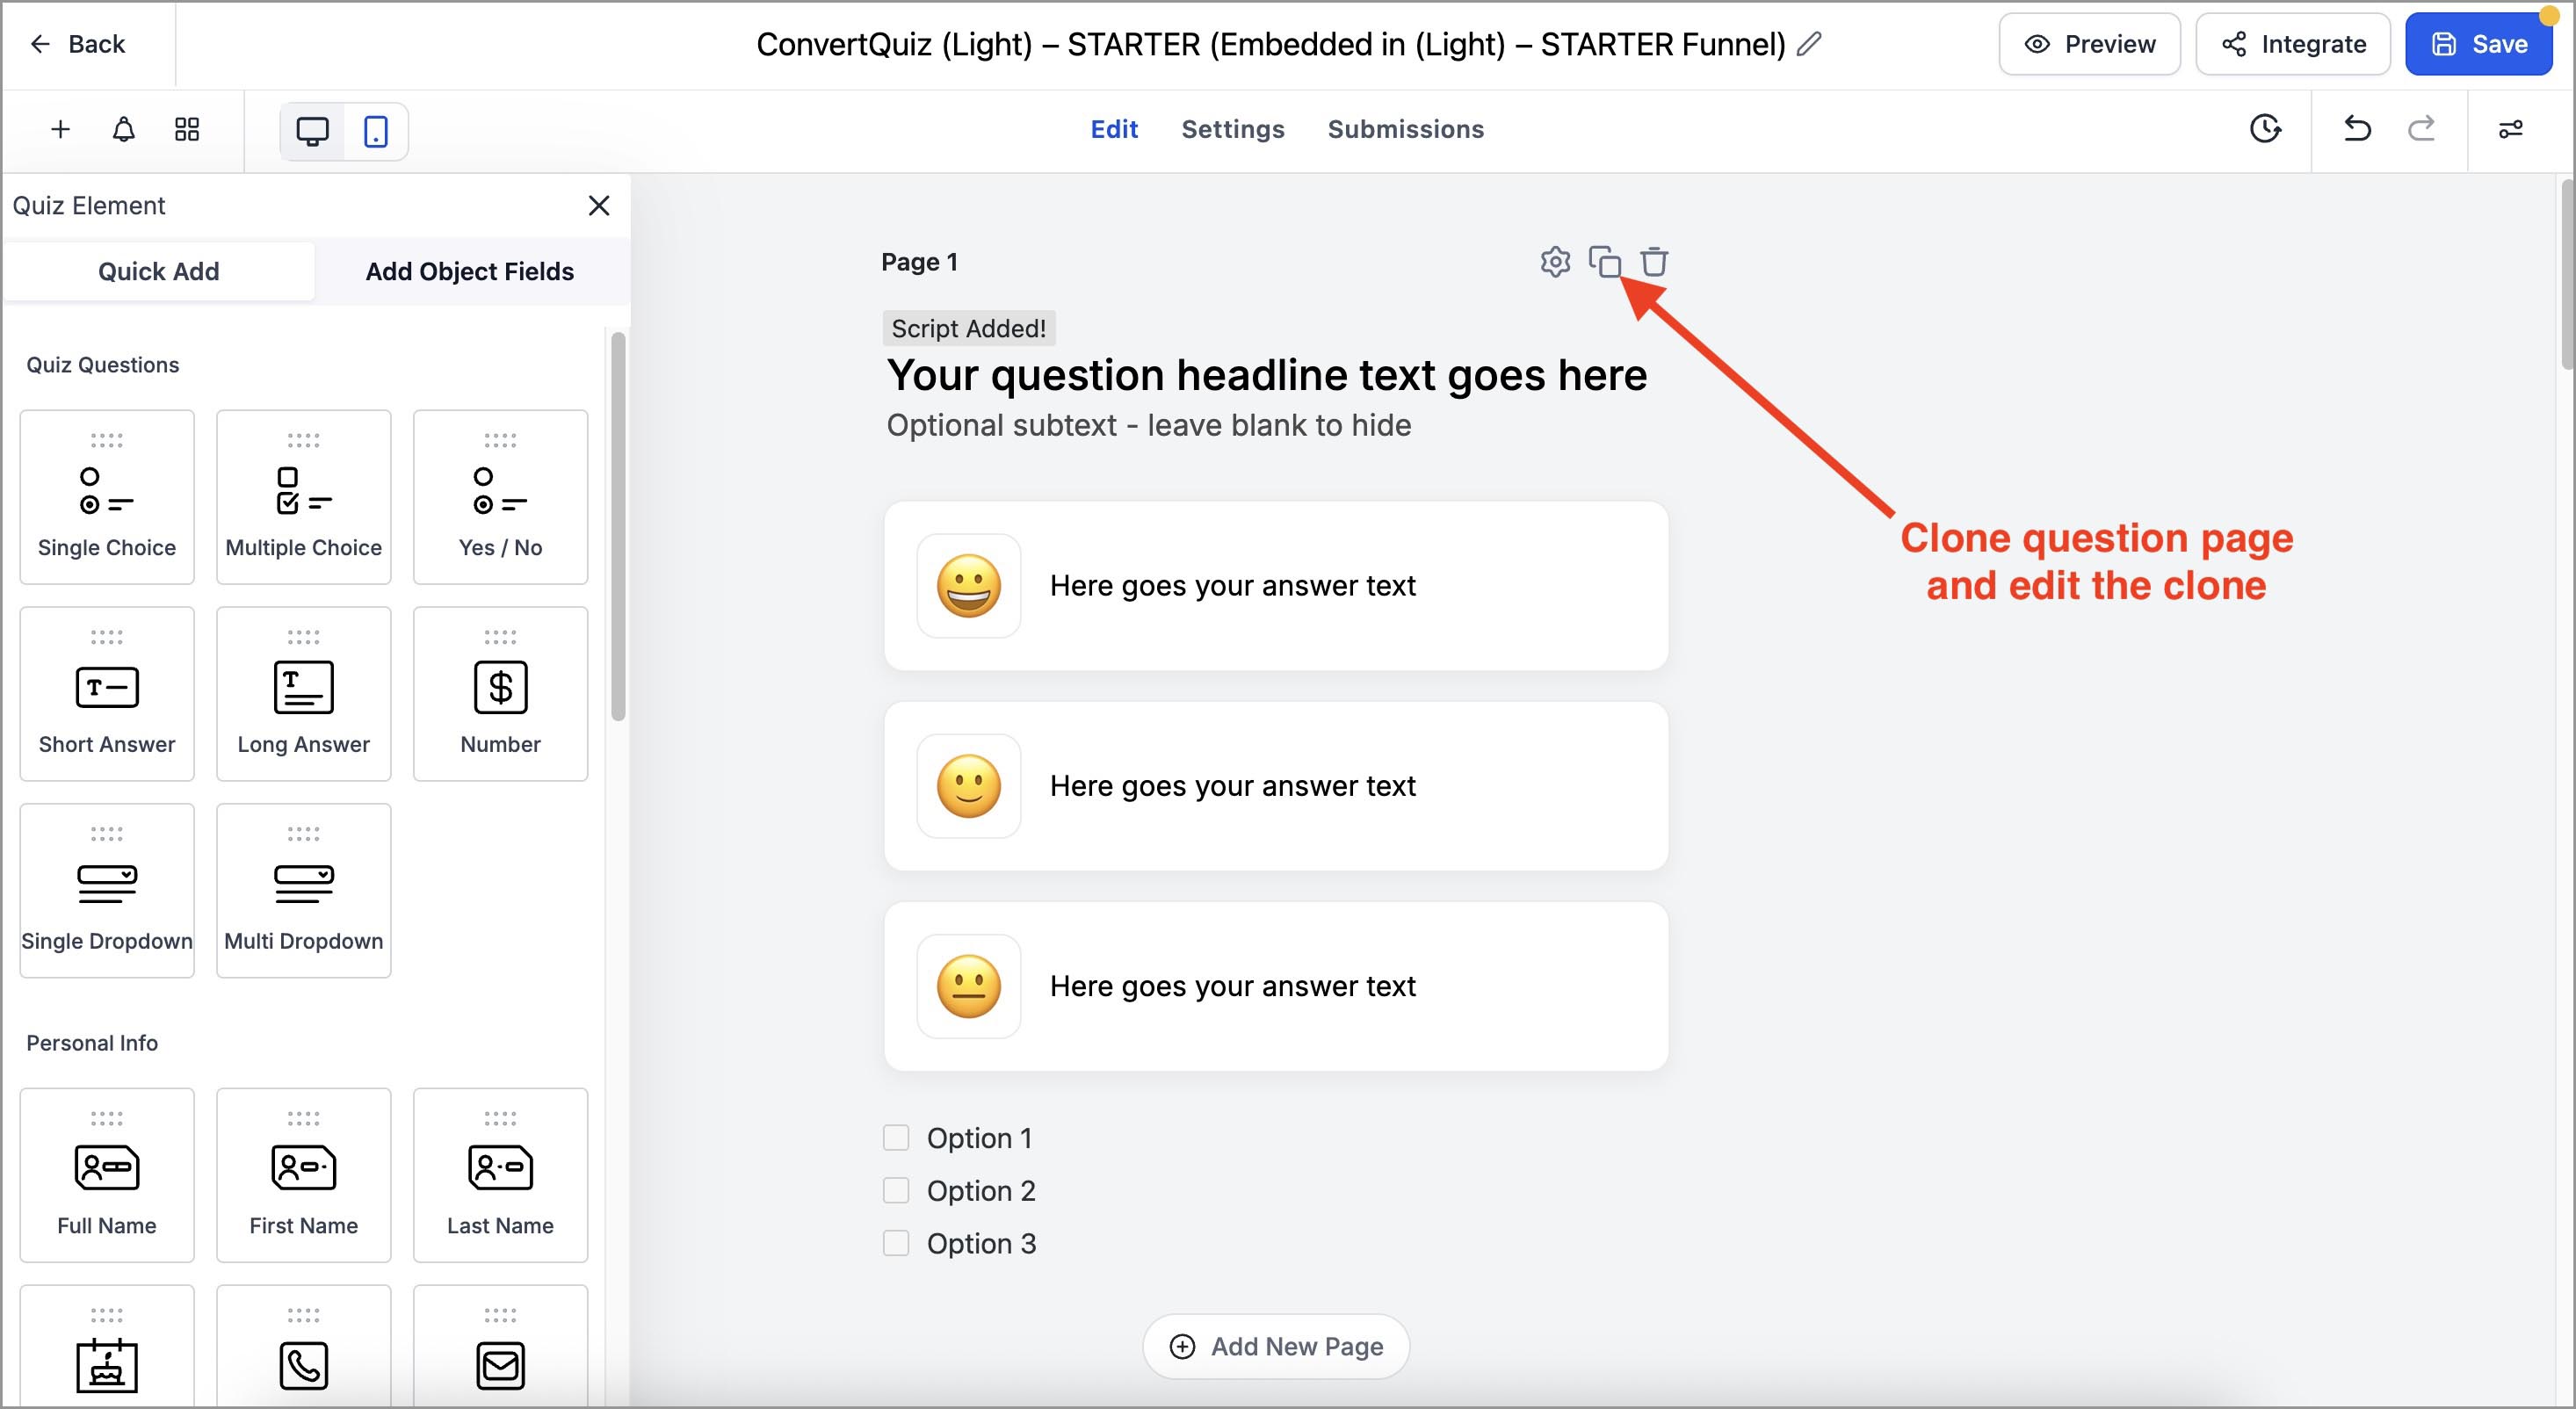
DO NOT DELETE any of the precreated questions until you’ve finished creating your whole quiz (easy fallback if you need to copy/paste something again).
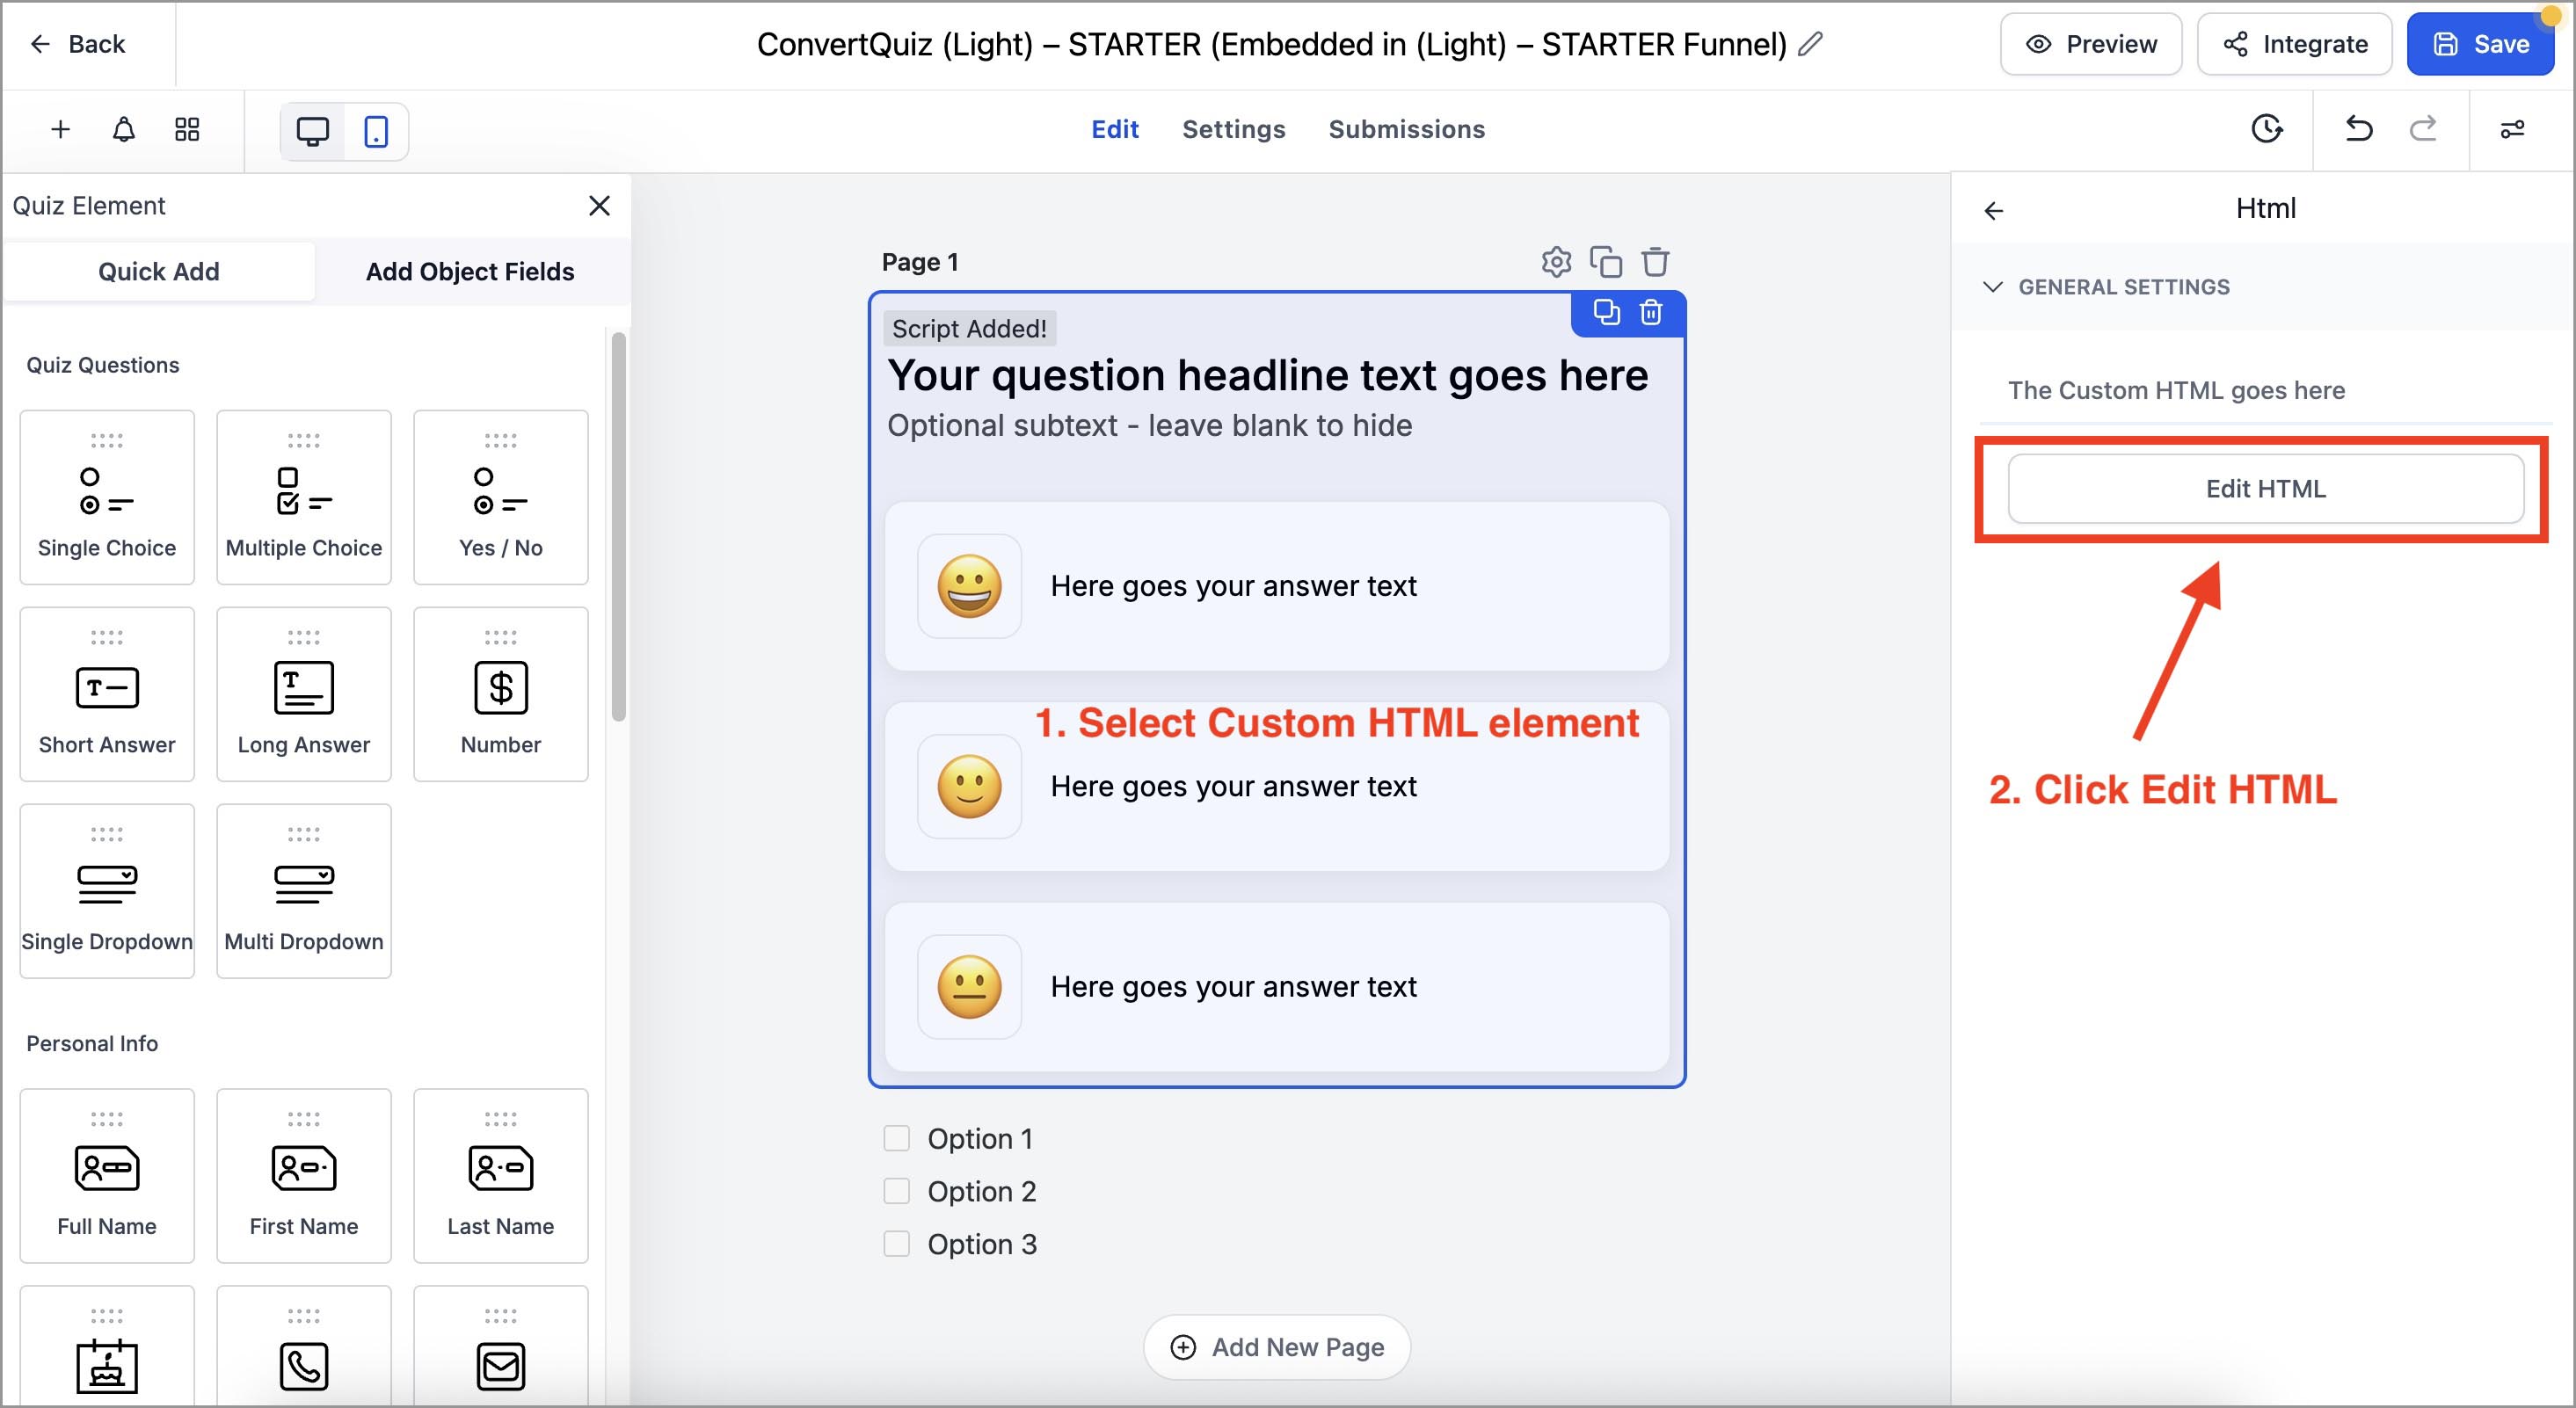
3. How to set the Custom HTML question
On your cloned question page select the Custom HTML element and click Edit HTML in the right setting panel.
(click to enlarge)
ConvertQuiz question theme has three parts:
Read this first – a short note about that theme’s variations and structure.
Question section – with question on headline settings.
Answers section – with answers settings.
3.1 How custom question section settings work
3.1.1 Setting Single choice / Multiple choice type question
Toggle it by changing the data-pq-multi attribute value to "true" or "false" (in quotes).
At the very top of the question section you’ll see a wrapper like:
<div class="question-wrapper theme-emoji-text" data-pq-multi="false">(click to enlarge)
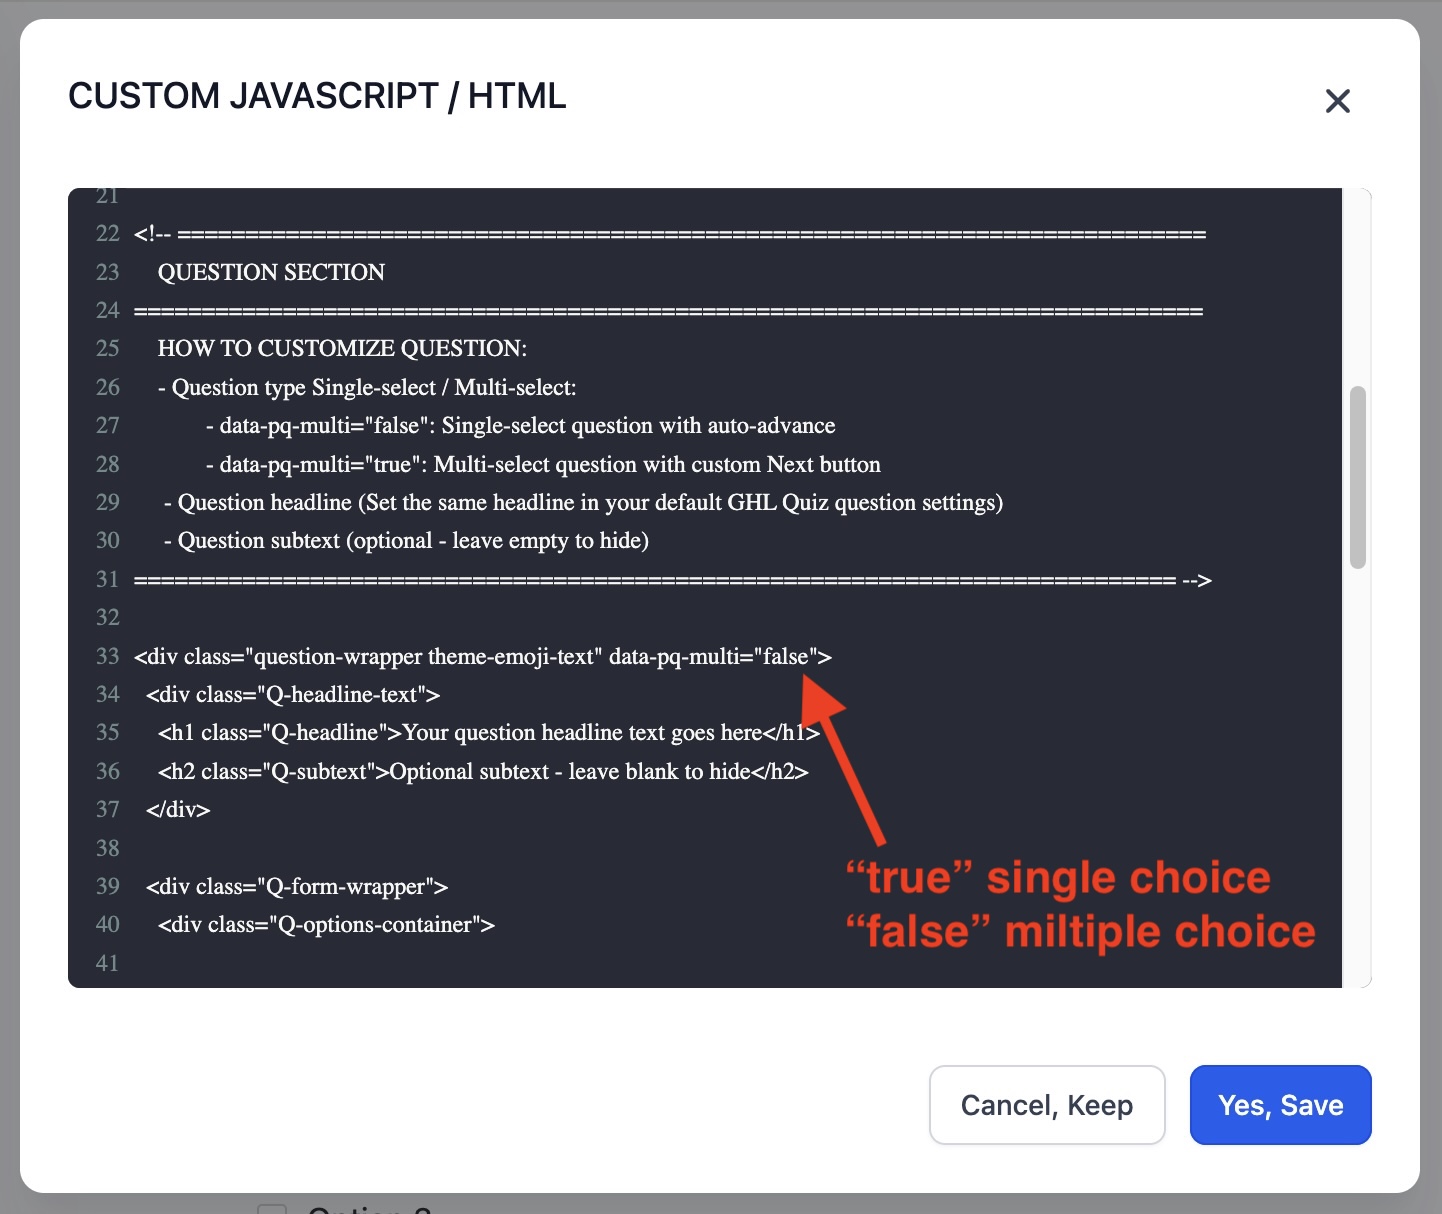
data-pq-multi="false" → Single choice (Auto Submit)
data-pq-multi="true" → Multiple choice (Next button)
Be precise: only change true / false. Don’t remove quotes or other characters.
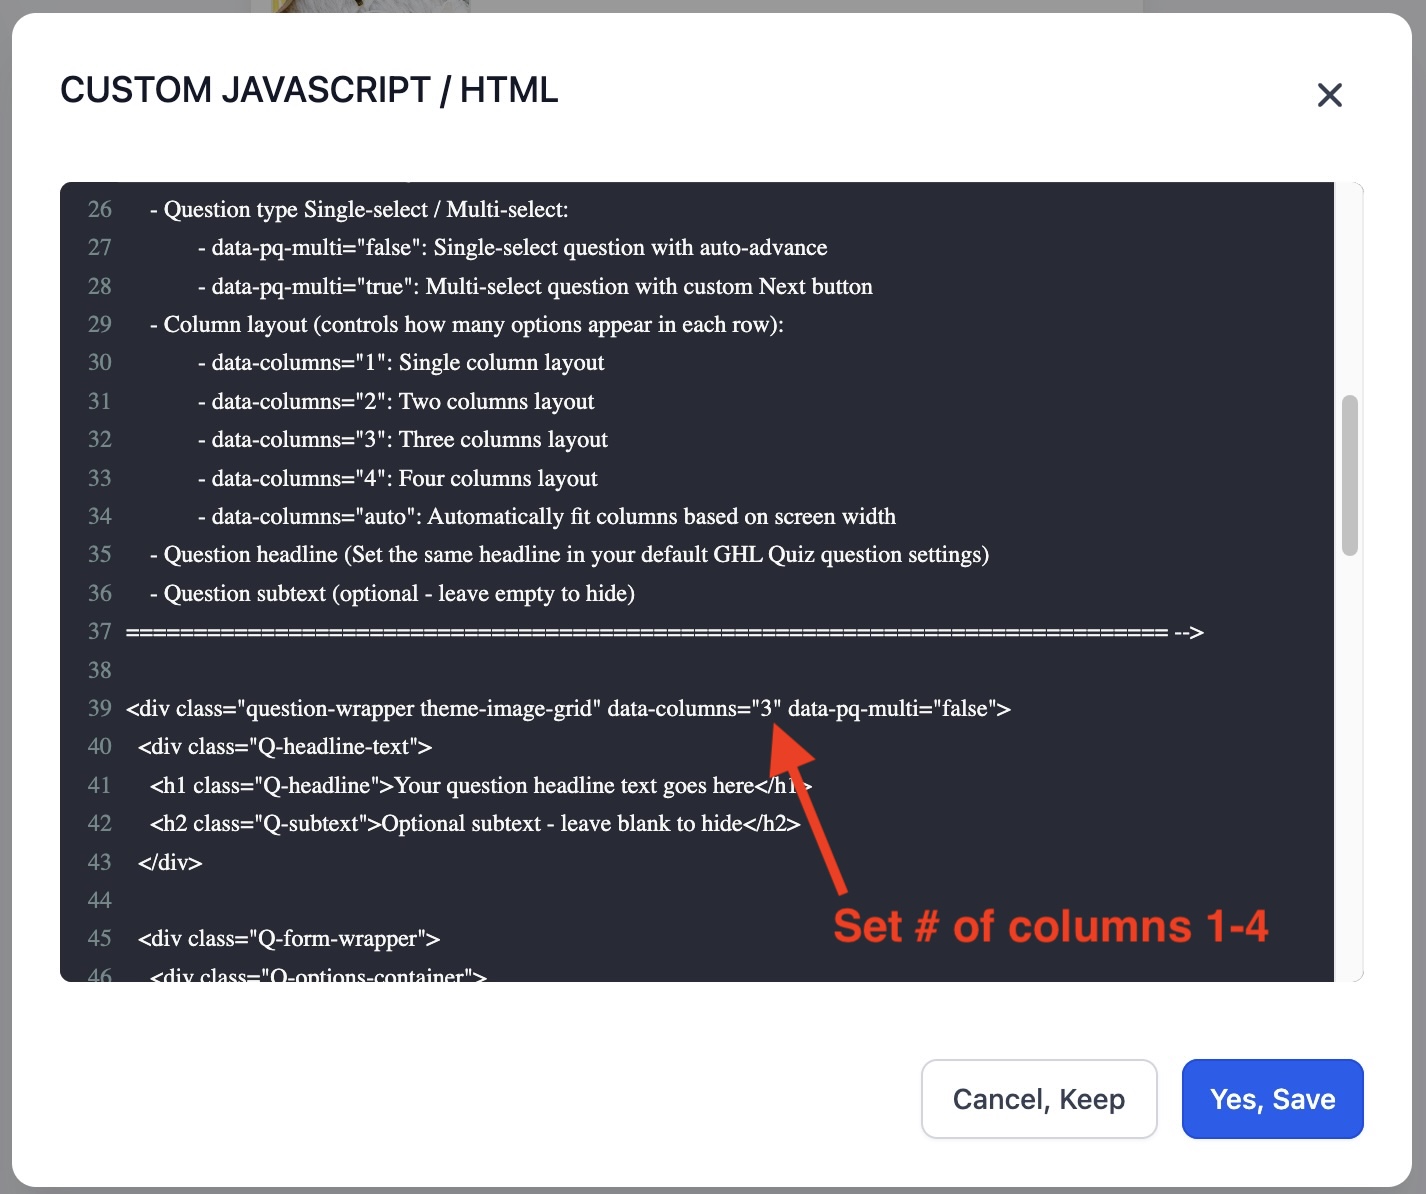
3.1.2 Setting the number of columns in the IMAGE GRID THEME
You can set the number of columns (1–4) by setting it in the data-columns attribute (in quotes).
At the very top of the question section you’ll see a wrapper like:
<div class="question-wrapper theme-image-grid" data-columns="3" data-pq-multi="false">
(click to enlarge)
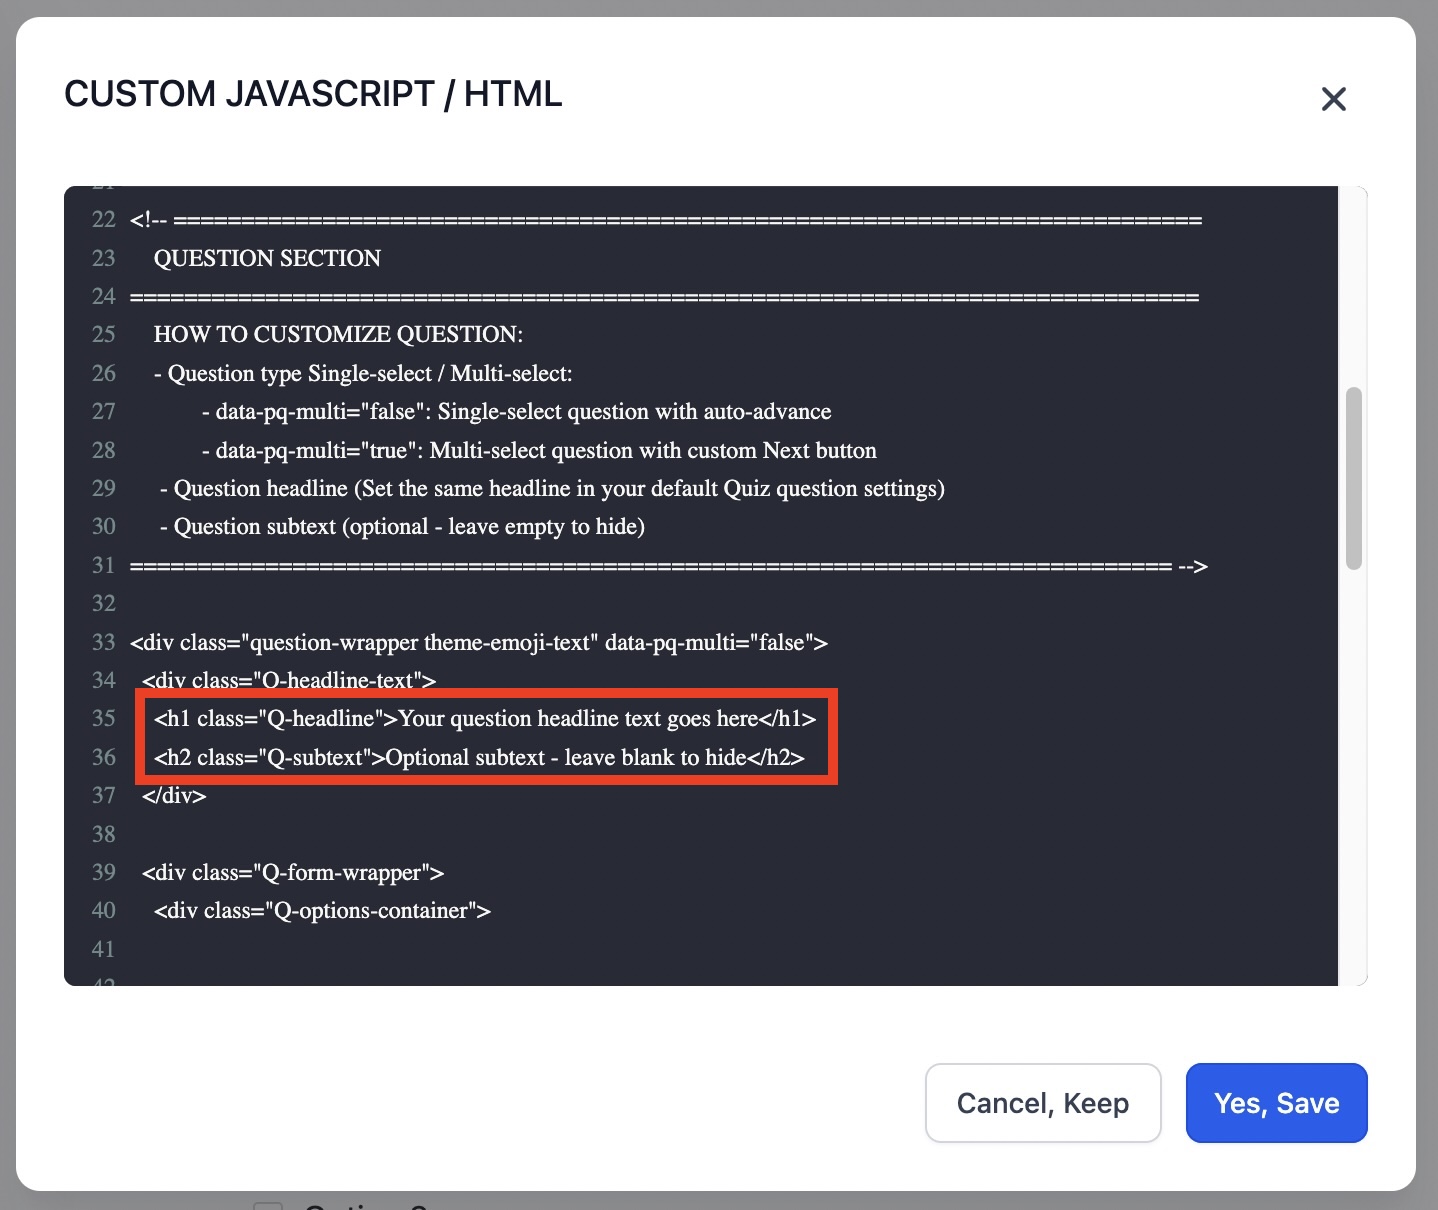
3.1.3 Setting the Question Headline and Subtext
In the question section you’ll see a h1 & h2 elements:
<h1 class="Q-headline">Your question headline text goes here</h1> → Replace the headline text.
<h2 class="Q-subtext">Optional subtext - leave blank to hide</h2> → Replace the subtext or leave it empty to hide
(click to enlarge)
3.2 How custom answers section settings work
Two important rules!
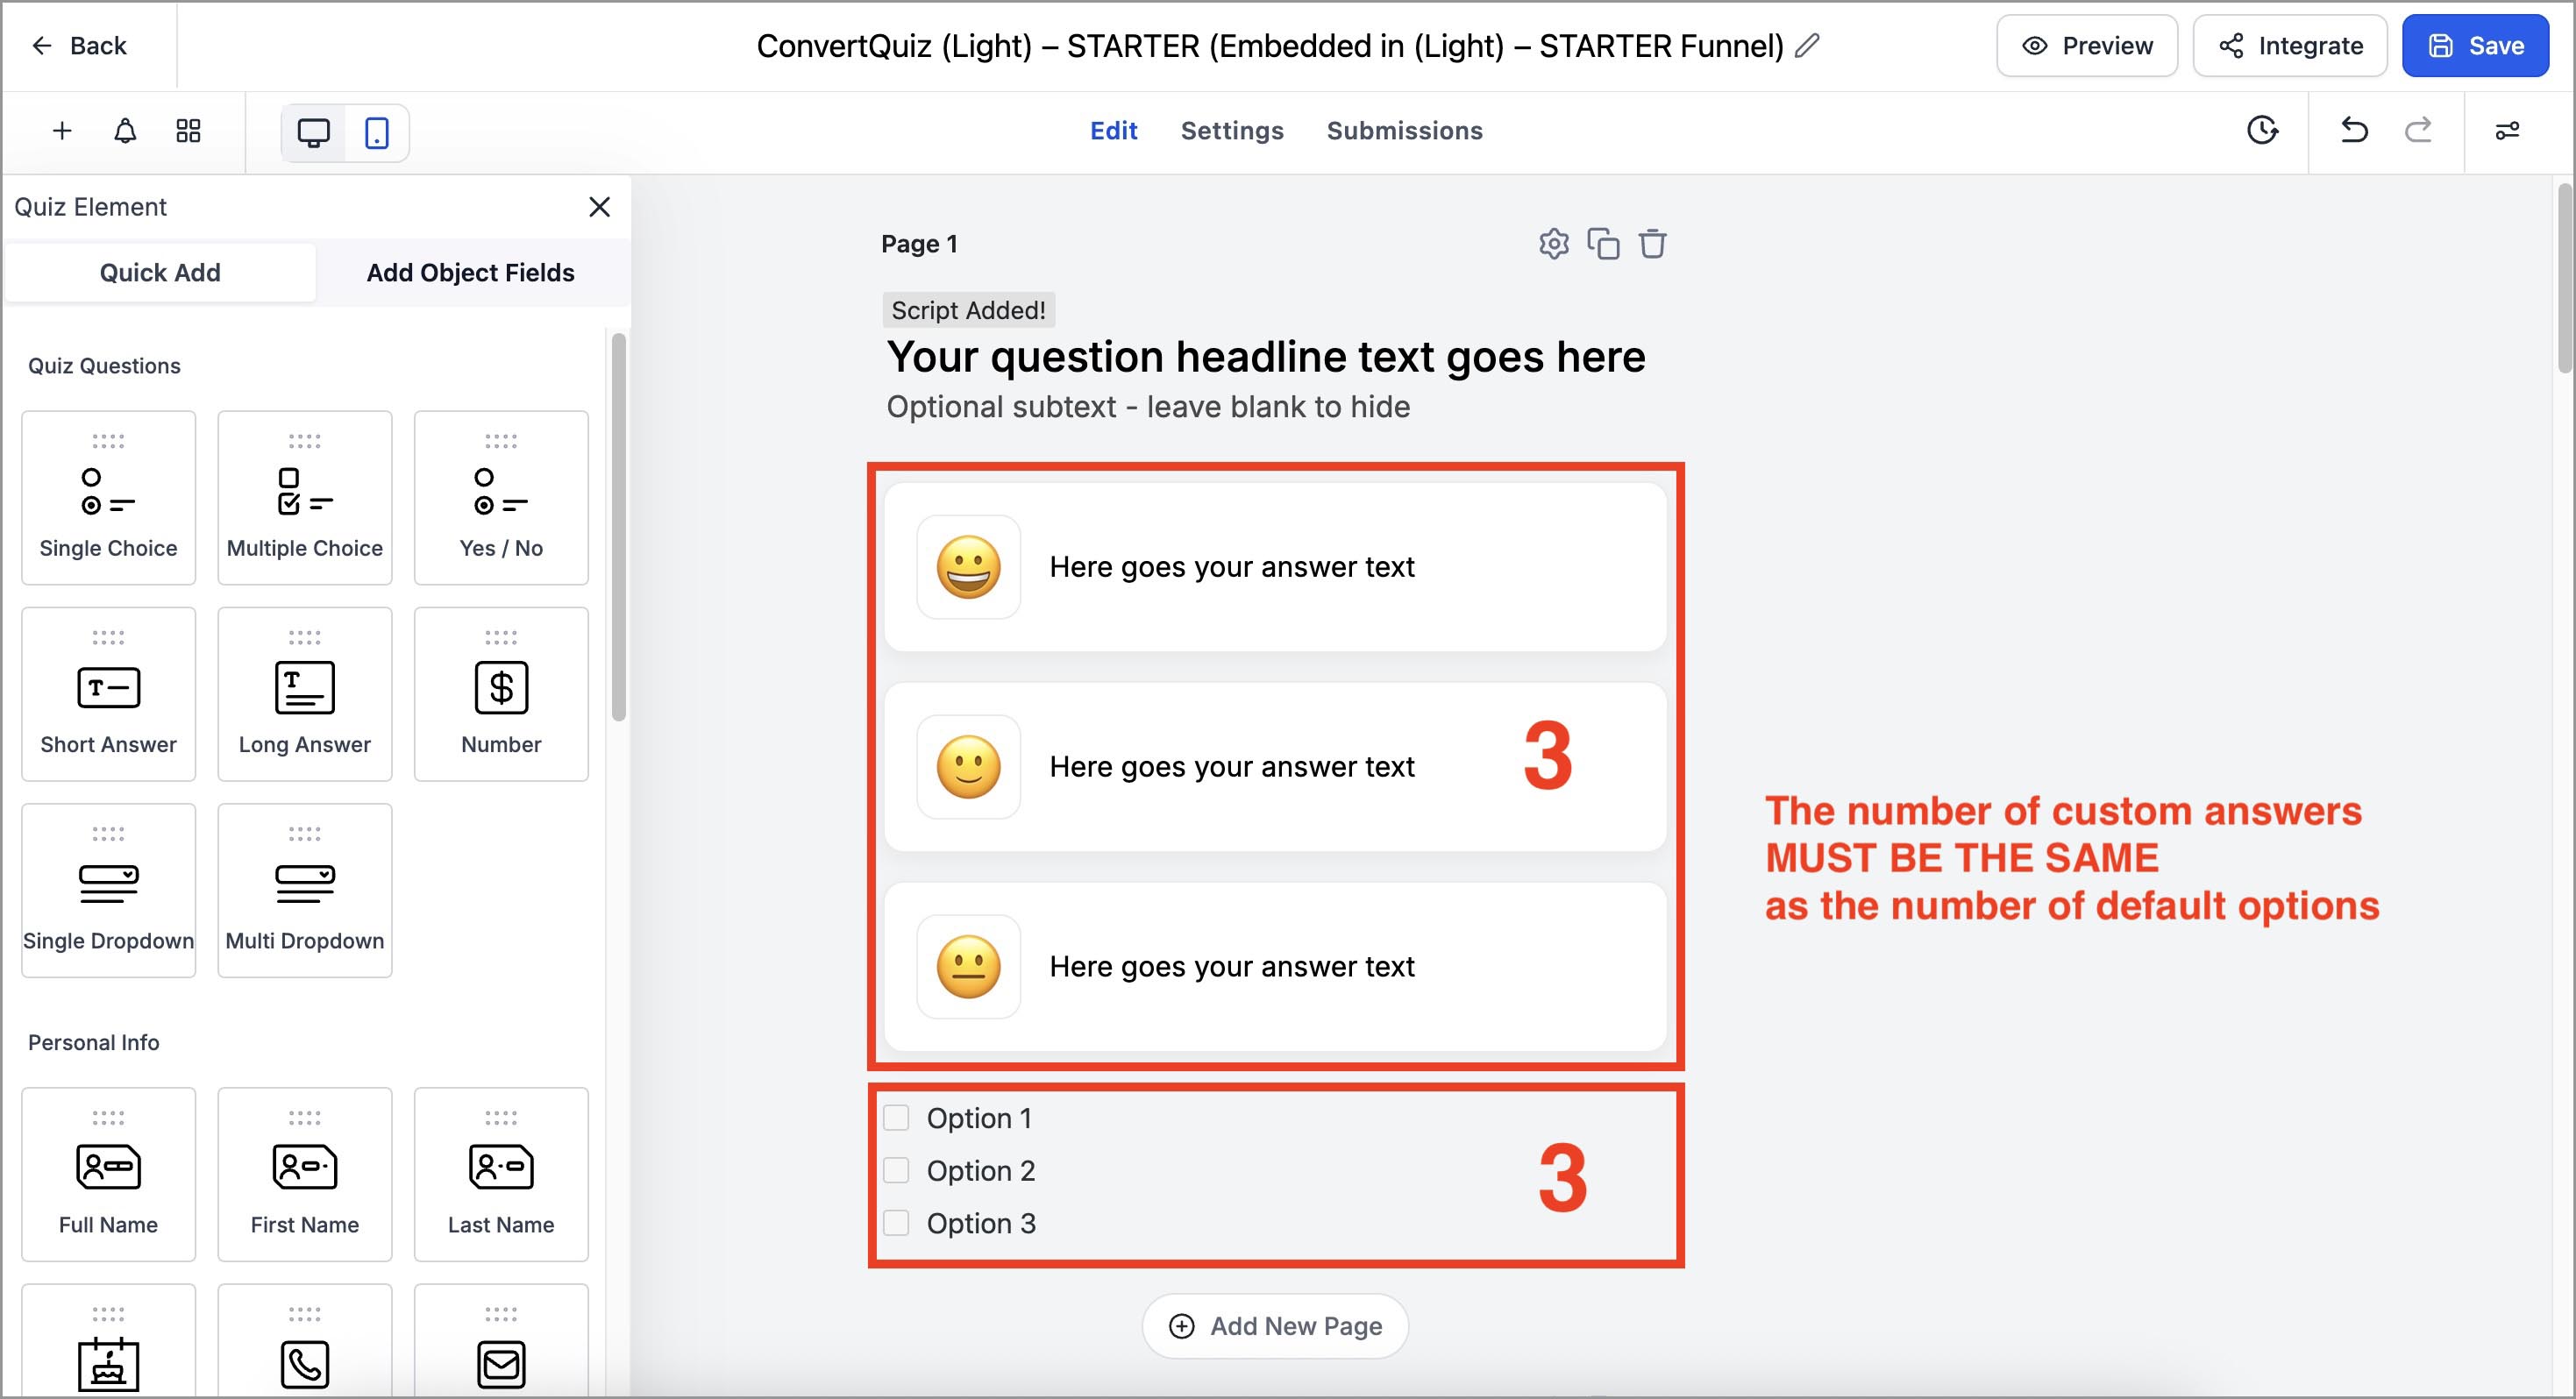
RULE 1. The number of Options blocks (custom answers) here MUST BE THE SAME as the number of default options (Multiple choice element) in quiz builder.
(click to enlarge)
RULE 2. Each custom Option block data-index attribute value MUST MATCH the position of the corresponding default option (Multiple choice element) in quiz builder.
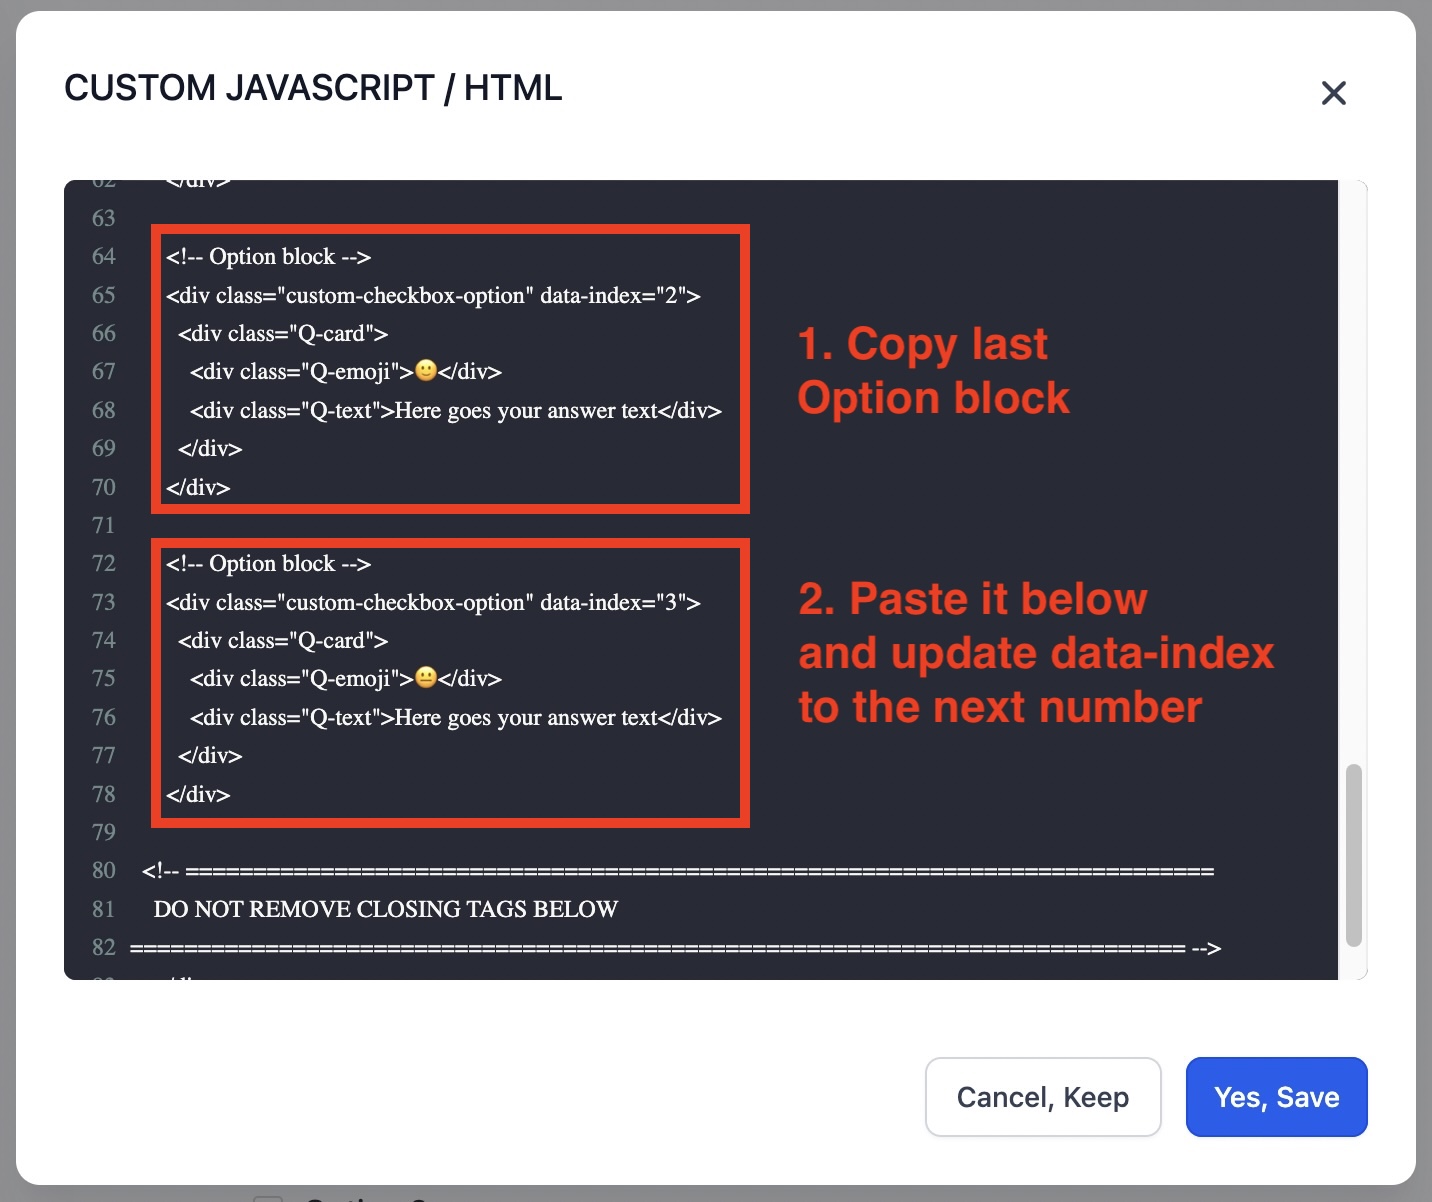
At the very top of the Option block (custom answer) you’ll see a wrapper like:
<!-- Option block -->
<div class="custom-checkbox-option" data-index="1">
(click to enlarge)
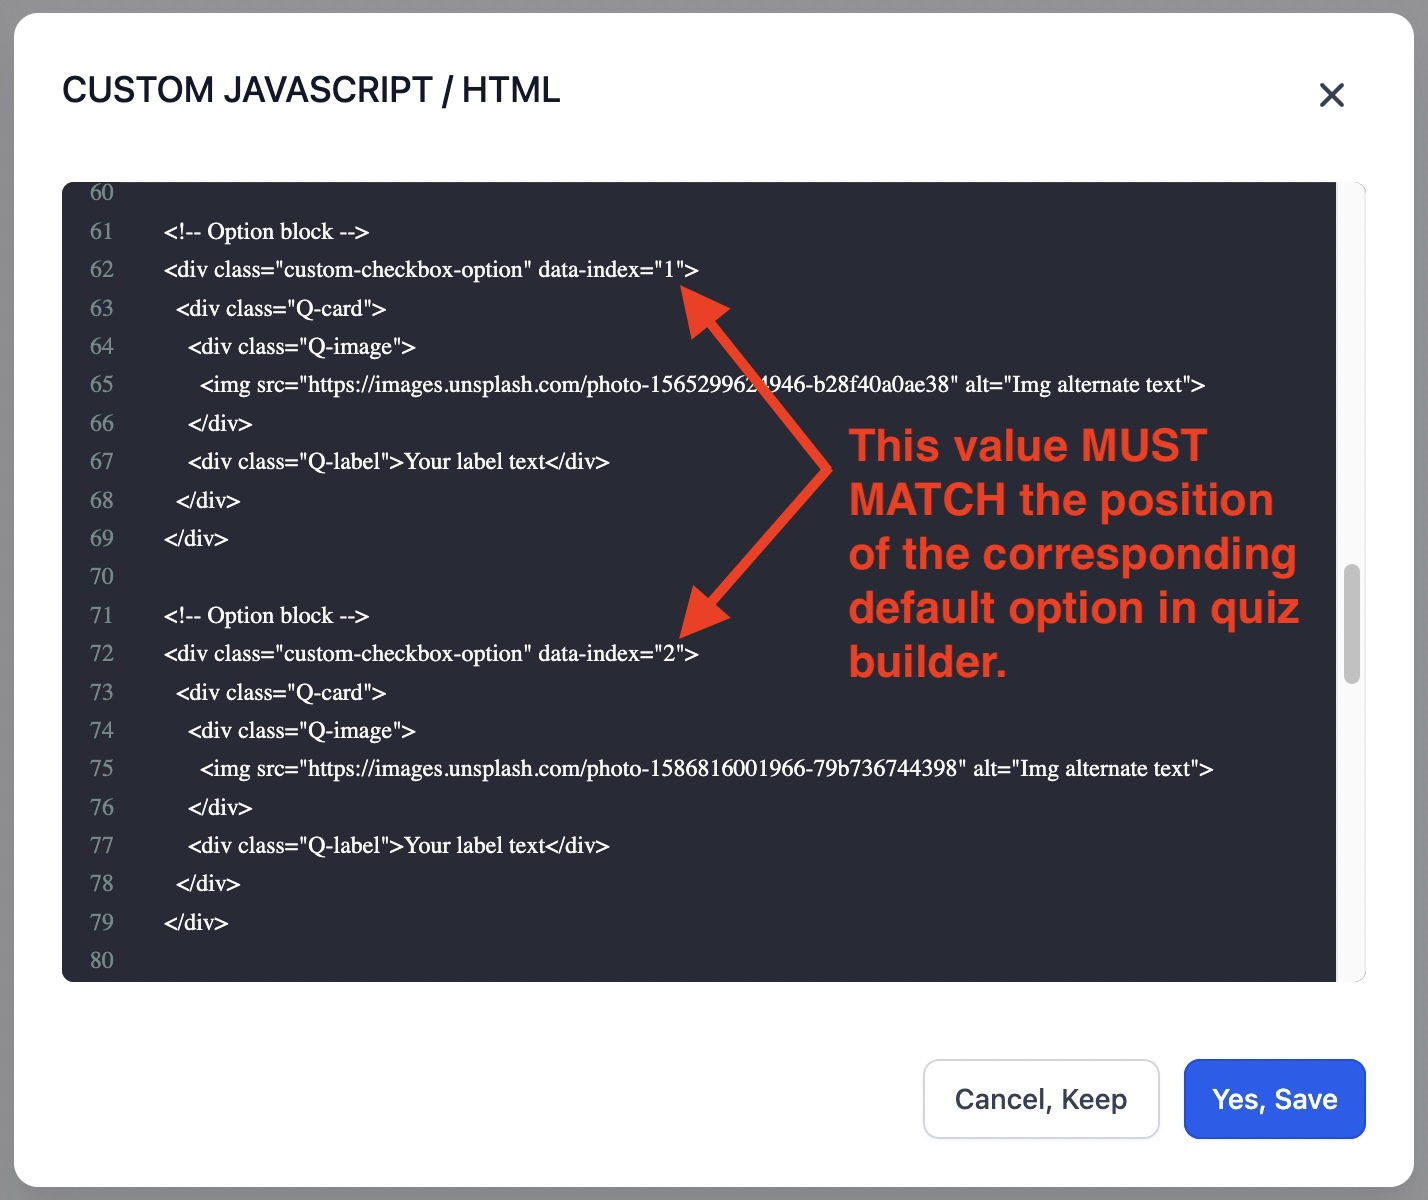
For example:
to match with 1st default option in quiz builder, use data-index=”1”
to match with 2nd default option in quiz builder, use data-index=”2”
to match with the 3rd default option in quiz builder, use data-index=”3”.etc
3.2.1 Changing variations of the themes
EMOJI / TEXT THEME
Emoji with text: include emoji in the Q-emoji div: <div class="Q-emoji">😀</div>
Text only: leave the Q-emoji div empty: <div class="Q-emoji"></div>
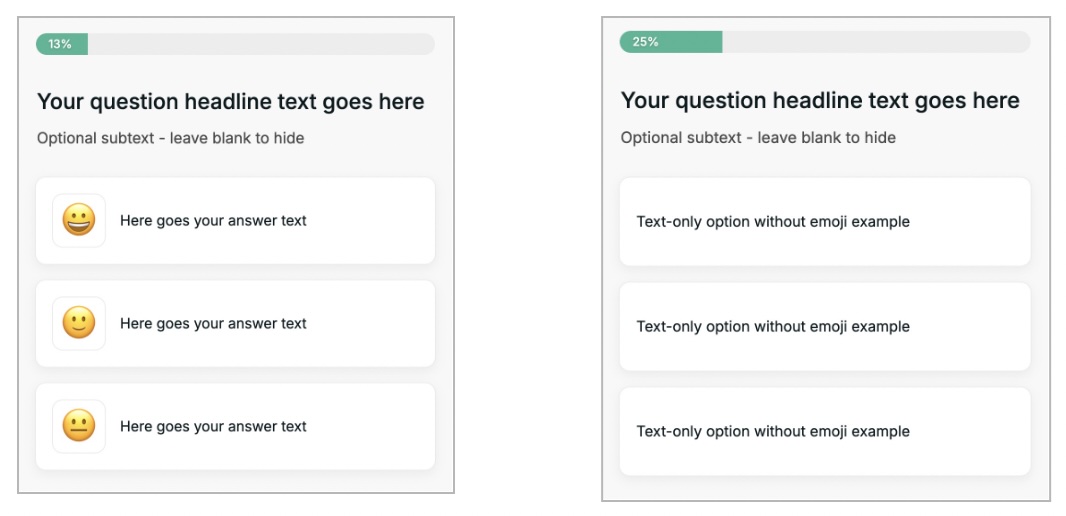
IMAGE GRID THEME
Image with label: include text in the Q-label div: <div class="Q-label">Label</div>
Image only: leave the Q-label div empty: <div class="Q-label"></div>

3.2.2 Setting images in Image Card & Image Grid Themes
In the Option blocks you’ll see Q-image div with img element:
<div class="Q-image">
<img src="https://imageurl.jpg" alt="Img alternate text"> → Replace the image source url text & add alternate text for an image alt)
</div>
3.2.3 Setting custom answer text in Emoji/Text & Image Card Themes
In the Option blocks you’ll see Q-text div:
<div class="Q-text">Here goes your answer text</div> → Replace the answer text
3.2.4 Adding or removing custom answers
To add an answer, simply duplicate the last Option block and change the data-index value to the next number.
(click to enlarge)
To remove an answer, delete one option block and remove the corresponding default option (Multiple choice element) in quiz builder.
When you’re done editing your question in the Custom HTML, click Yes, Save, and repeat this process for the rest of your quiz questions.
💡 NOTE: While editing Custom HTML do not delete class names, quotes, or angle brackets. If something breaks, revert to the cloned template and copy again.
4. How to set default Multiple Choice quiz question element
Custom question (inside Custom HTML) is the “visual layer,” but scoring and categories live in the default Multiple Choice element.
‼️ IMPORTANT: ConvertQuiz maps clicks from custom answers to the corresponding default options. That’s how segmentation and redirecting work.
This is why the number and the order of custom answers must match the number and the order of default options:
Option block data-index="1" → default Option 1,
Option block data-index="2" → default Option 2,
Option block data-index="3" → default Option 3, etc.
4.1 Set the number of default options
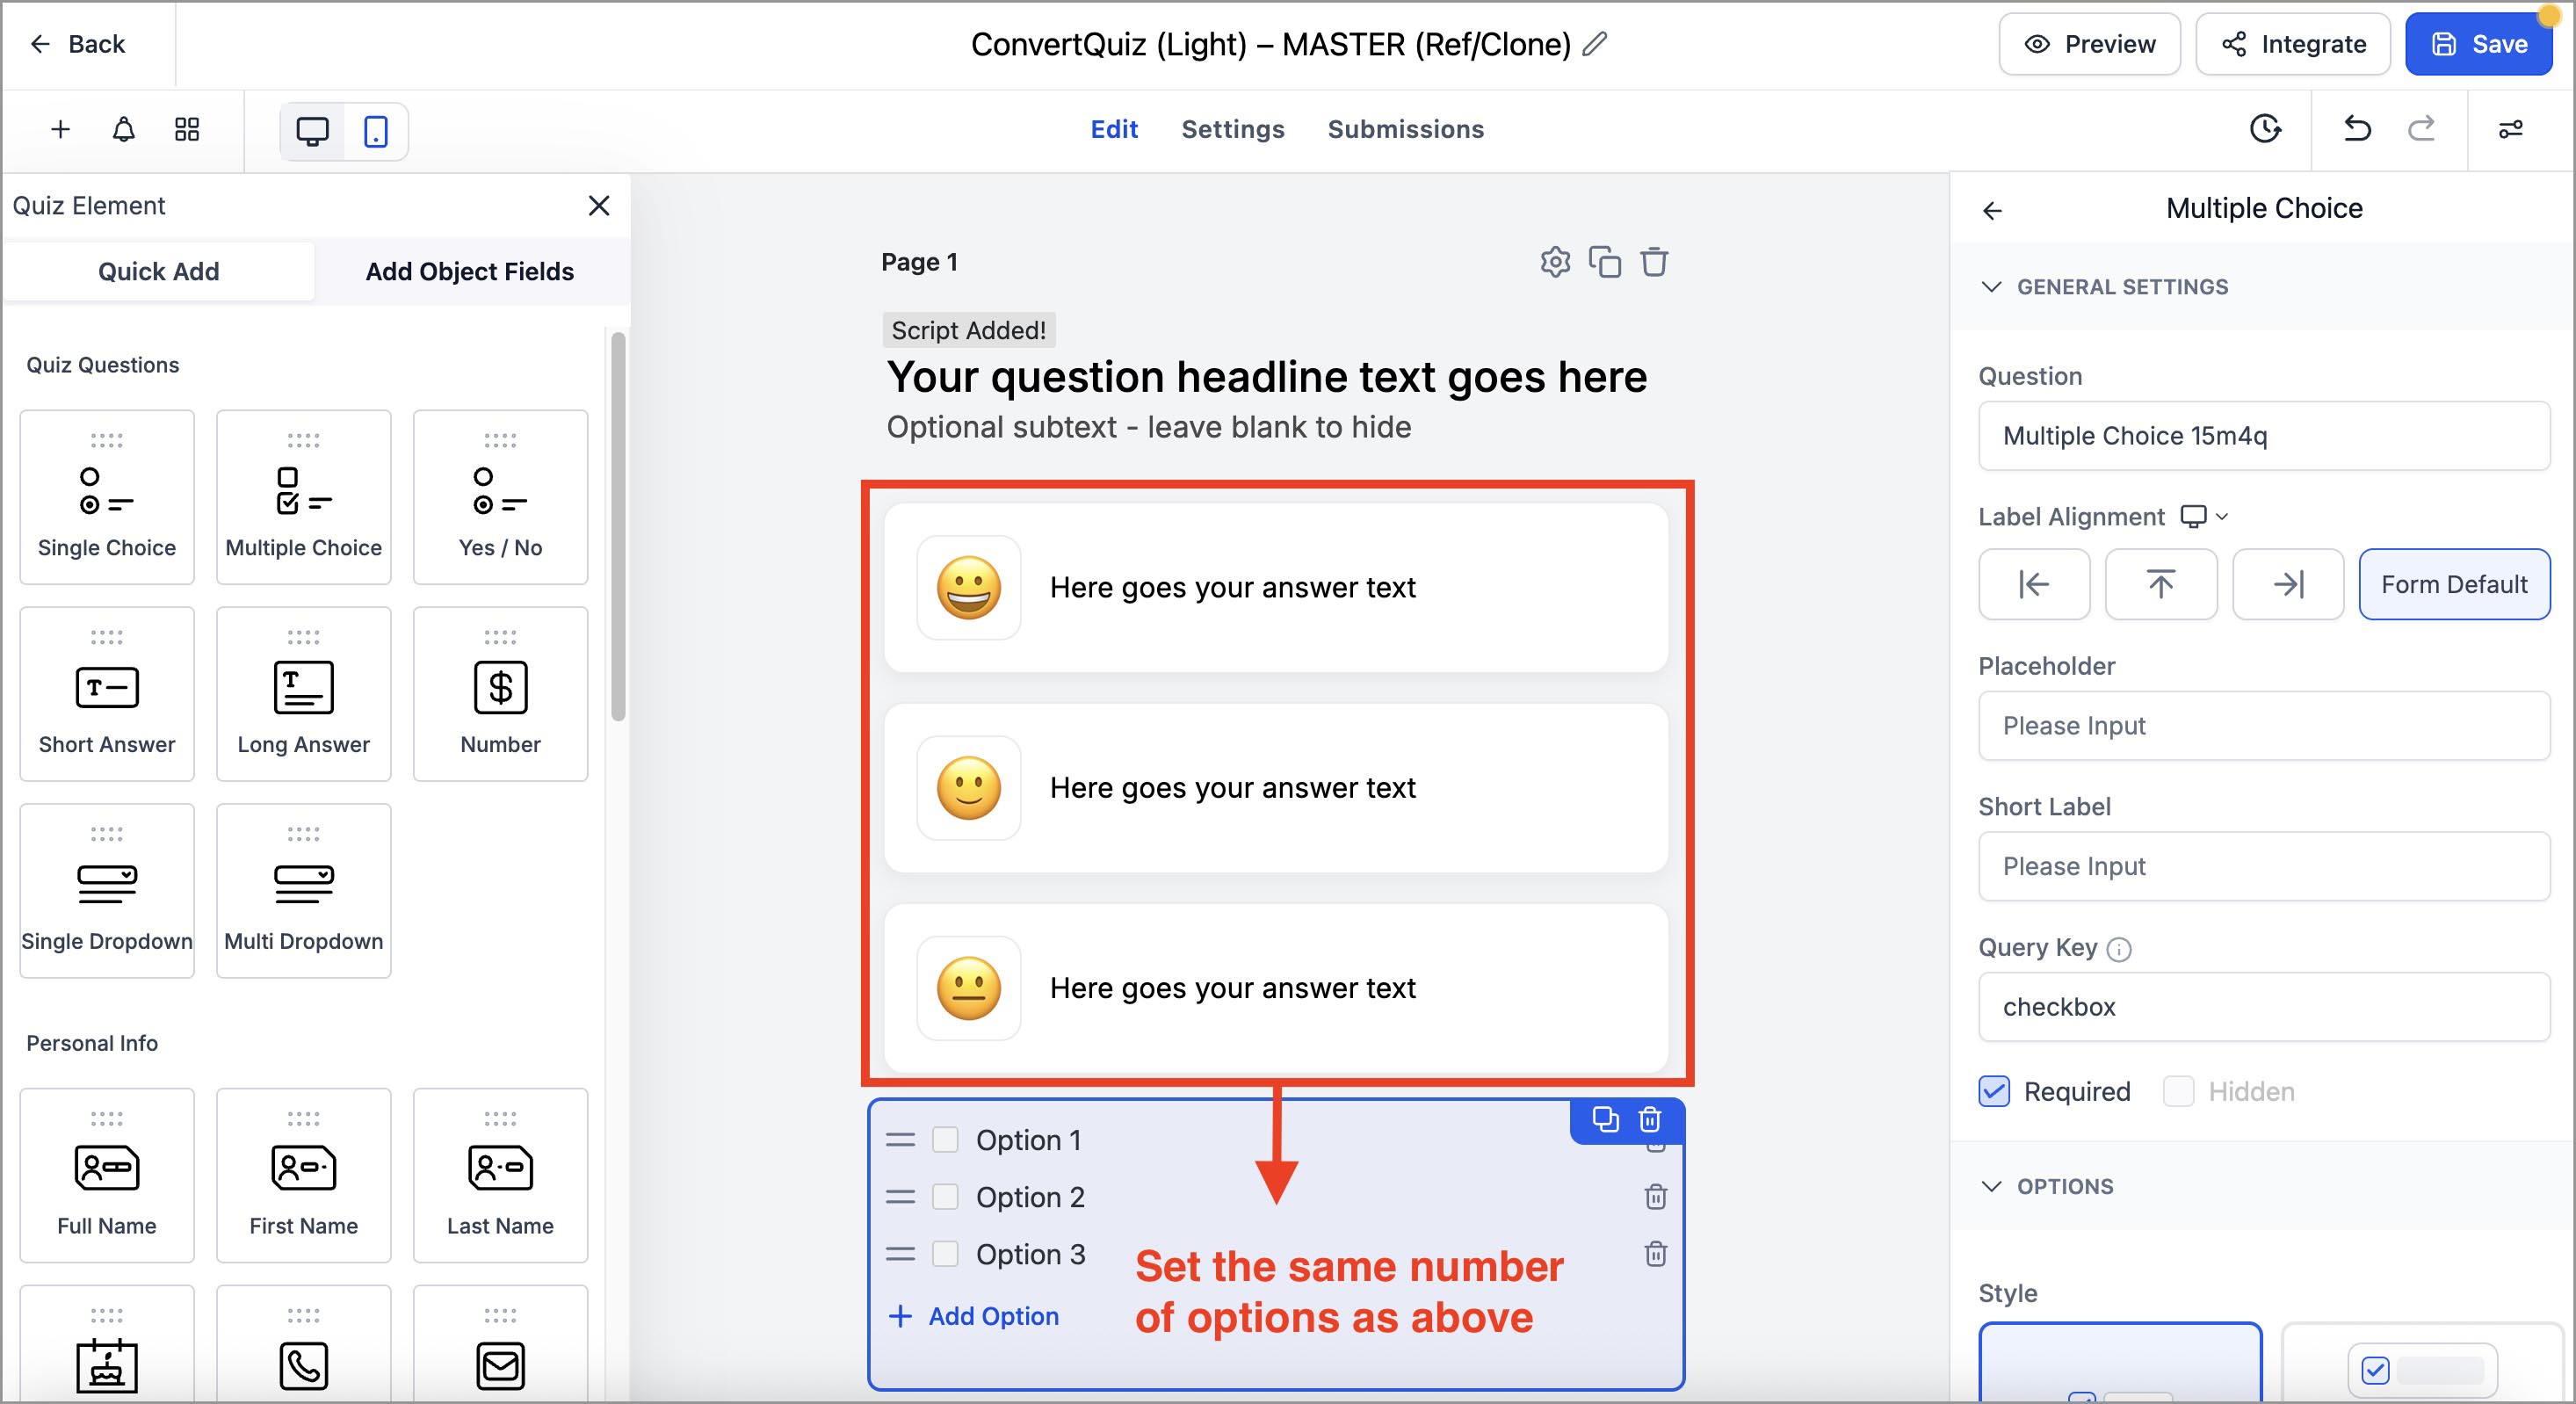
Select the Multiple Choice element (it’s directly below the Custom HTML block).
Use + Add Option to add answers, or the trash icon to remove them, until the count matches your custom answers.
(click to enlarge)
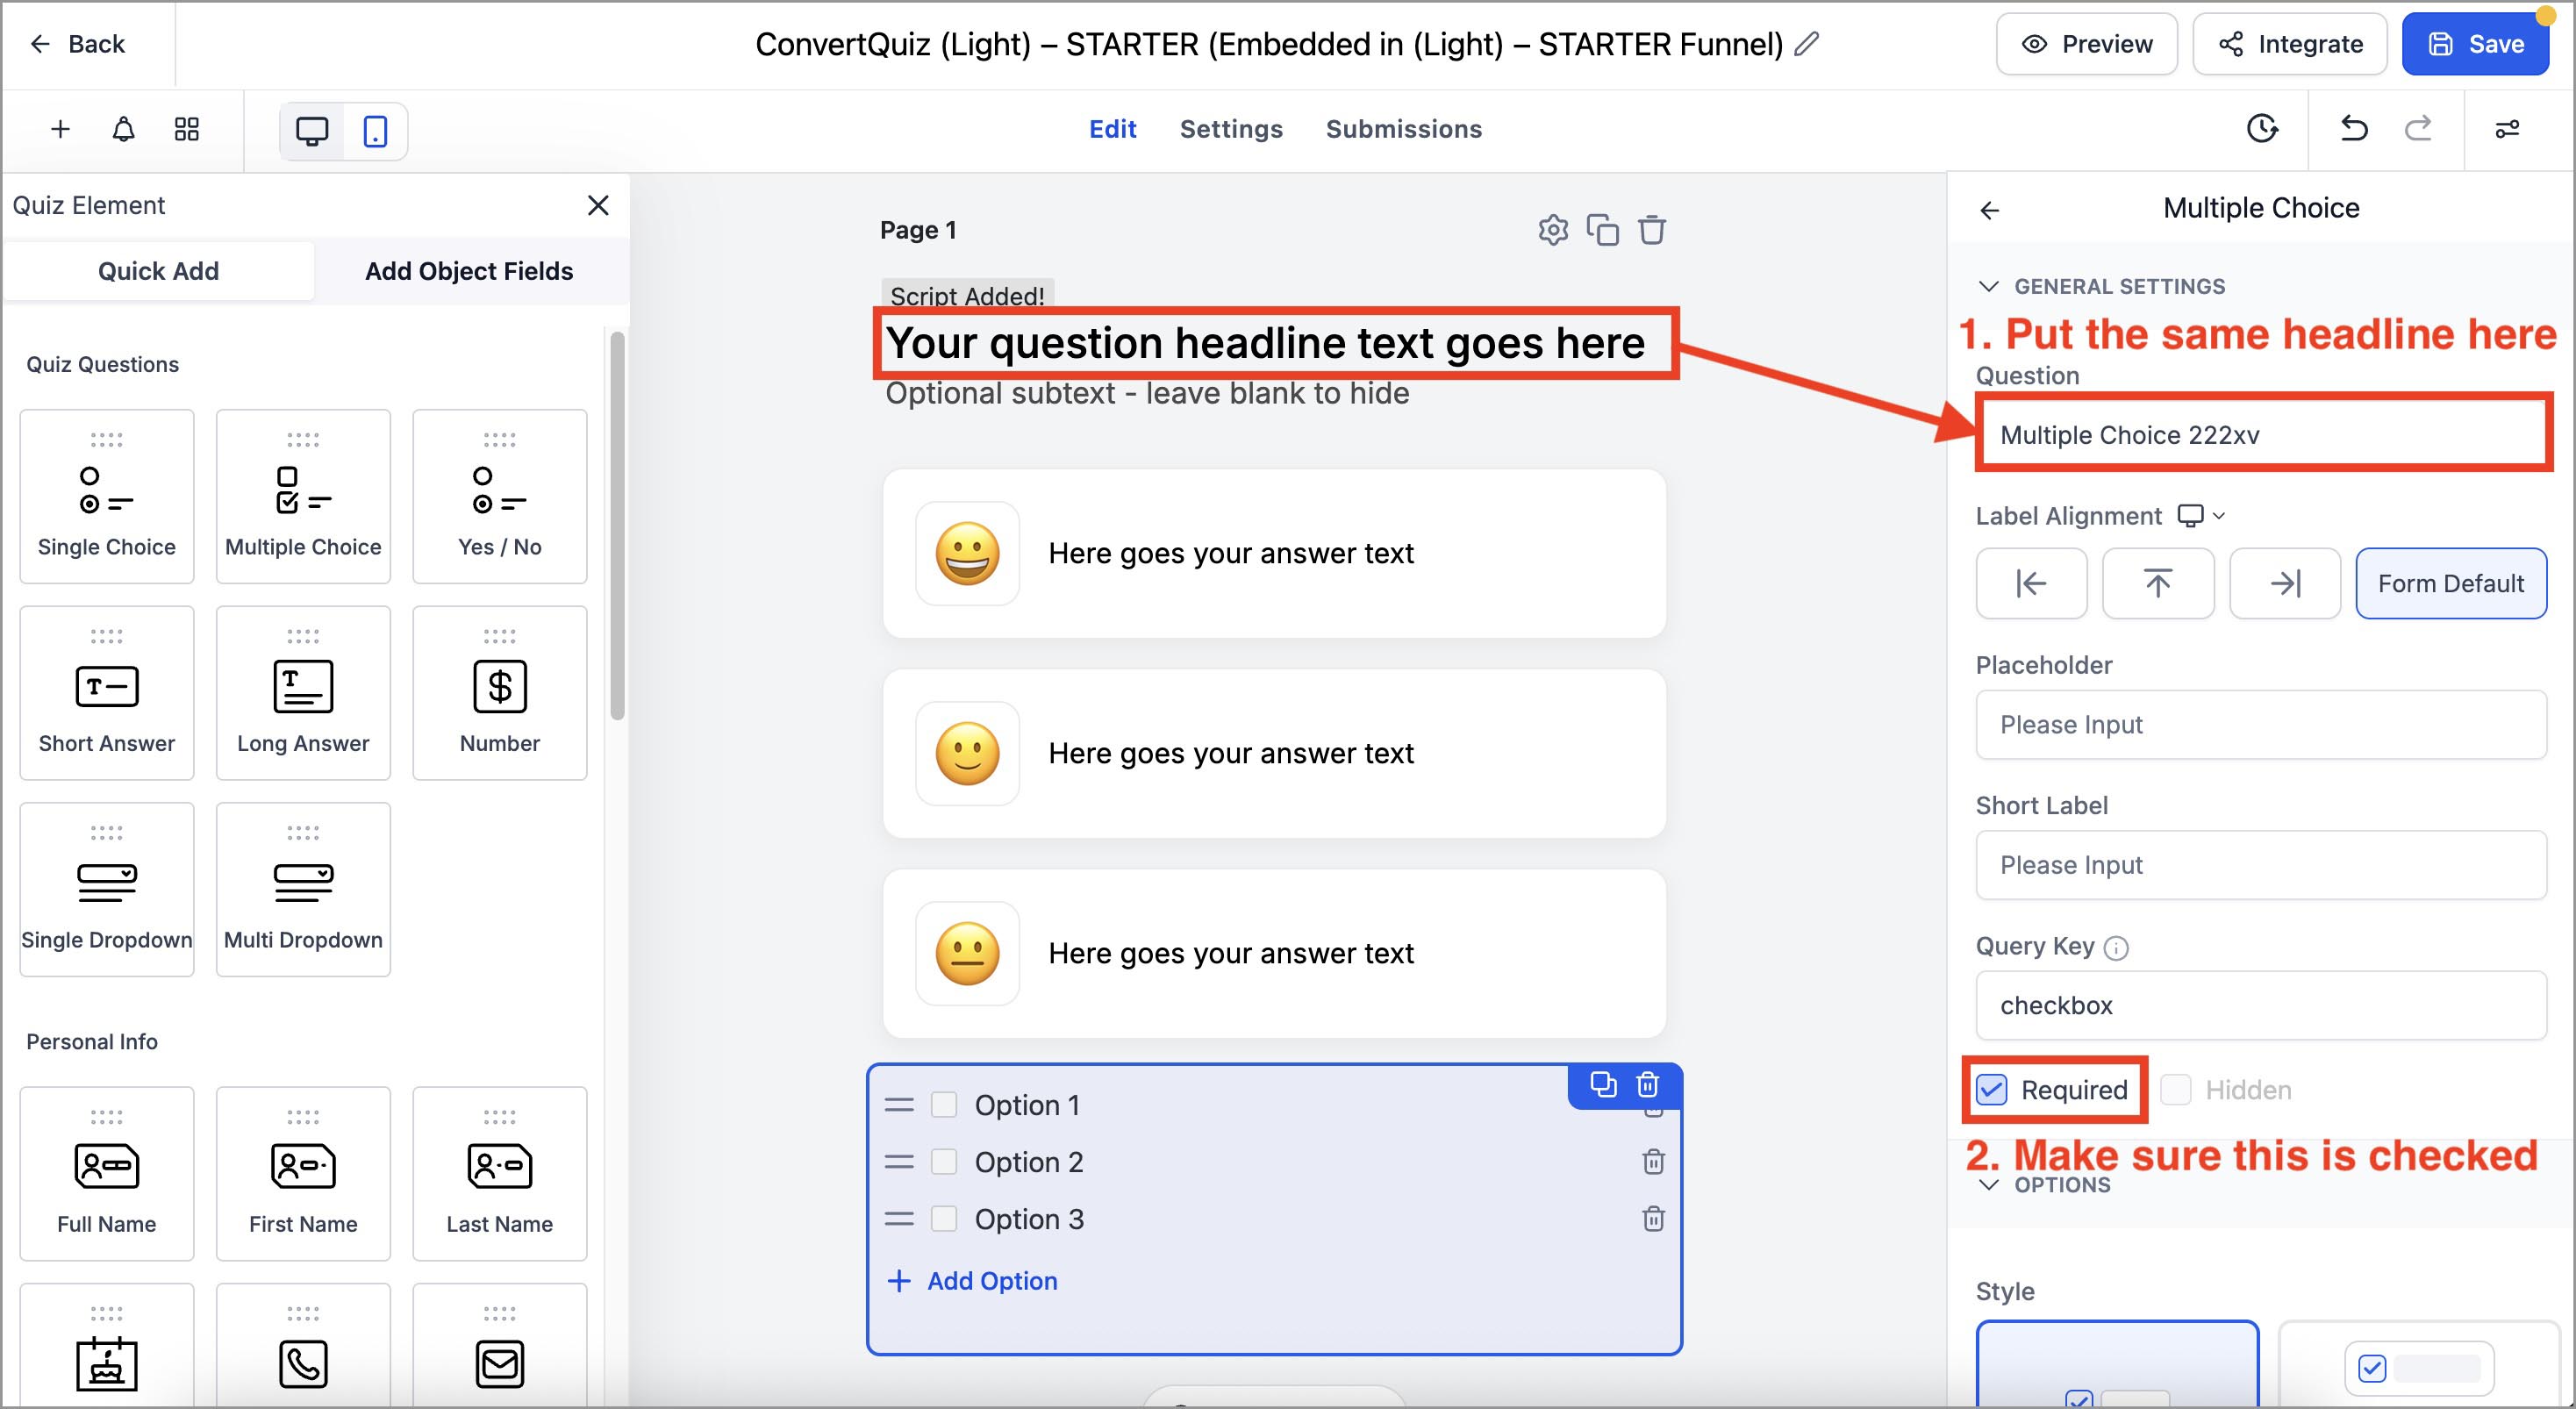
4.2 Set question headline in the default Multiple choice element
In the Multiple Choice right sidebar, set the Question text to match the headline you set in the Custom HTML.
Make sure that the Required checkbox is checked.
(click to enlarge)
4.3 How ConvertQuiz segmentation and redirection work
Before assigning categories and scores, here’s the logic ConvertQuiz uses to segment users into different categories and send them to pages based on their category.
Segmentation (scores + categories)
How it works:
(you already set) In the Result Template → Category Score set the Show Score = ON & Score Format = Actual Score
(click to enlarge)
In the default Multiple choice options, you assign Category and Score to each answer (next chapter below)
When the quiz is submitted, ConvertQuiz reads the score for each category, determines the winner and assigns the user to the winning category.
Tie-breaker: if there is a tie, the one higher in the category list wins.
‼️ IMPORTANT: Any answer that should count toward a category must have at least 1 point for that category.
Redirection (based on the winning category)
How it works:
After the winning category is determined, ConvertQuiz redirects the user to the page for that category. You have two redirection methods:
1. Same-domain redirect (UTMs preserved)
Use this method when your quiz and category pages are on the same domain.
The quiz must be embedded on a page that shares the same domain name as your category result pages.
Example:
Quiz page → specificdomain.com/quiz
Category pages →
specificdomain.com/category-a
specificdomain.com/category-b
specificdomain.com/category-c
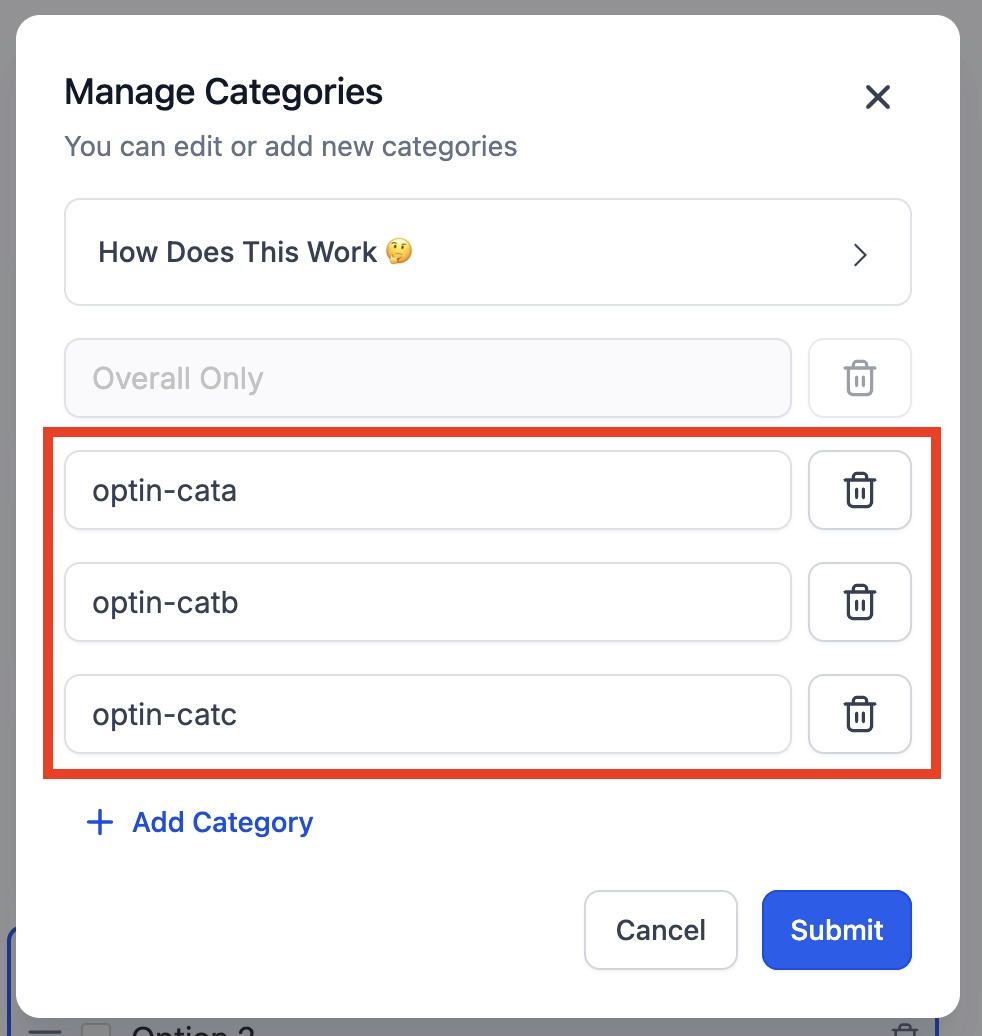
Category names = category page paths
Example:
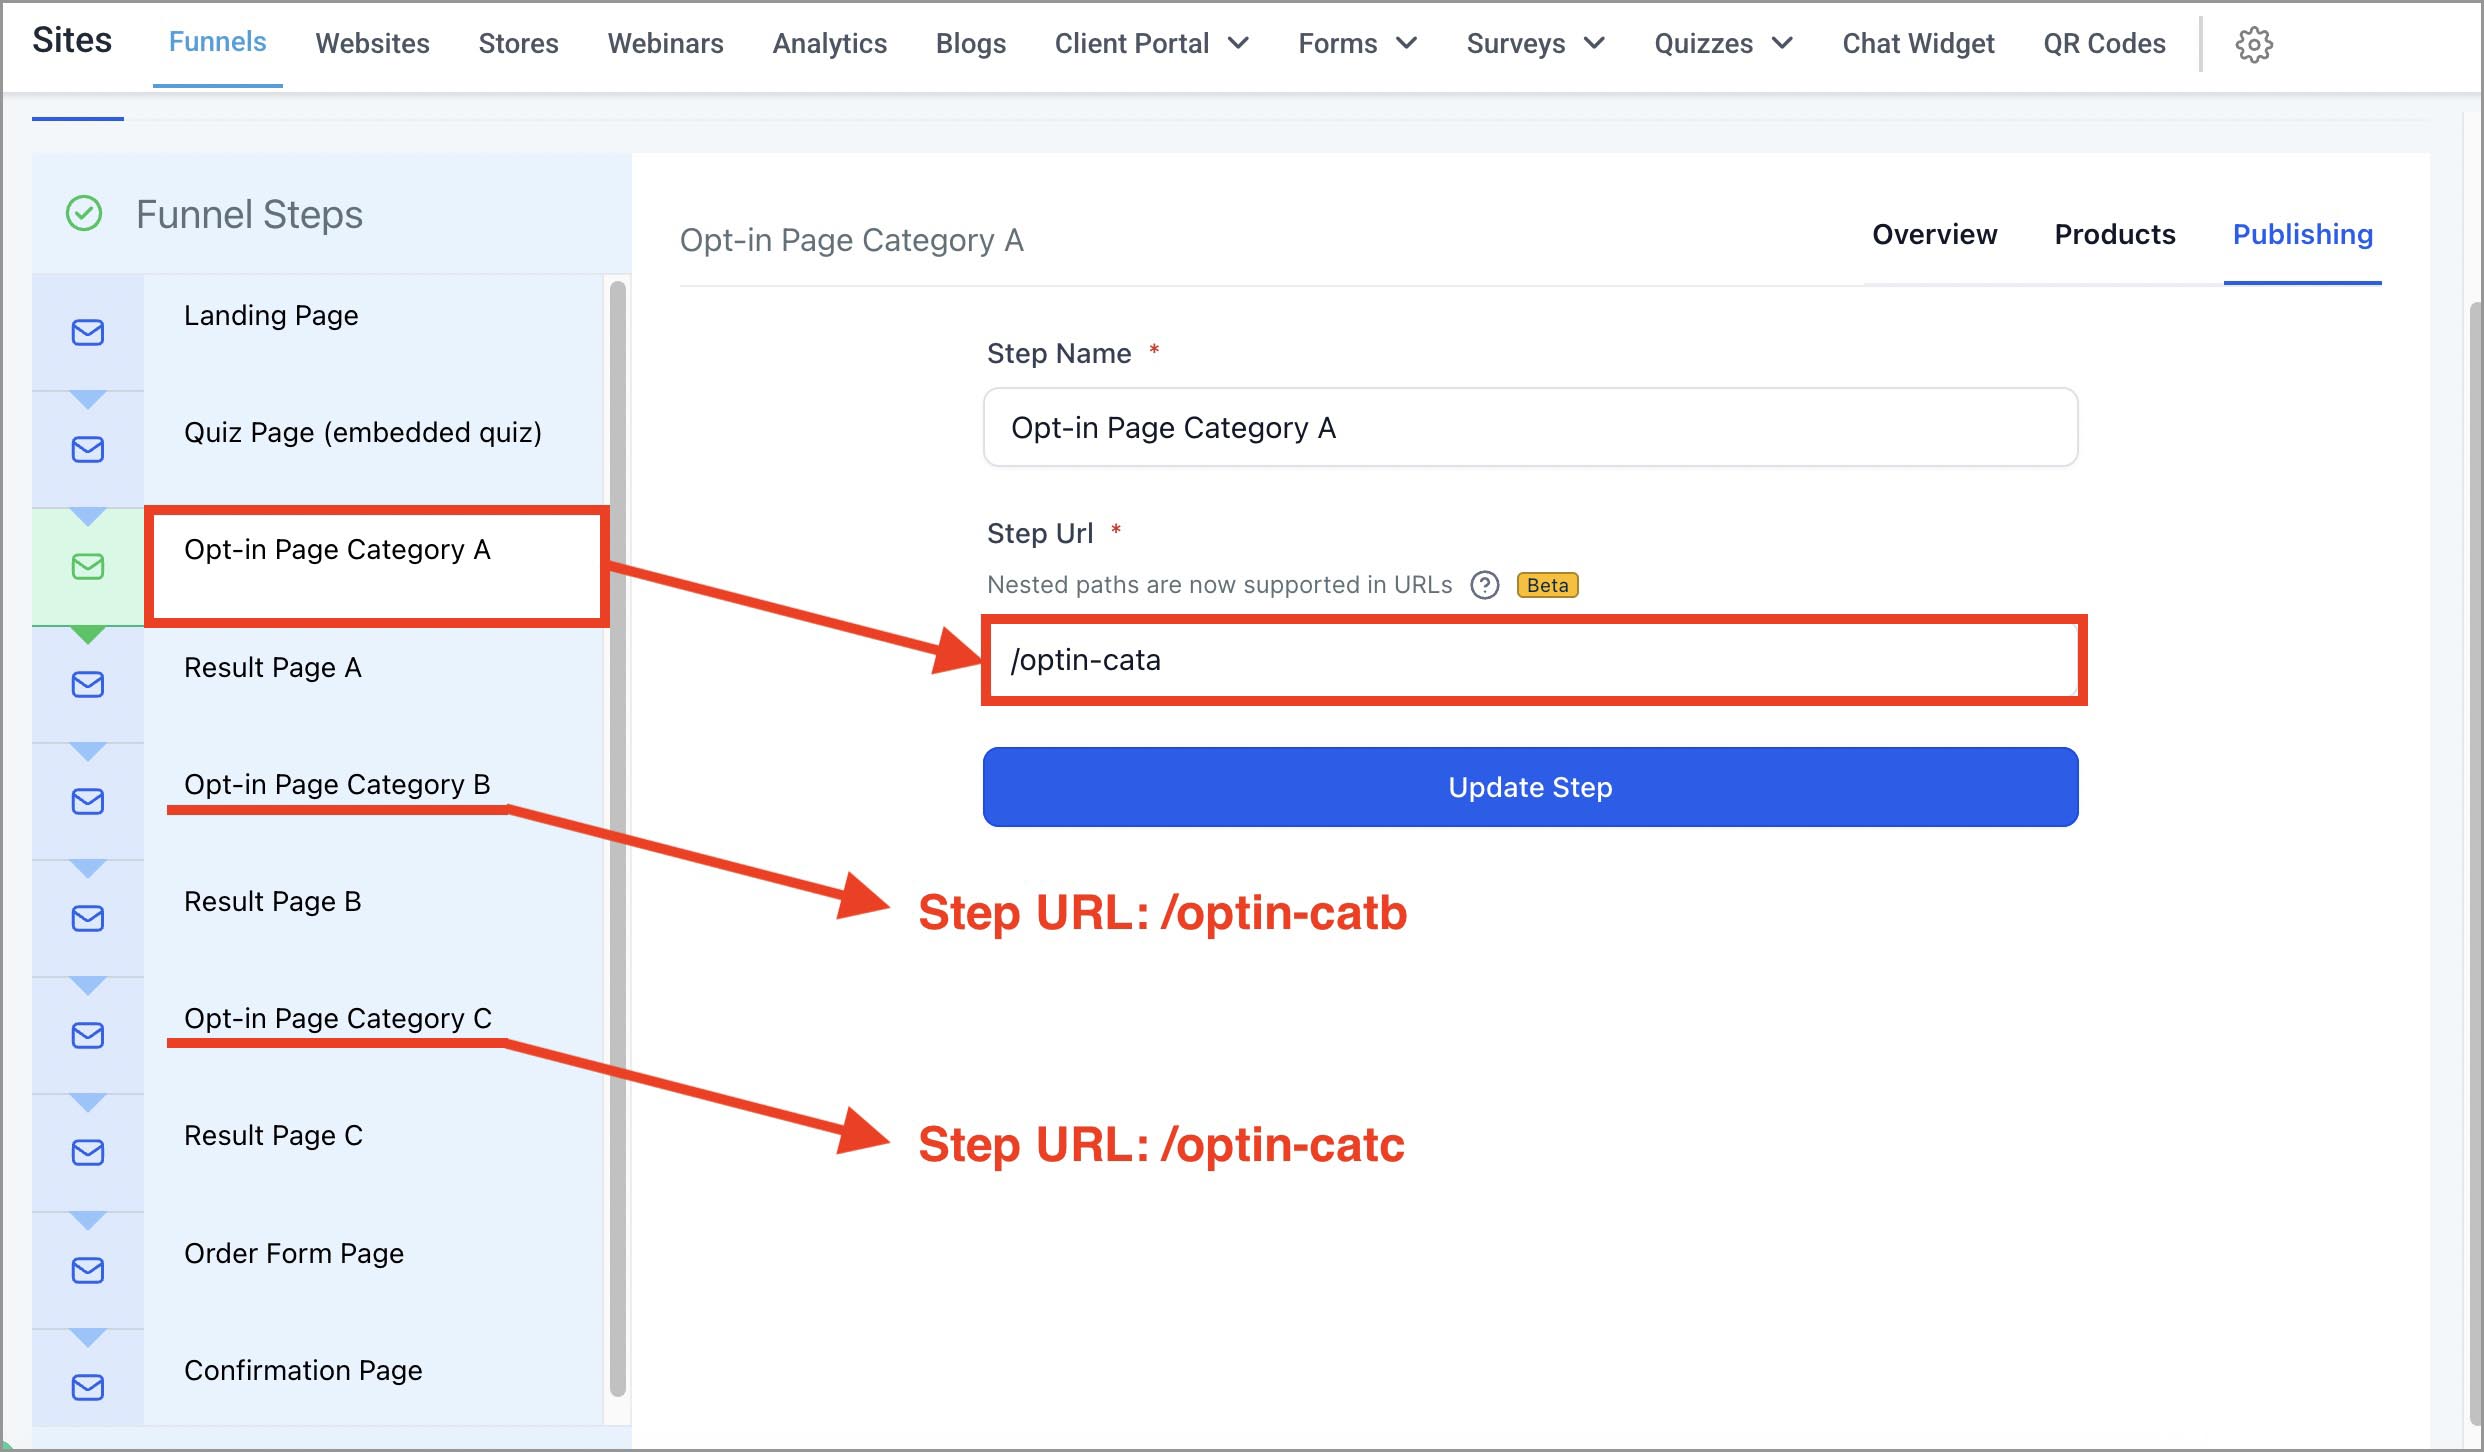
Category names in STARTER template quizzes:
optin-cata
optin-catb
optin-catc
Matching category opt-in page paths in the STARTER template funnel:
/optin-cata
/optin-catb
/optin-catc
(click to enlarge)
ConvertQuiz appends the winning category name to the quiz page’s domain, creating the final URL and preserving any UTM parameters present on the quiz page URL.
💡 NOTE: You can nest paths. If your page is /healthquiz/category-a, set the category name to healthquiz/category-a (no leading slash is fine).
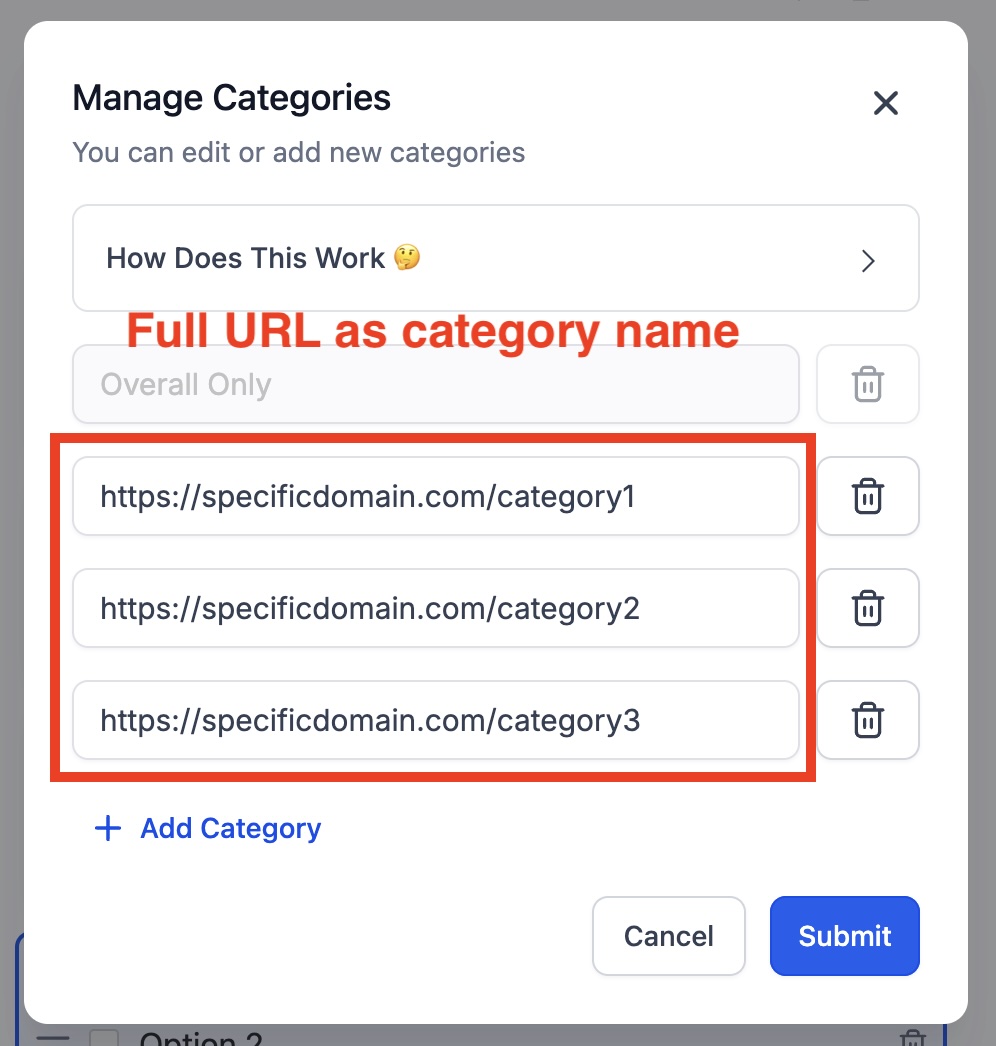
2. External-domain redirect
Use a full URL as the category name, e.g.
https://othersite/categorypage-a?utm_source=quiz
If you type http:// ConvertQuiz automatically upgrades it to https://
UTMs are not auto-carried in this method. Include any UTMs in the URL itself.
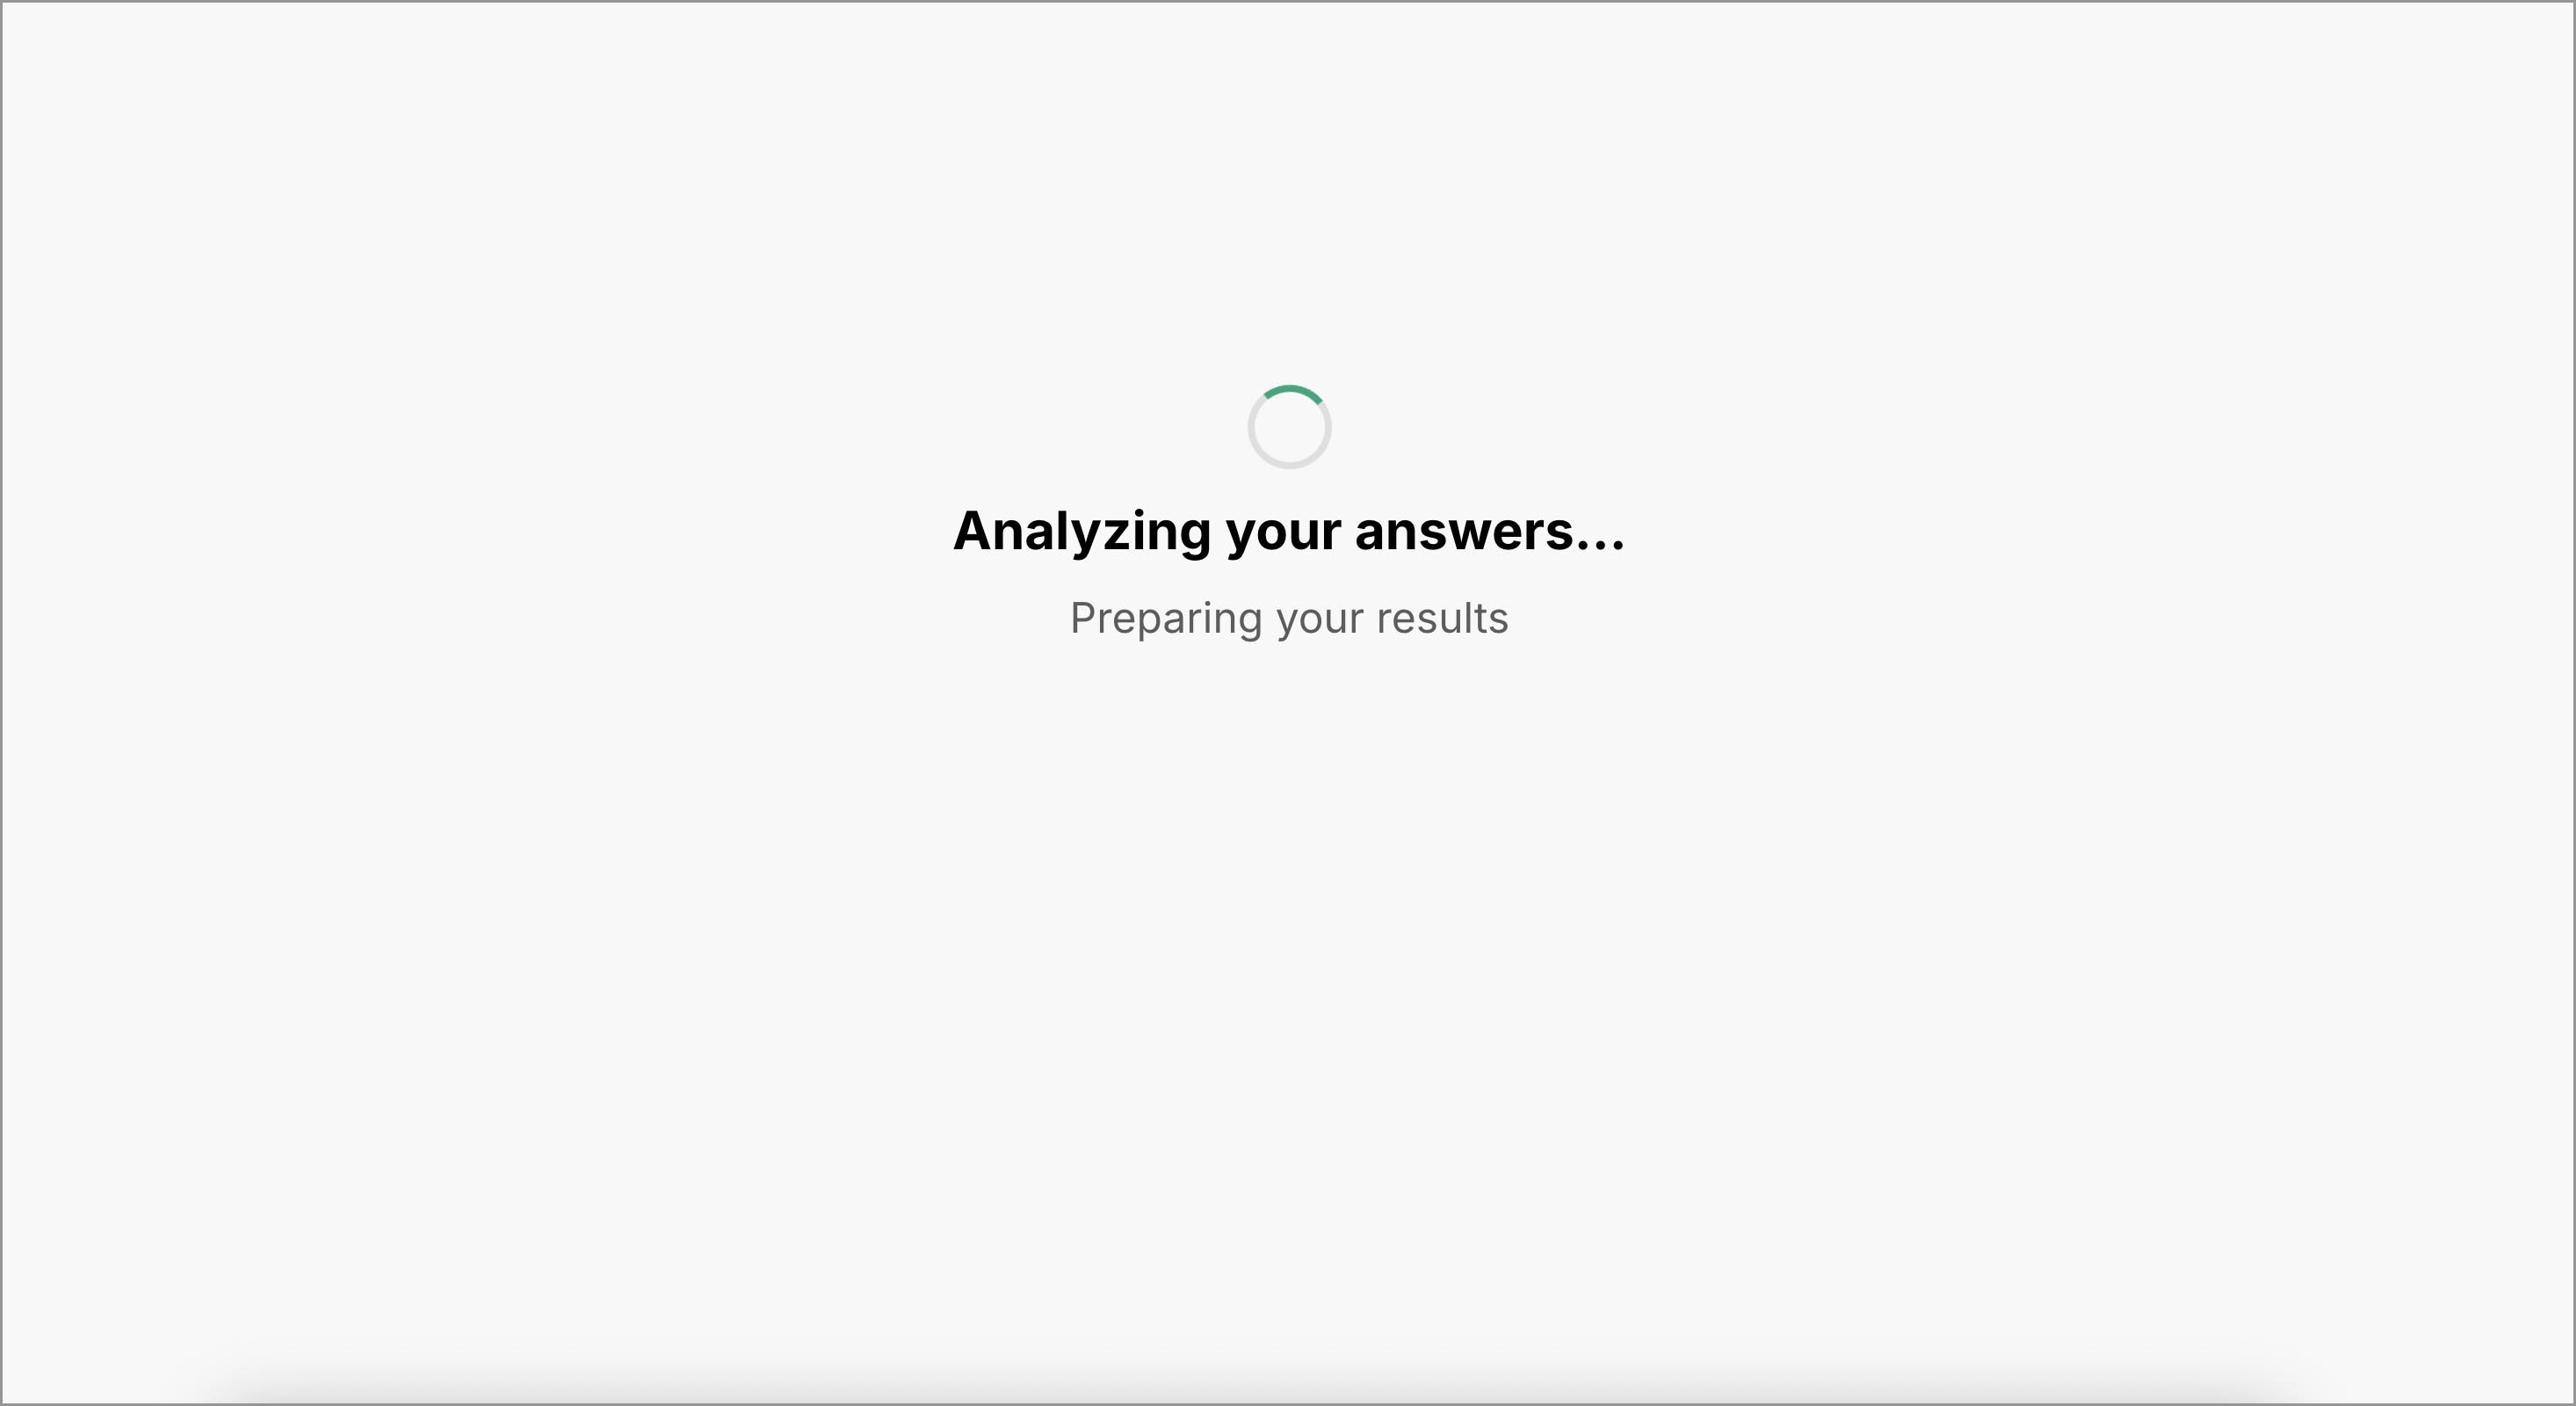
Redirect overlay (what users see)
On submit, users don’t see the default Result Page. Instead, they’ll see the Redirect Overlay with your custom title/subtitle and a spinner (duration and text are configurable).
‼️ IMPORTANT: For redirects to work, you must include the ConvertQuiz host loader script on the page where the quiz is embedded. If you use our Starter or Master funnel’s Quiz page, the script is already there—no action needed. If you embed the quiz anywhere else (your own funnel step or website page), follow the: "How to Embed the Quiz On a Page" instructions.
4.4 How to assign categories and scores to each default option
Please read chapter 4.3 "How ConvertQuiz segmentation and redirection work" first, before assigning categories and scores.
1. Select the Multiple Choice element (below the Custom HTML block).
2. In the right sidebar, scroll down to Options settings and set:
Category (path for same-domain, or full URL for external),
Score (points for that category).
(click to enlarge)
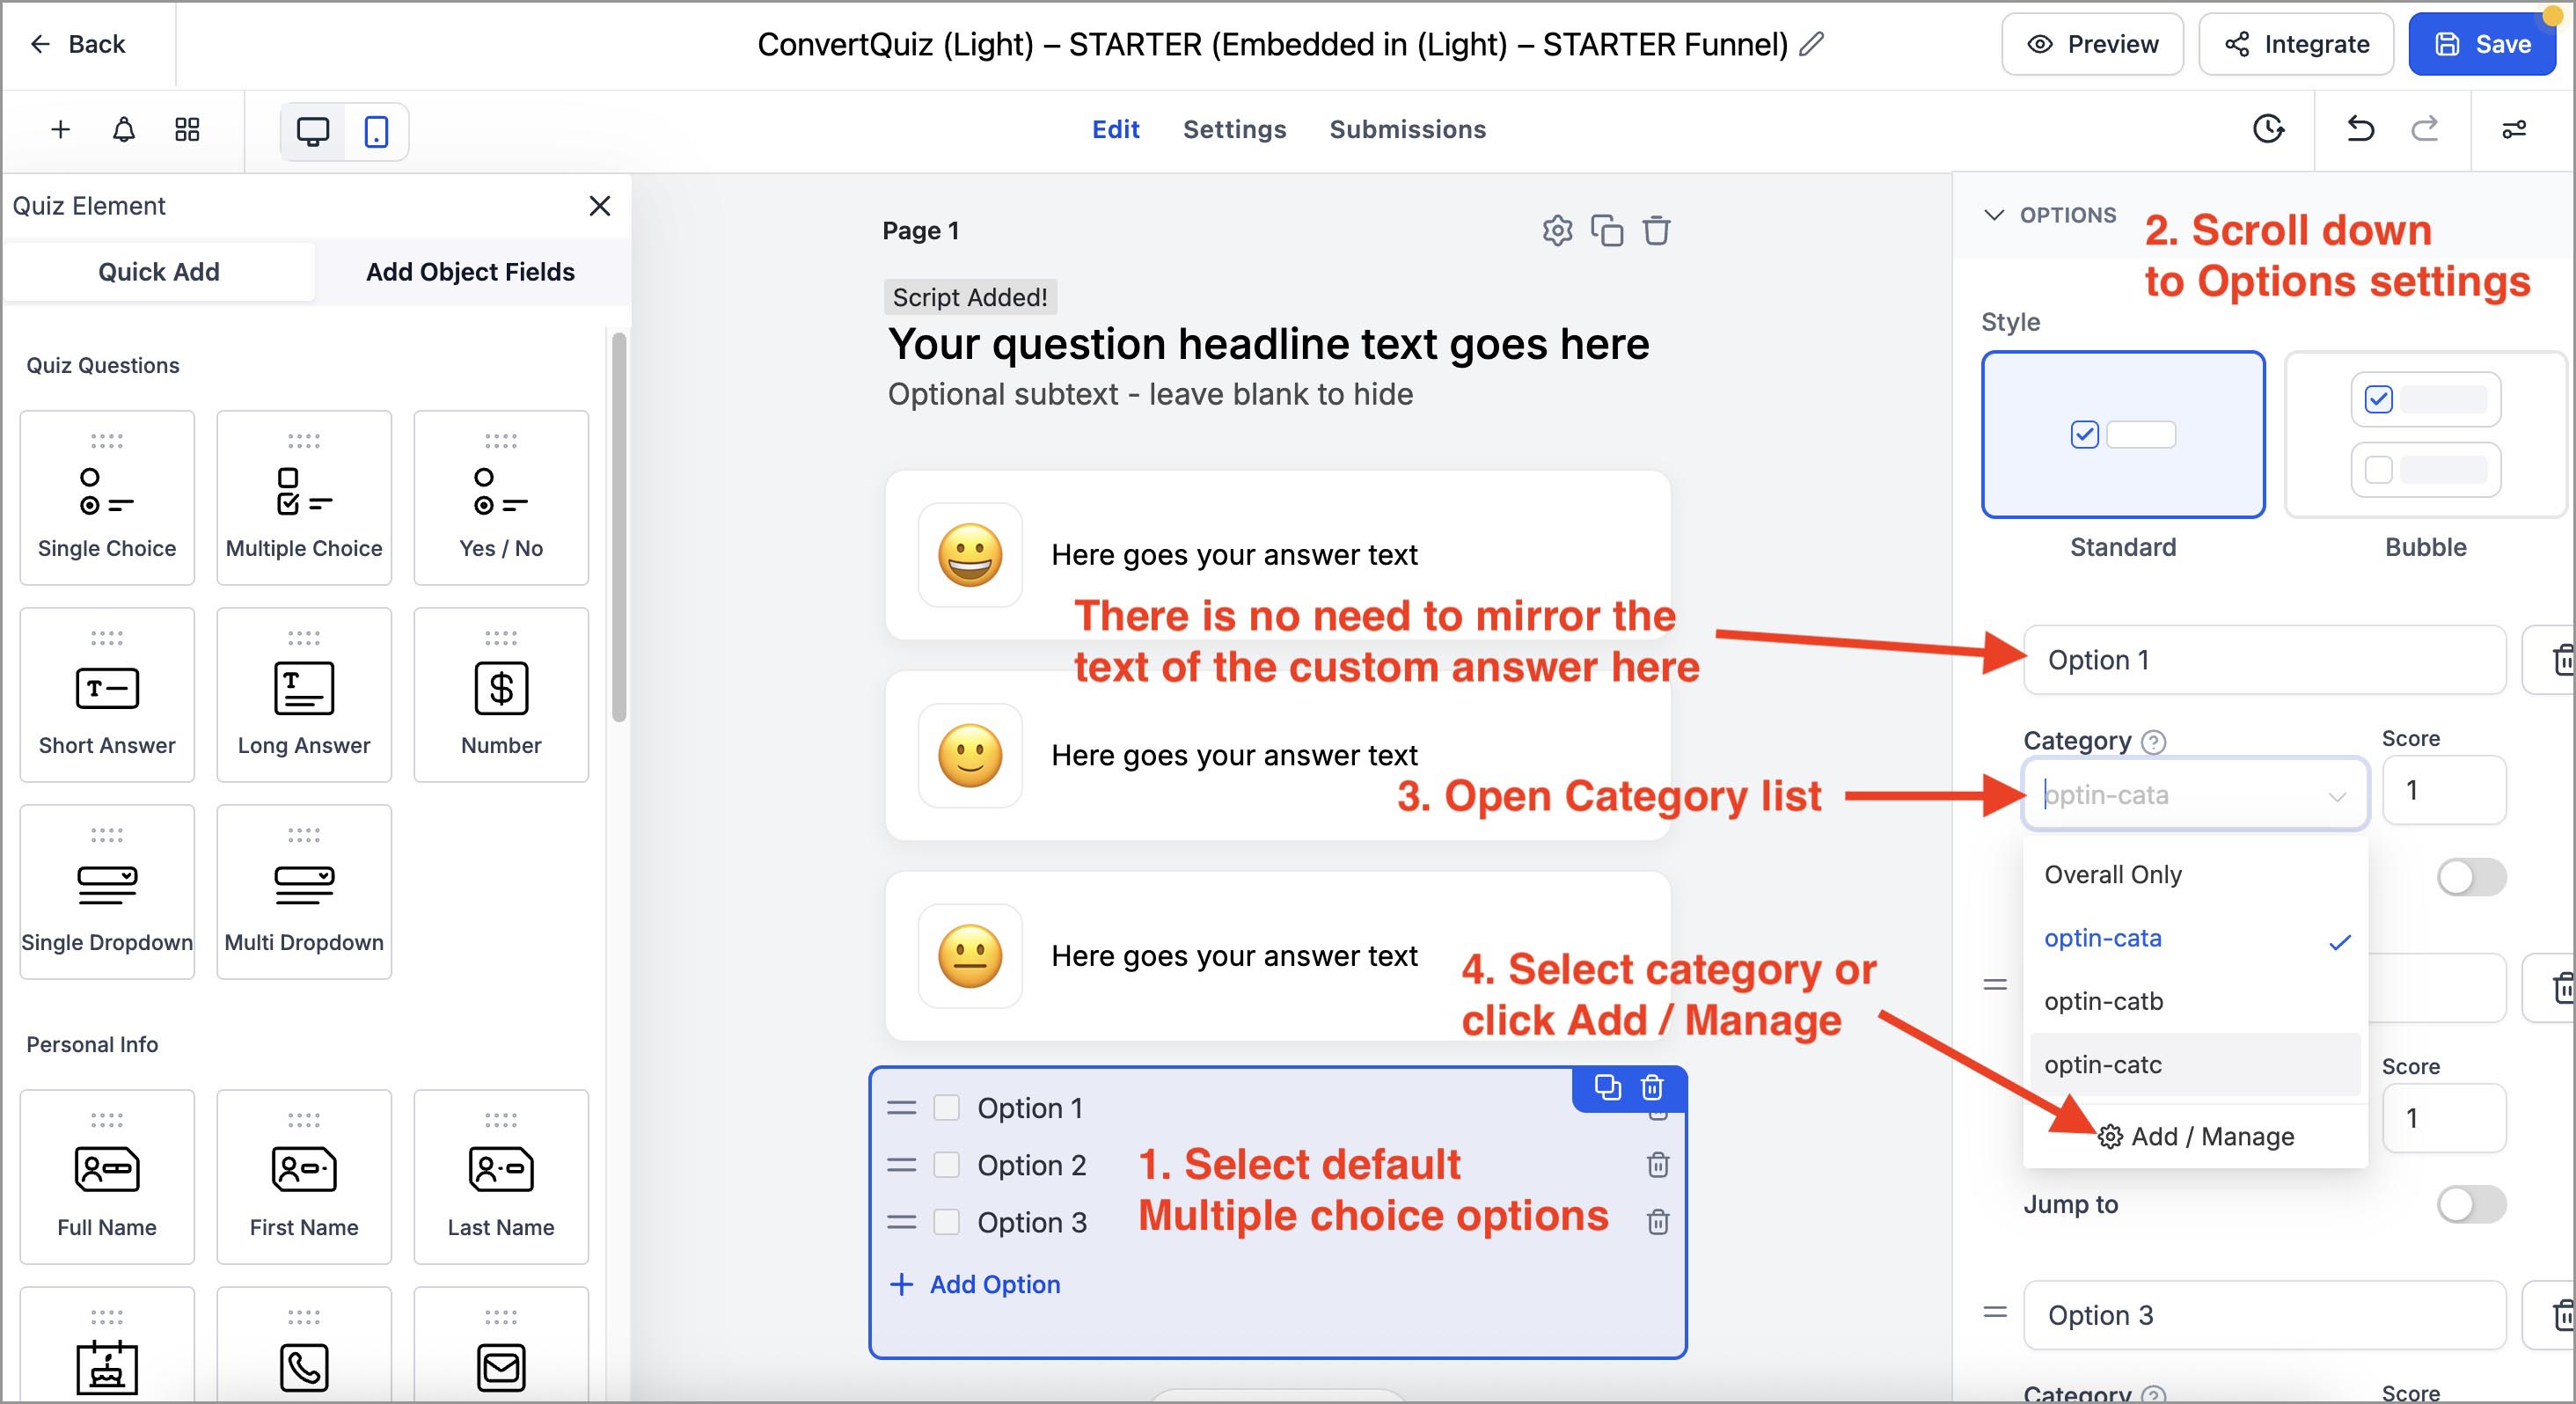
💡 NOTE: No need to duplicate answer text: The visible text comes from your Custom HTML. In the default option, focus on Category and Score. Just keep the position aligned:
(custom answer data-index → default option position + category & score)
4.4.1 How to Add / Manage categories?
In the Category dropdown, click Add / Manage.
Create or edit category names to match your chosen redirect method (see 4.3).
Using STARTER templates? You can keep the defaults (optin-cata, optin-catb, optin-catc). Only change them if you rename paths or pages—then update the names here to match.
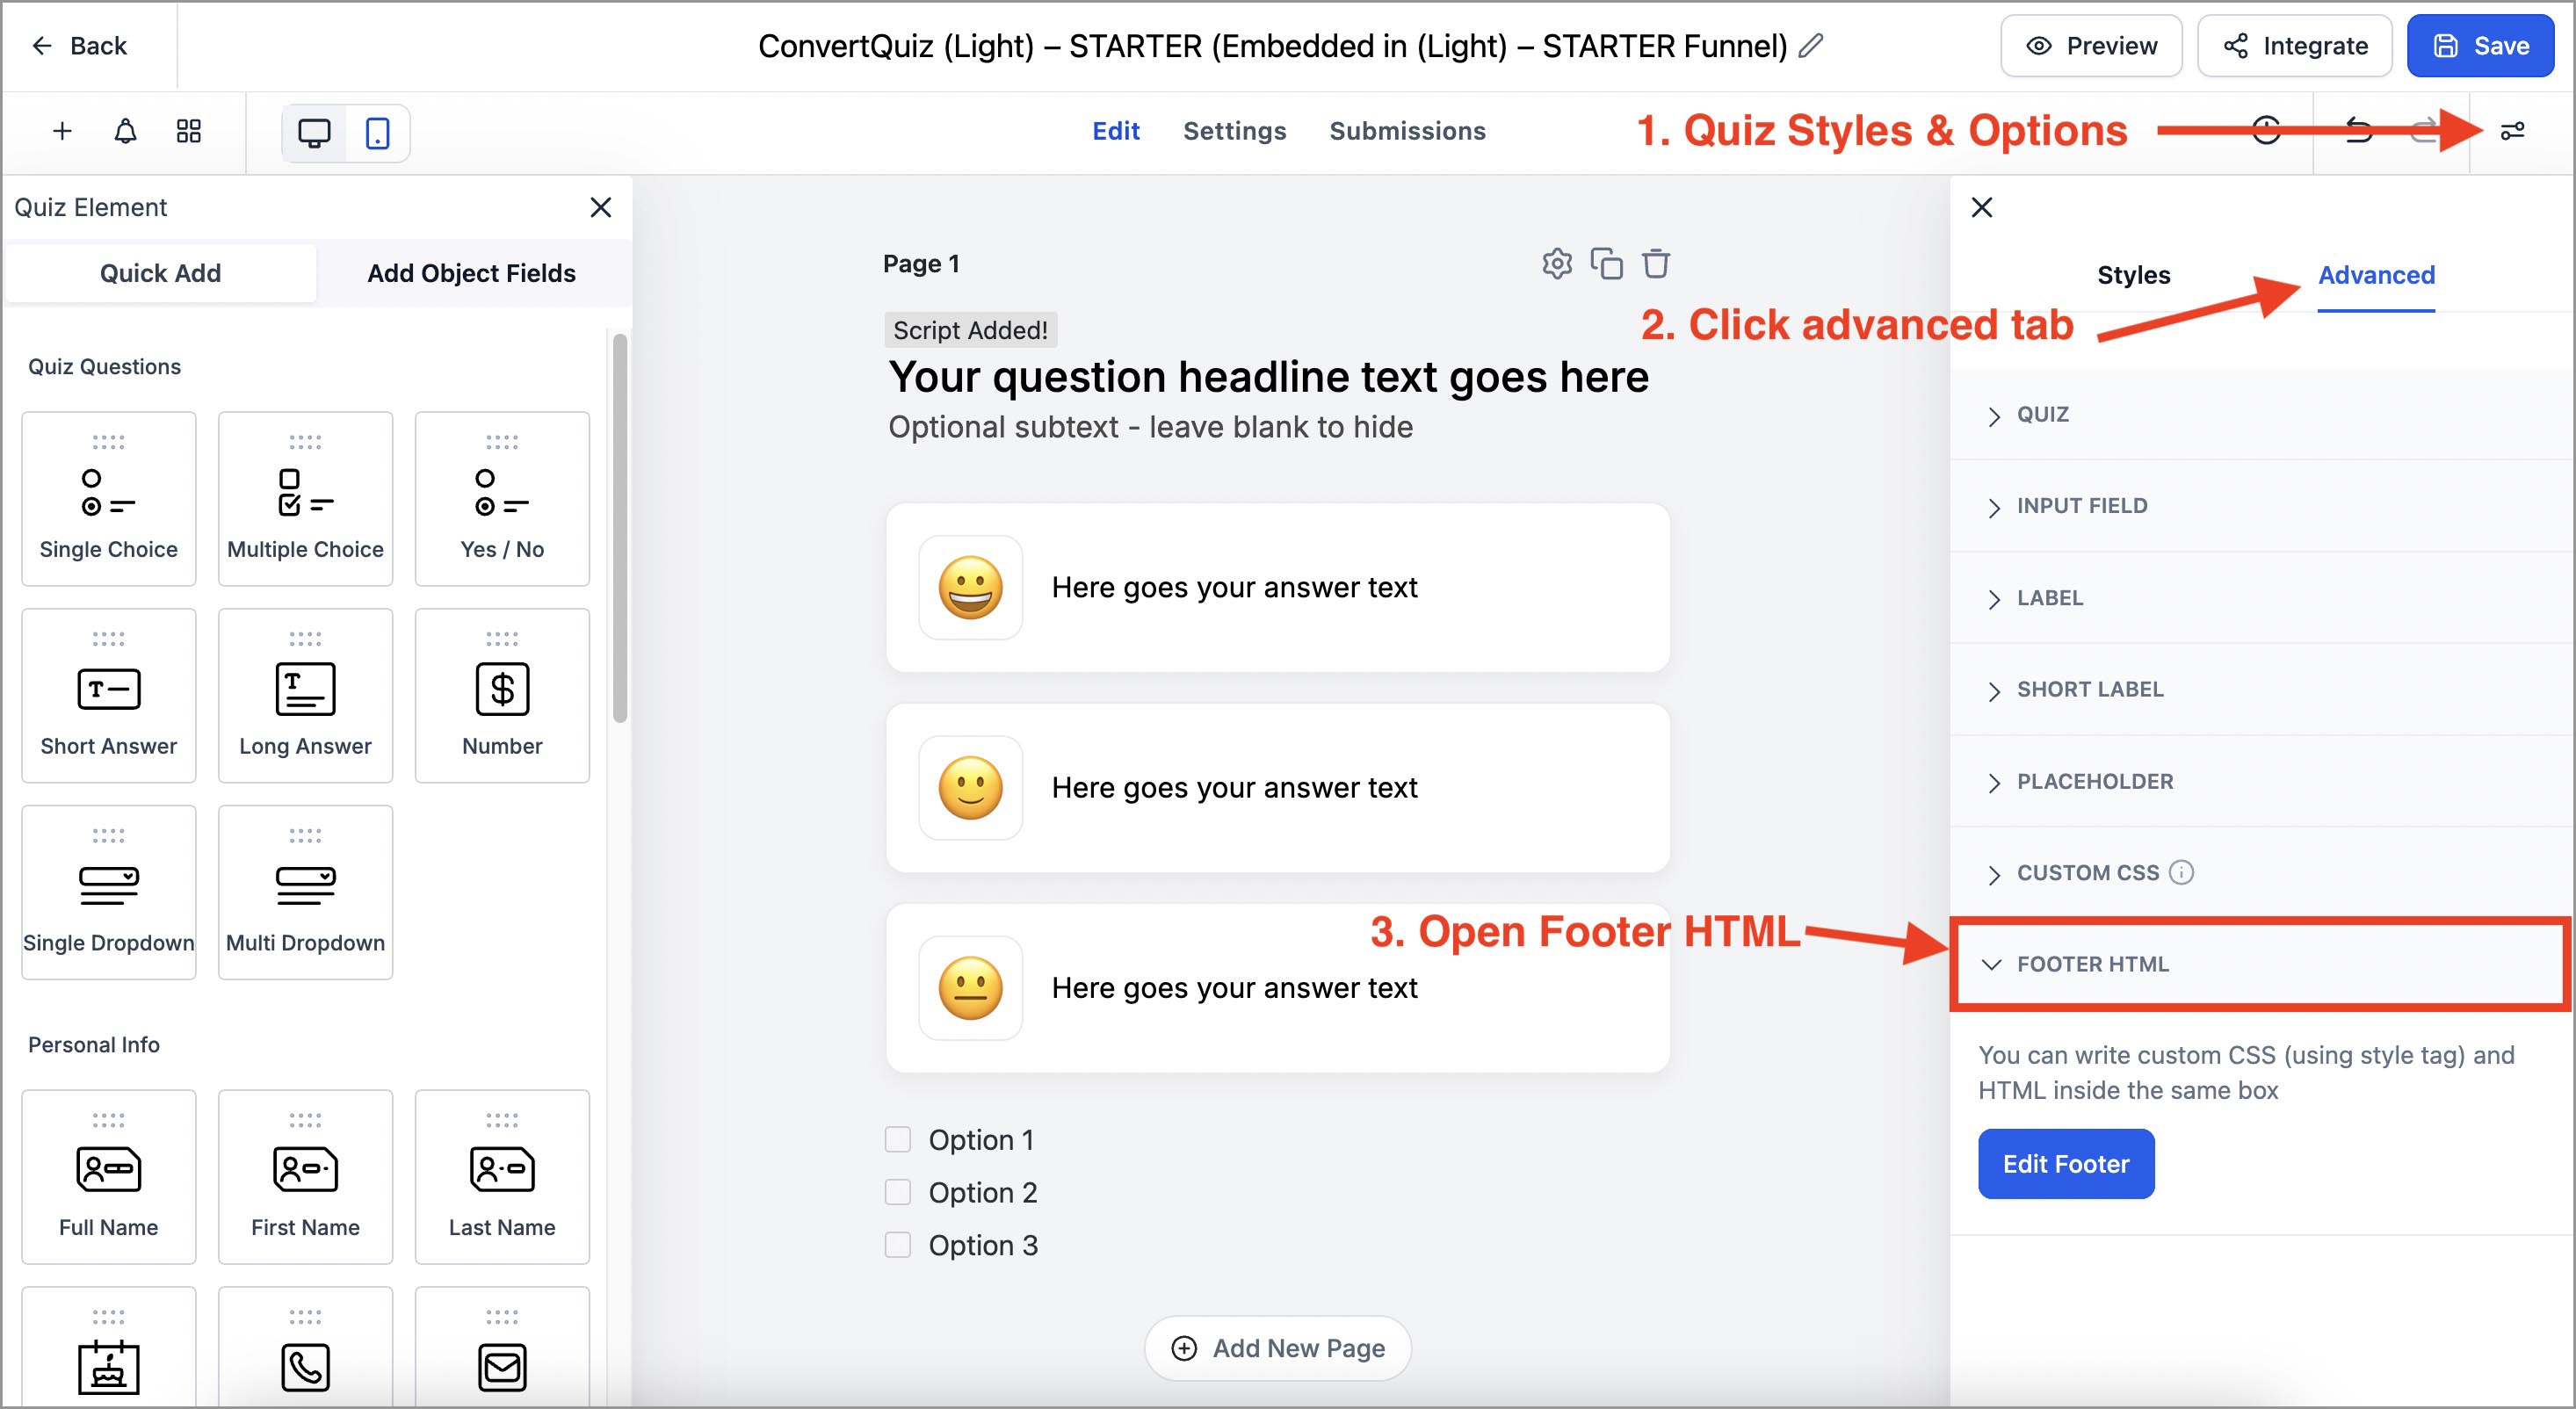
How to Configure ConvertQuiz Functions
You’ll control ConvertQuiz behavior (redirects, overlay text, progress bar, multiple choice helper/button, hints, warning banners) from a single configuration window inside the quiz.
Without selecting anything in the quiz builder click Styles & Options (top bar) → Advanced tab → Footer HTML
(click to enlarge)
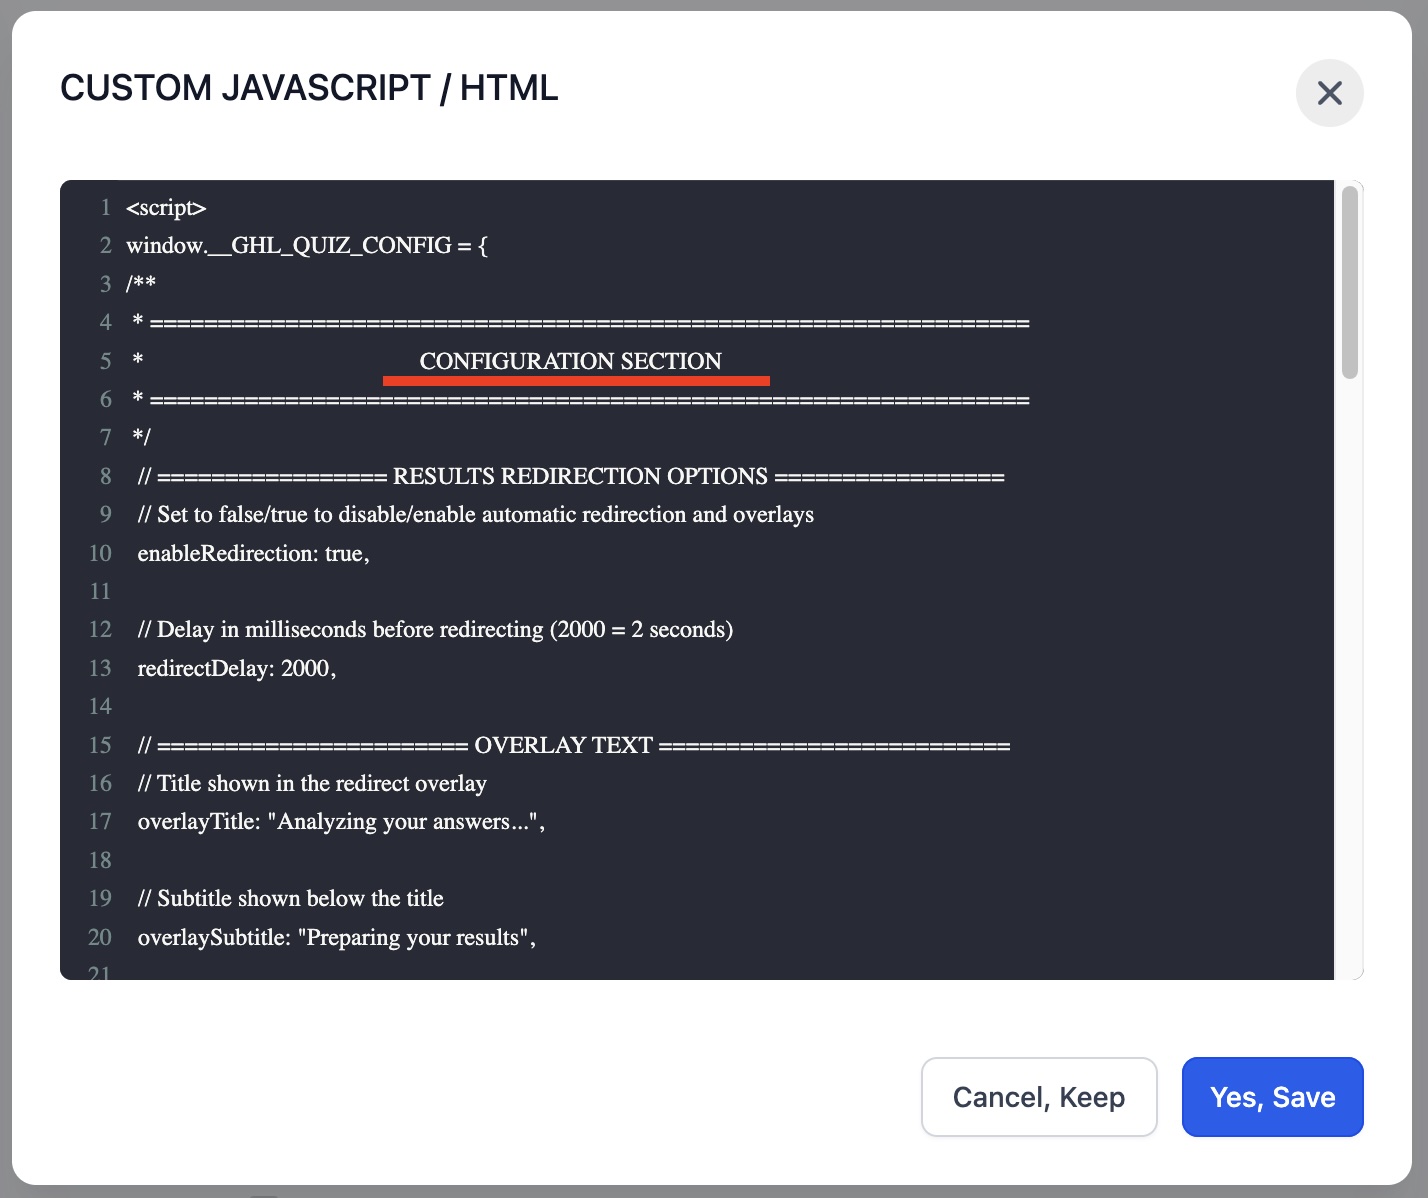
You’ll see a window with clearly marked CONFIGURATION SECTION at the top of that footer file.
(click to enlarge)
1. Important Footer HTML editing rules (Read first)
Custom question (inside Custom HTML) is the “visual layer,” but scoring and categories live in the default Multiple Choice element.
Only edit inside the CONFIGURATION SECTION
Below the line !!!! DO NOT MODIFY ANY CODE BELOW THIS LINE !!!! is the core engine. Don’t touch it — changes may break ConvertQuiz and prevent future updates.Do not remove punctuation. Keep quotes "…", single quotes '…', commas ,, colons :, and braces { }. Removing any of these can break functionality.
If something breaks: copy this entire script from a MASTER quiz template (Ref/Clone) and paste it back.
Translations are allowed: You may translate any visible text here (overlay, banner messages, button label) to your users’ language.
2. How to configure redirection behaviour
In the Footer HTML, scroll to the section:
// ================= RESULTS REDIRECTION OPTIONS =================
Enable/disable automatic redirection and the overlay
enableRedirection: true, → redirect based on winning category
enableRedirection: false, → show the default result page
Delay before redirect (overlay display time)
Milliseconds (1000 = 1s). For ~2 seconds:
redirectDelay: 2000 → overlay shows ~2 seconds
3. How to configure redirection overlay
Scroll to:
// ======================= OVERLAY TEXT ==========================
overlayTitle: "Analyzing your answers...", → edit title text
overlaySubtitle: "Preparing your results", → edit subtitle text
NOTE: Translate freely; keep quotes and punctuation.
4. How to configure quiz progress barr
Scroll to:
// ==================== PROGRESS BAR OPTIONS =====================
Show/hide progress bar
enableProgressBar: true, → show
enableProgressBar: false, → hide
Show current position and total questions (e.g., “1/7”)
showQuestionCount: true, → show
enableProgressBar: false, → hide
Show current position and total questions (e.g., “1/7”)
E.g., "{current}/{total}" → shows 1/7;
questionCountFormat: "{current} of {total}", → shows 1of 7
Show percentage
showPercentage: true, → show
showPercentage: false, → hide
5. How to configure Multiple choice question helper & button text
Scroll to:
// ================ MULTIPLE CHOICE QUESTION OPTIONS ================
Helper line under multi-select questions
multiSelectSubheader: 'Select one or more options, and click Next',→ edit helper text
Next button label
nextButtonText: 'Next', → edit button text
NOTE: Translate freely; keep the quotes. Don’t remove any punctuation.
6. How to translate warning banner messages
Some browsers block embedded iframes (mobile) or block redirects (Brave desktop). These banners tell users how to disable shields/ad-blocking so the quiz works.
Do not switch them off unless you have a very good reason (e.g., a short test). In production, keep them enabled.
Scroll to:
// =================== WARNING BANNERS OPTIONS =====================
Mobile warning banner
showMobileWarning: true, → keep it on
mobileWarningMessage: "<strong>Having trouble seeing...", → translate text
Brave desktop warning (critical for redirects):
showBraveWarning: true, → keep it on
braveWarningMessage: "Make sure that <strong>Brave...”, → translate text
bravePointingText: "Click there 👇" → translate text
How to Test Your Quiz
1. After configuration Save the quiz
If you see an Alert! banner (“Third-party scripts inside the HTML block…”), check Don't show again and click Proceed.

2. Open Preview and run a quick pass:
Check basic layout (note: the quiz background is not visible in preview—only the redirect overlay background will show).
Submit a single-choice and a multiple choice question
Confirm the progress bar appears if enabled
Confirm you see the overlay on submit (redirect itself won’t fire in preview).
3. When embedded on a page:
Confirm redirects occur to the correct pages.
If using Brave desktop you should see the banner; turn Brave Shields OFF and retest redirect.
Troubleshooting quick fixes
1. No redirect (after embedding quiz in page):
enableRedirection might be false
Custom Option block data-index values may not match the default option order
Categories/points may be misconfigured
Browser is blocking redirects—keep the Brave banner ON
2. Stuck on a question (doesn’t advance):
The number of custom answers (Option blocks) doesn’t match the number of default options.
3. Progress bar missing:
enableProgressBar might be false
4. Helper or Next button text didn’t change:
Missing quotes around multiSelectSubheader or nextButtonText.
5. Syntax error (everything stops working):
A comma/quote was likely removed. Restore the config from the MASTER quiz and try again.
